
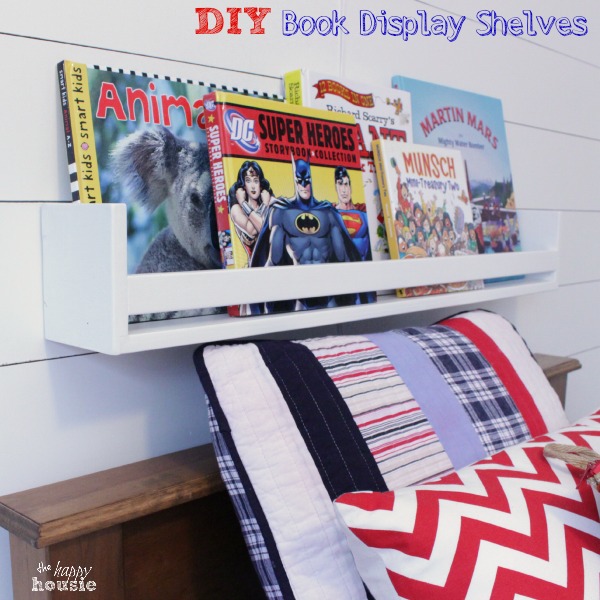
DIY Book Display Wall Shelves {PB Kids Knock Off}
Today I’m sharing an easy (knock off) project that is also super practical: DIY Book Display Wall Shelves. We have a bit of a book collection issue around here… I have a really hard time parting with kid’s books – anyone else like that?? They just hold so many amazing memories- in fact, when I was pregnant with our first son I ordered a copy of my favourite story from childhood and I have read it to him about 37000 times already- because it held such strong memories and loving emotion for me. Books can really do that. So naturally I wasn’t about to do a book purge hence we needed multiple storage solutions for them in our boys’ bedroom. These DIY Book Display Wall Shelves work perfectly and hold all their favourite nighttime reads- right within reach for their bedtime routine.
These were simple to make, but I can’t lie to you. My dad did most of it for me (you may remember that I talked him into ‘helping’ out with projects while my husband was out of town with work…). So I don’t have a thorough tutorial for you- more of an explanation.
Here goes…. How to make your own DIY Book Display Wall Shelves:
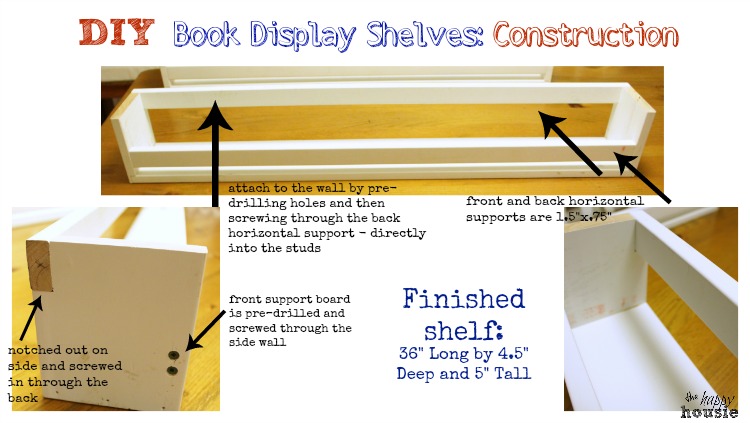
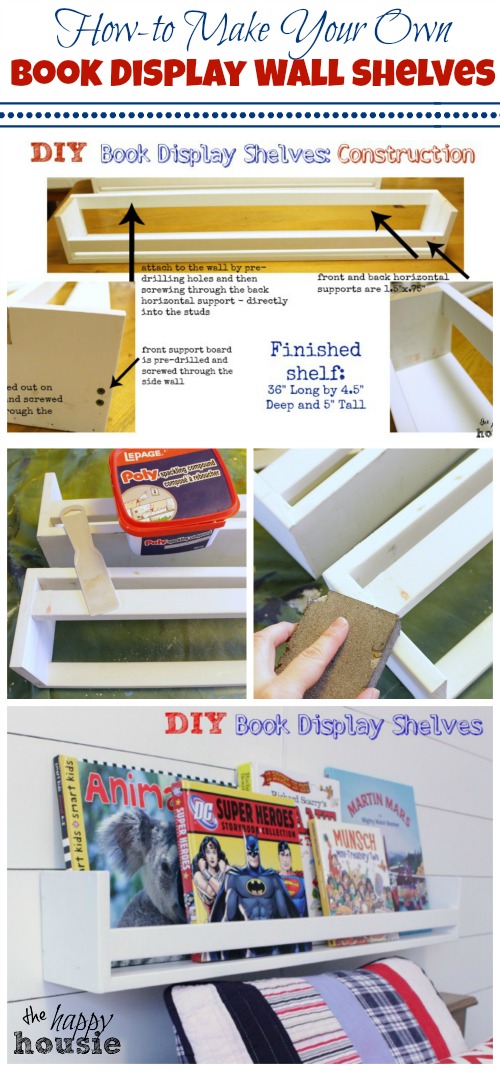
Materials needed for ONE 36″ long shelf (we made two- one for over each boys’ bed).
(You know how the size that you call wood is always bigger then is actually is in real life… so we used🙂
– for the bottom: 1 36″ length of 1×5 (which really measures 0.75″ x 4.5″)
-for the horizontal supports: 2 x 36″ length of 1×2 (which really measures 1.5″ x 0.75″)
– for the sides: 2 side pieces of 1×5 cut to a 5″ lenth (which really measures 0.75″ x 4.5″ x 5″)
– wood screws, wood glue, drill, saw for cutting
The cuts were fairly straight forward except that we notched out the spot where the back horizontal support meets the side support, as you can see in the image below. Although this adds strength, it isn’t a necessary step. You could use all straight cuts and just predrill, glue and then screw the straight pieces together if you don’t have the correct tools for notching things out.
Here is my pictorial representation of how they went together:
After they are assembled, the rest is pretty straight forward. Fill all the holes, sand, refill and resand if necessary until you have a nice smooth surface to paint.
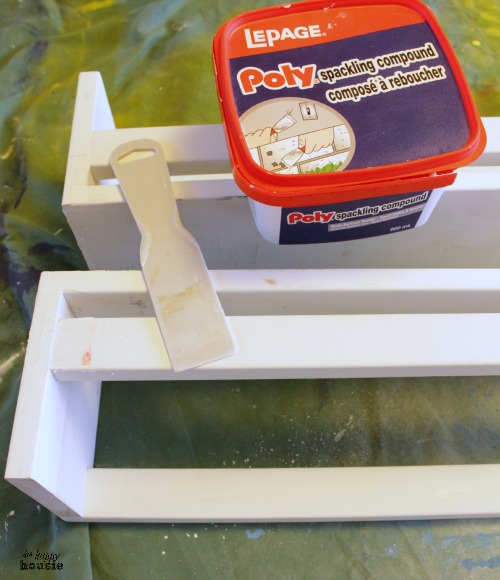
Since we used preprimed wood there was no need to prime- so I just gave them two good coats of paint… and done.
Lastly, we figured out where the studs were in relation to where we wanted to hang the shelves. We then marked and predrilled the shelves to ensure that they would go right into the studs…. and then attached them using wood screws. They are nice and solid (and hopefully my three year old doesn’t decide to test just how solid they are)…
I originally pinned and modeled these after the Pottery Barn Collectors shelves… and even though these aren’t exactly the same (the sides on the PB shelves are much more fancy) – I think they give a pretty similar look. I actually prefer the straighter lines of our DIY book display wall shelves to the curvy sides of the collectors shelves. 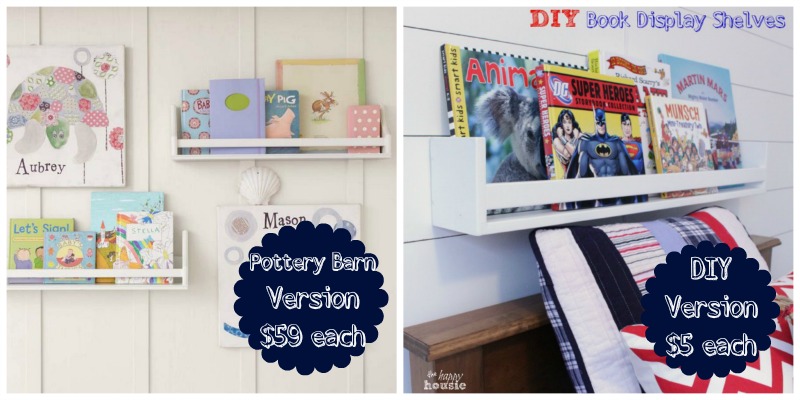
Budget Breakdown:
The PB version cost $59 each for the 3′ length (or $82 Canadian – where we are)… I said EACH – so these two DIY book display wall shelves would have cost us $164 plus taxes and shipping (in Canada). I paid $9 for the pre-primed wood and we had the screws, filler, and paint already – so there was no additional expense. Uh, that’s a little more my speed…if ya know what I mean.
So, all in all, a pretty straightforward knock off project (and a really easy one, if you talk your Dad into making it for you…).
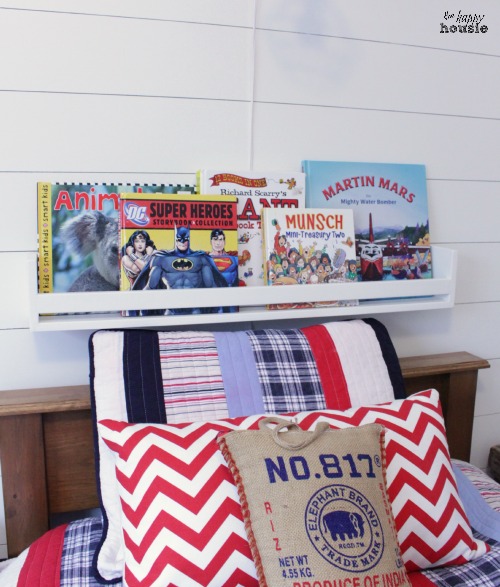
I love them- we use them everyday for our nighty-night books- and I think that they look great mounted on the planked walls. Things are coming along in the boys’ room – can’t wait to show you the next project (you may see some shadowy hints of it if you look really closely above the display shelves.
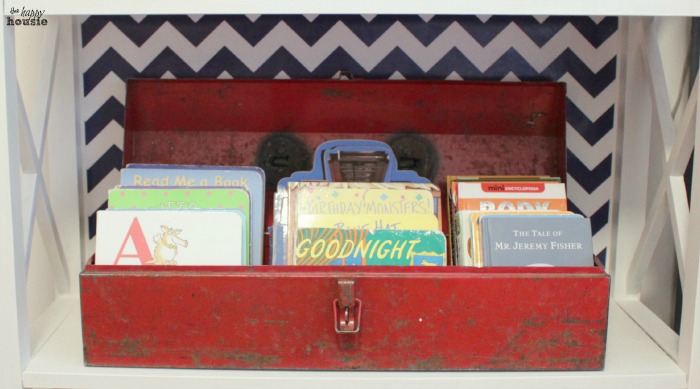
And did you see this other way I have been storing books in the boys’ room? This little tool kit looks so much cuter in real life, the picture really doesn’t do it justice…
What sort of solutions do you have for book storage? Any great tips for me?
Thanks for reading. And remember my housie friends, HOME isn’t built in a day. Enjoy the journey.


I may link up at some of these fabulous places below, for more info check out housie parties:
Make the Scene Monday , Monday Funday , Give Me the Goods Monday , Inspiration Monday, Craft-o-Maniac Monday, Nifty Thrifty Tuesday, Project Inspire{d} , Inspire Me Tuesday, The Scoop, Hit Me With Your Best Shot, Wow Me Wednesday Whimsy Wednesday , Fall Into Fall , From Dream to Reality, The Inspiration Exchange, Live Laugh Rowe Live Laugh Linky, Thursdays Are Your Days, The Weekly Creative , The Creative Connection, Inspire Me Please, Catch as Catch Can, Fabulously Creative Friday, Party Junk, Pinworthy Projects , Link Party Palooza,, Weekend Bloggy Reading, Strut Your Stuff Saturday, Spotlight Saturday, Get Schooled Saturday, Overflowing With Creativity , , Suburbs Mama , That DIY Party


I love all your updates to your boy’s room. You have a true talent. Thanks so much for linking up at our Link it or Lump it party!
Amy @ http://www.delineateyourdwelling.com
Aw, you are too kind Amy! Thanks for your sweet comments, and for hosting!
How sweet is that little toy chest!
Thank you Tennille!
Woo hoo!! I was waiting for these! I saw them on the wall in some of your pictures 😉
I need to make these for Aiden’s room asap!
Hi Sherry! They are one of my favourite projects- we literally use them daily. The boys love having their favourite books right there, too. Good luck with your project!
Awesome! What a great knock-off!
This is a great idea – I’d love to get a set of these for my classroom too! Kids read so many more books when they can see them face-out. (Seen on Inspiration Monday.)
Hi,
I just found your blog through Pinterest and I’m wondering if you could share where you got the bedding from?!? It’s exactly what I’m looking for 🙂
Thank you,
Tara
Hi Tara!
I bought the boy’s bedding (their quilts are slightly different from one another) at Home Sense (which is basically the Canadian version of Home Goods). They are Ralph Lauren brand I believe but on the markdown prices there they only cost $50 each set (which I didn’t think was too bad!). We also use a duvet underneath their top quilts all winter- but the thin top quilt is the perfect weight for summer bedding. Good luck with your search!
This is on my list too, Krista! We have tons of books and displaying them would make my boys read more, I am sure. Now, the books are in the bottom of big bins and my kids don’t even see most of them. You surely did a great job on this project! Have a great weekend!Xo~
Hi Aniko! I agree- having the books out and visible absolutely makes reading more likely!! Thanks for your visit- hope your weekend is going really well!!
I absolutely LOVE this idea, Krista! I love the idea of displaying books as decor. They look fabulous in your boys’ room! Pinning and sharing.
Thanks Tasha!! They do turn into part of the décor when they are displayed above the bed- kind of like art, but easy and changeable:) Thanks for the pin and share!!
Wow – looks great! Seems fairly simple but I am SO intimidated by woodwork and my husband is NOT the handy type :o). Might have to try it though – I’m looking for some shelving ideas for baby’s room! Visiting from the Party Bunch Linky.
It definitely involves some woodwork but you could go super simple and just use straight cuts, predrill, and then glue and screw it together- then use filler to smooth out the joints – sand and paint… once you give it a go it can be amazing what you can make!! Or, you could always order them from PB!! The shelves are cute because you can put in pictures or little stuffies as well… Thanks for your visit!!
I love it and for $9.00 AWESOME!!! P.s I have that same elephant rice bag. Can we be elephant bag buddies? 🙂
Thanks Kimberly- I took the rice bag and stuffed it with a pillow form!! Lol:)