
DIY Chalk Paint From Craft Paint: a Grainsack Inspired Nightstand Revamp
Can you make DIY Chalk Paint from Craft Paint? I was wondering the same thing. And no better way to find out then to give it a try. I have a few tips for you, but all in all I think it was a big success!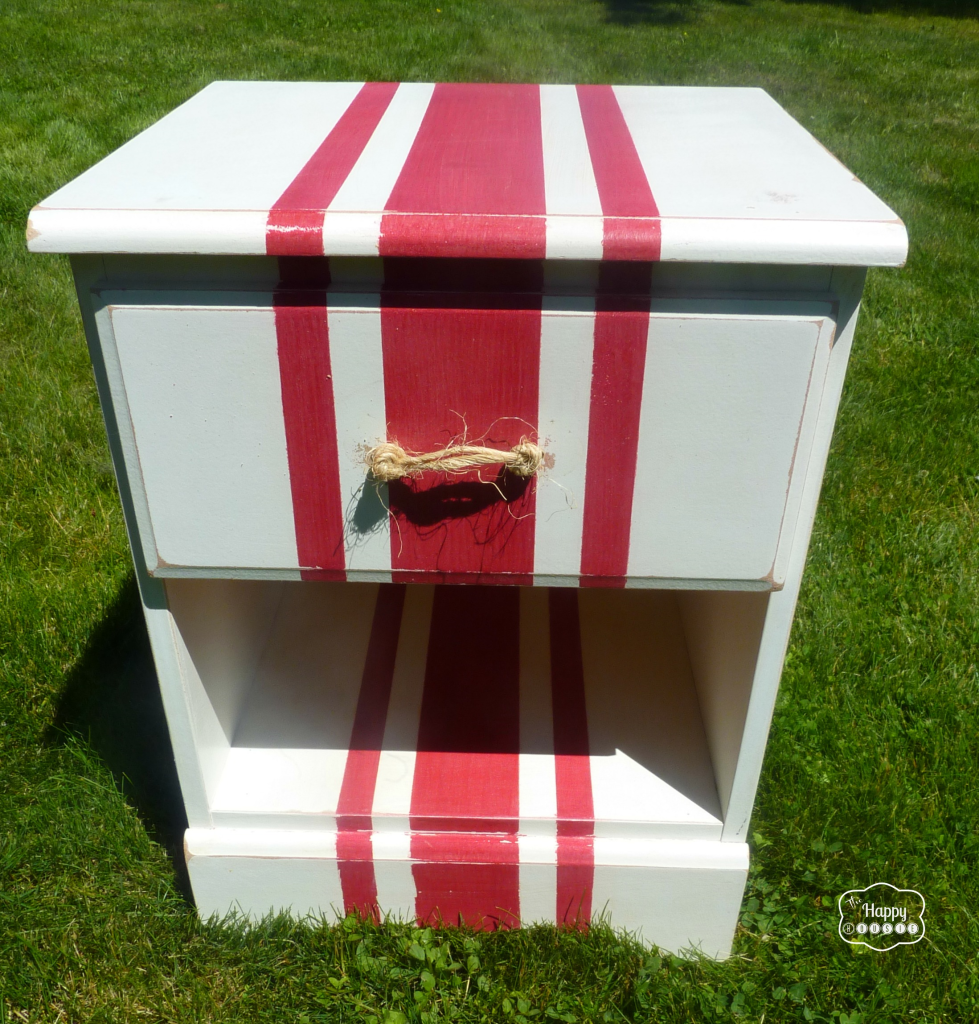
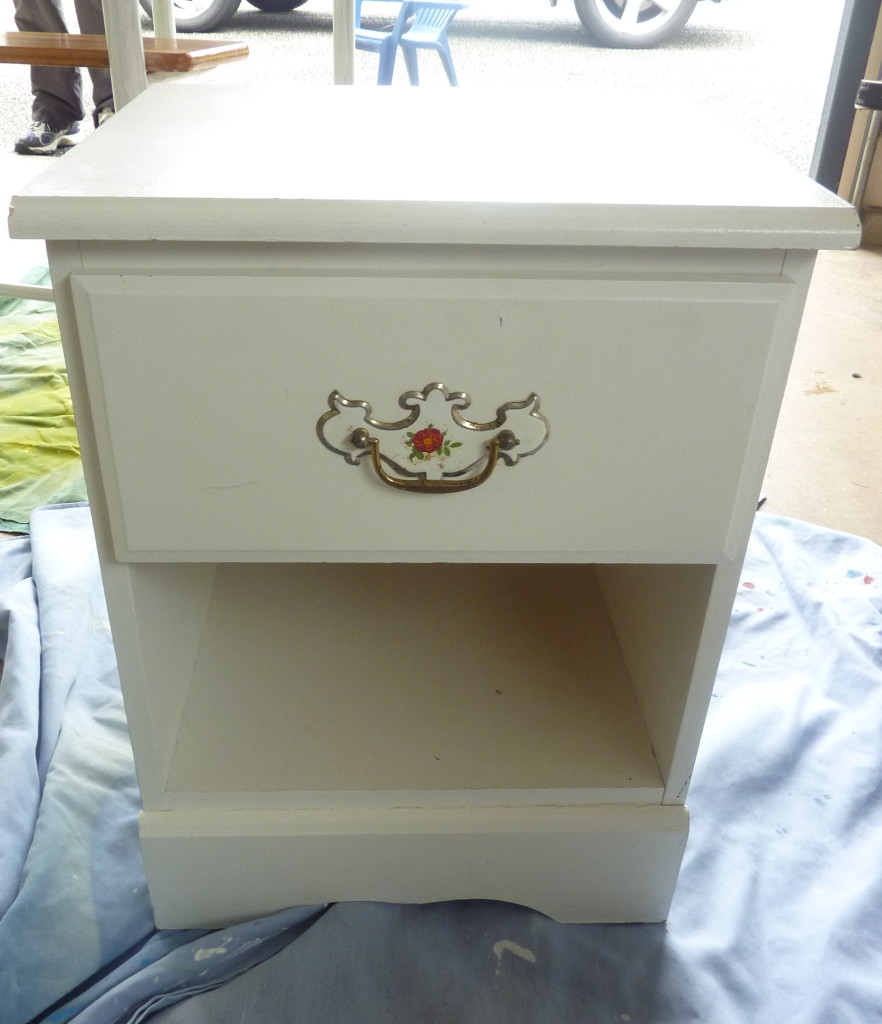
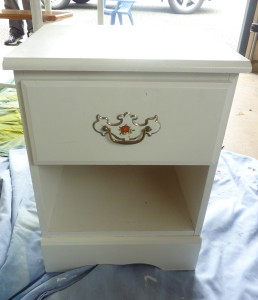
I recently showed you the plans for my son’s bedroom revamp. This little nightstand was a complete freebie bequeathed to us by a good friend. It used to be part of a little girl’s bedroom set, as you can probably tell by the flowery handles.
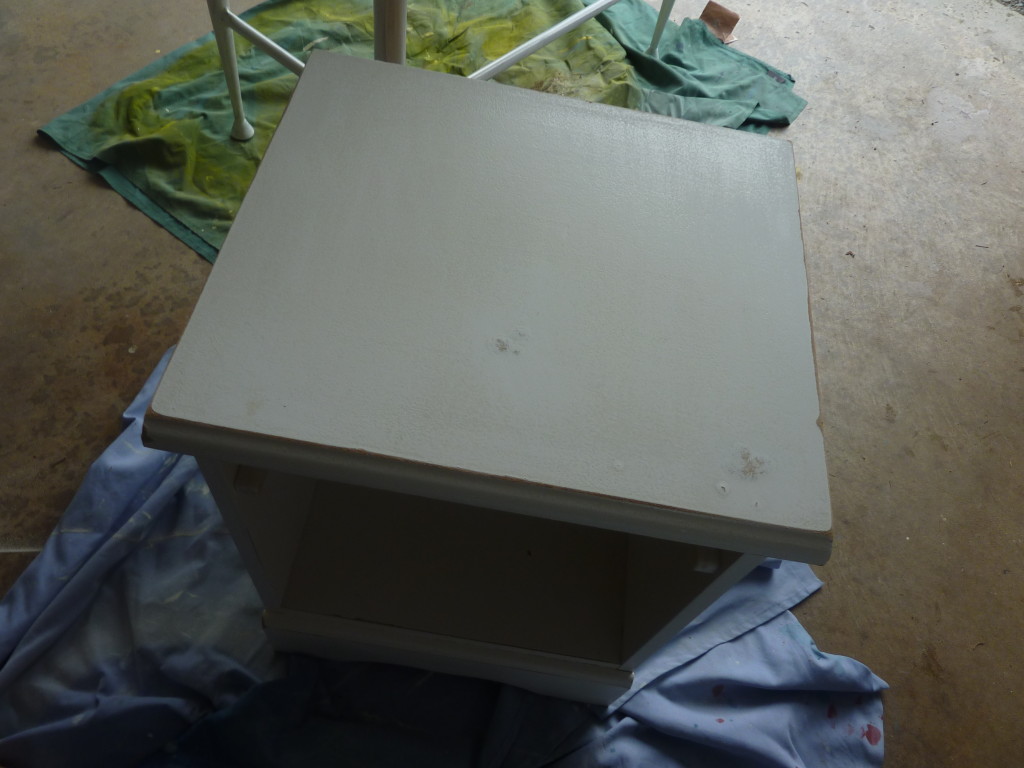
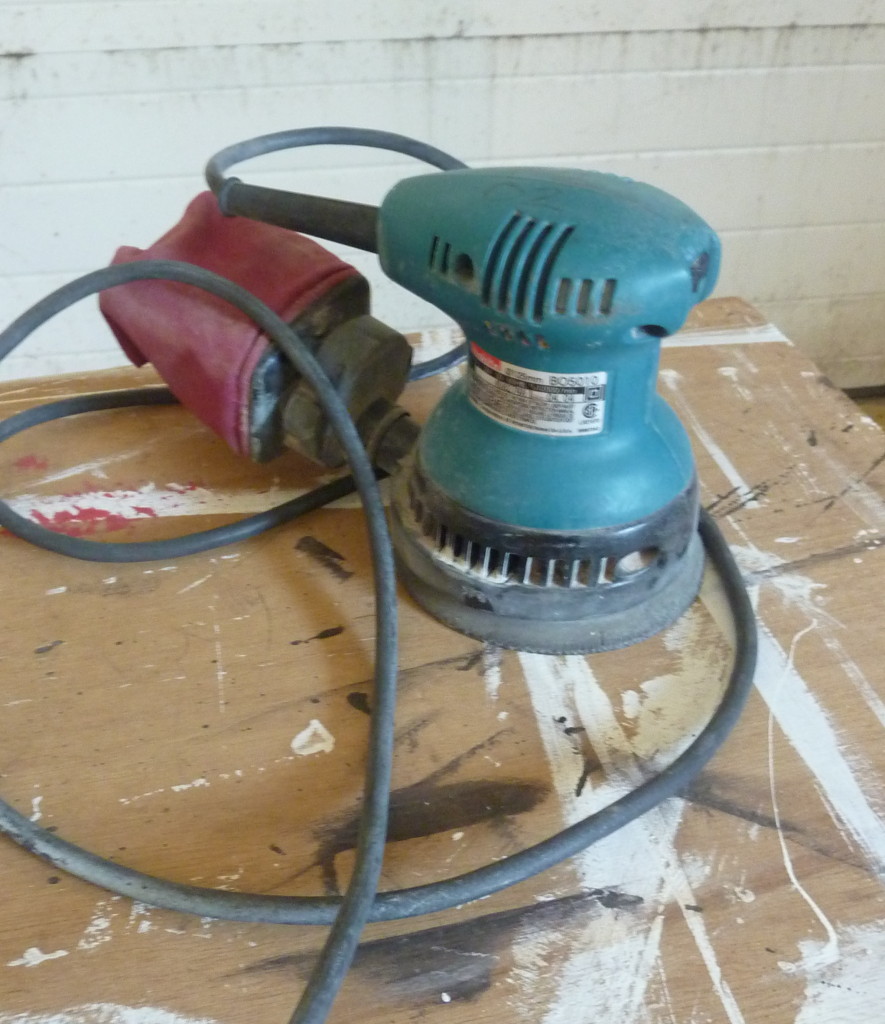
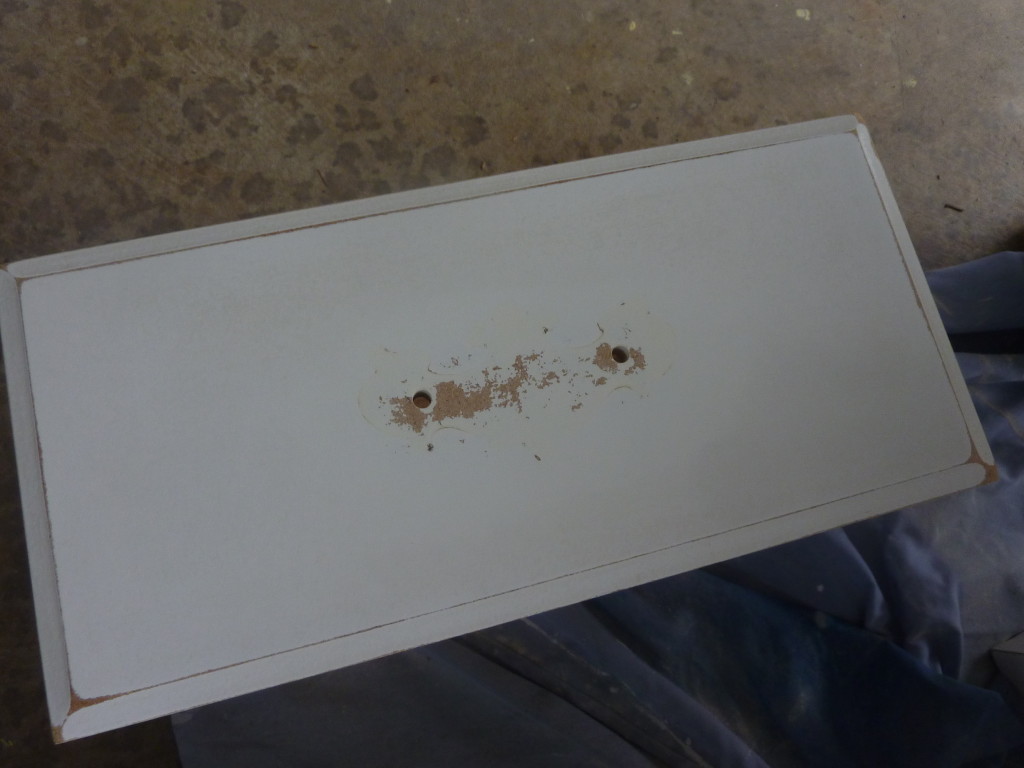
It was in rough shape with some damage on the top. I gave it all a good sanding with our orbital sander…
I removed the handle and gave the drawer a sanding as well…
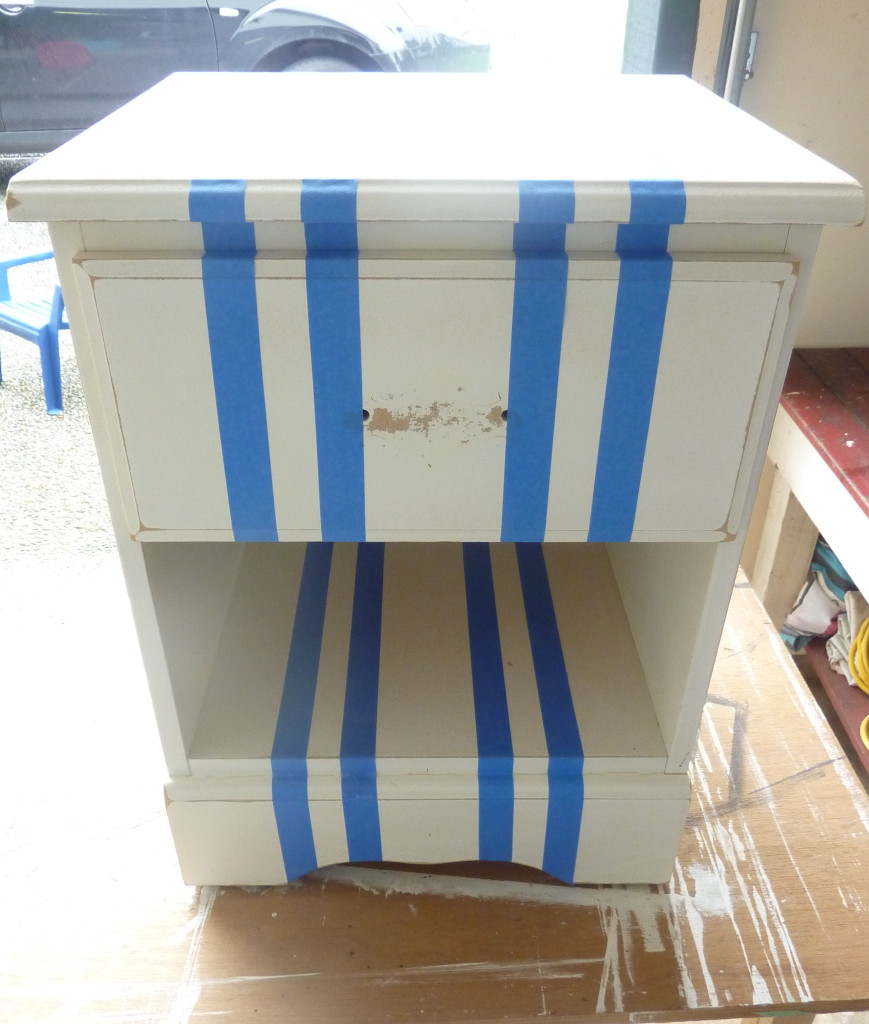
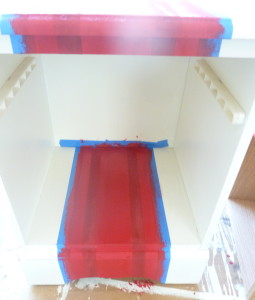
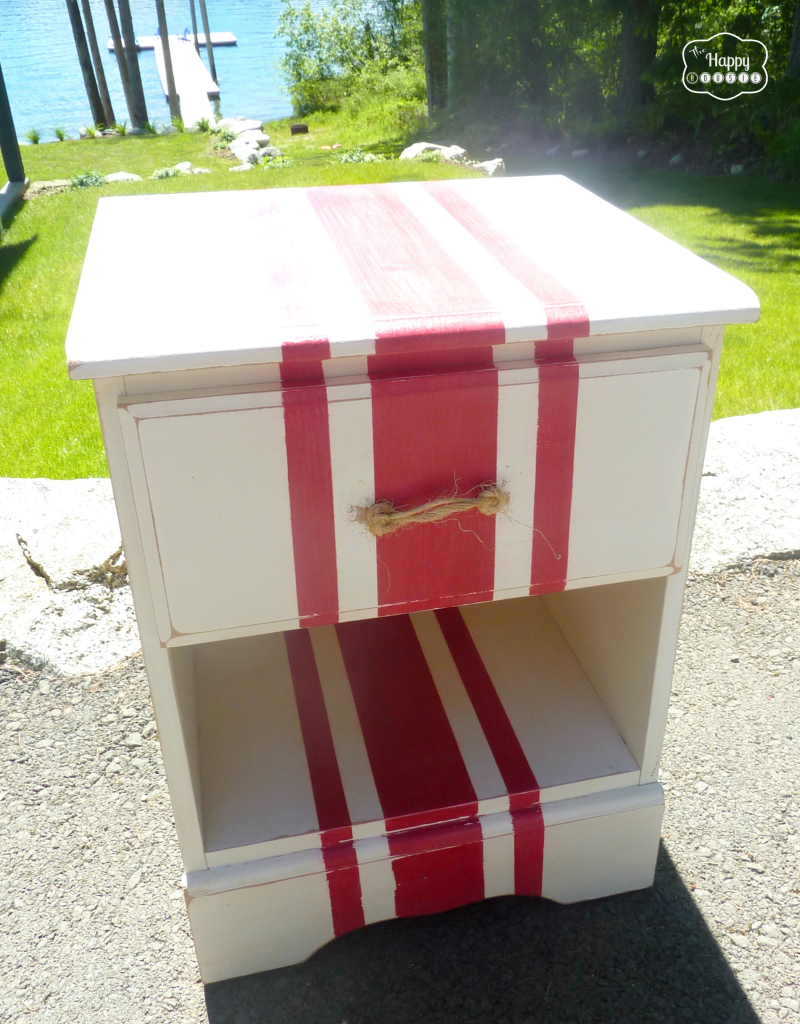
After sanding it all down and distressing the edges, I decided that I didn’t need to repaint the white – I like the slightly rough distressed finish. Instead I chose to add some red stripes using DIY Chalk Paint that I made from red craft paint that I had on hand.
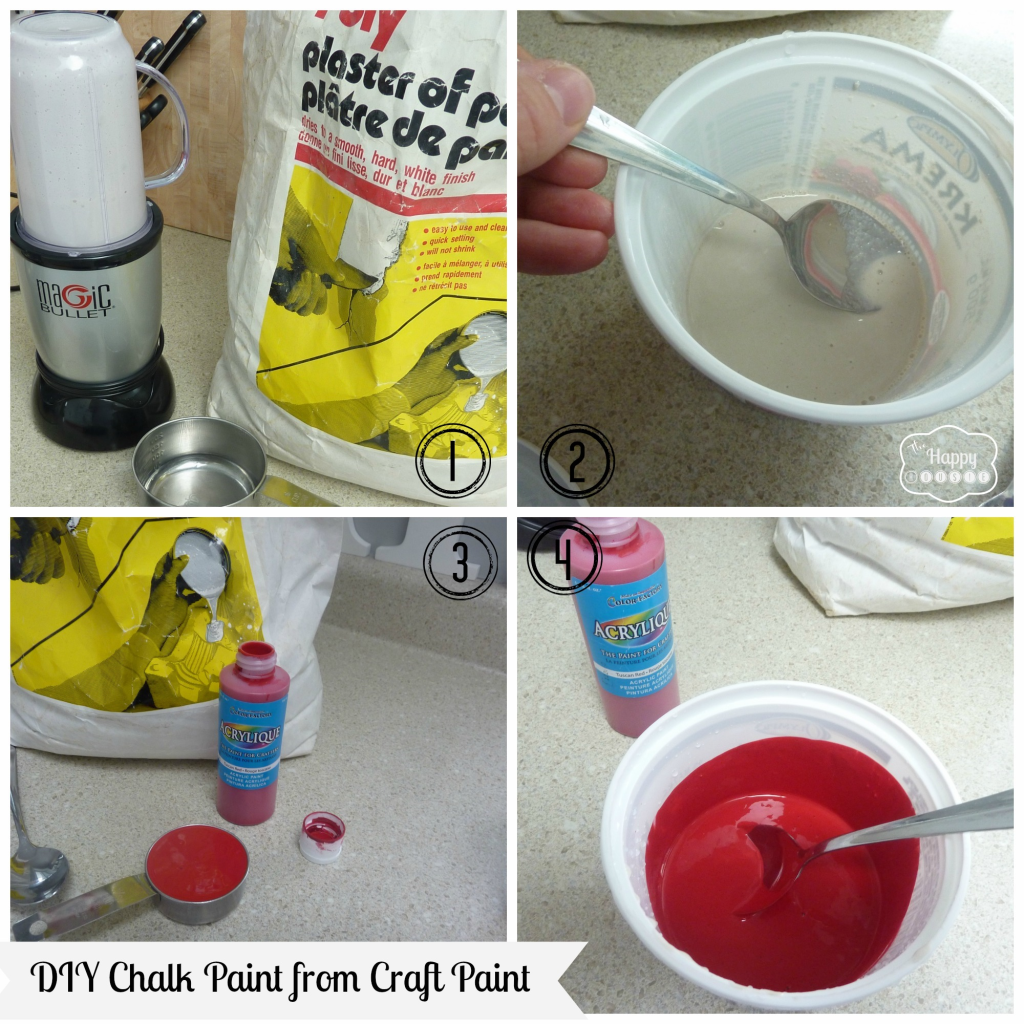
For this recipe I used the same proportions as with my other chalk paint recipe, but made a smaller batch with only 1/4 cup of craft paint.
-
Thoroughly mix 1/8 cup of Plaster of Paris with 1/8 cup of water (I use a blender just because my plaster is a little old and chunky)
-
Stir in 1/4 cup of craft paint until thoroughly mixed
I then taped off the stripe design that I wanted:
It took three coats of the DIY Chalk Paint from Craft Paint… I gave a very light sanding between each coat.
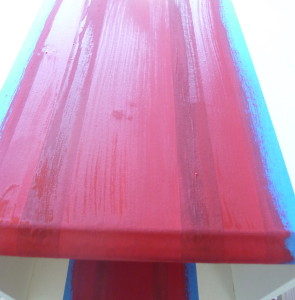
Once the tape was removed I had the inevitable bleed through. I have read somewhere about using a little mod podge on the edges of the tape to prevent bleed through but I didn’t try that tip… so I had rough bits.
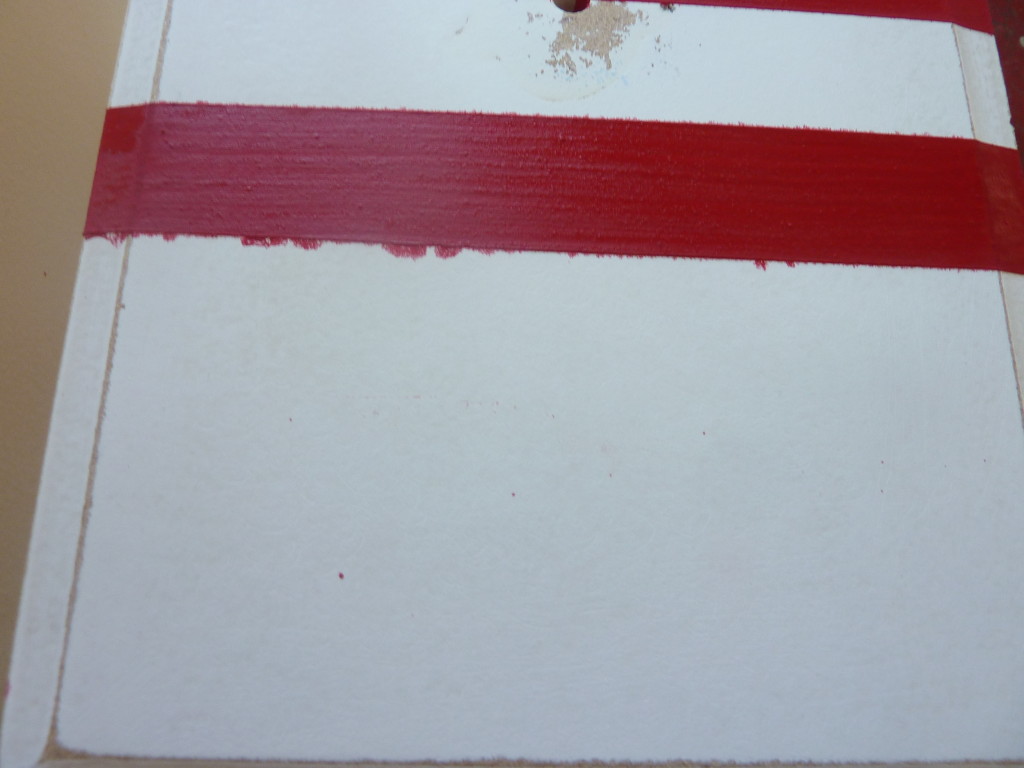
I solved this by lightly sanding the whole thing and sanding extra at the rough edges of the lines to remove them. TIP: chalk paint made from craft paint seems more delicate and sanded away much more easily – so be careful with your sanding. Once waxed, I was not able to scrape it off but before the waxing it was easily scratch-off-able.
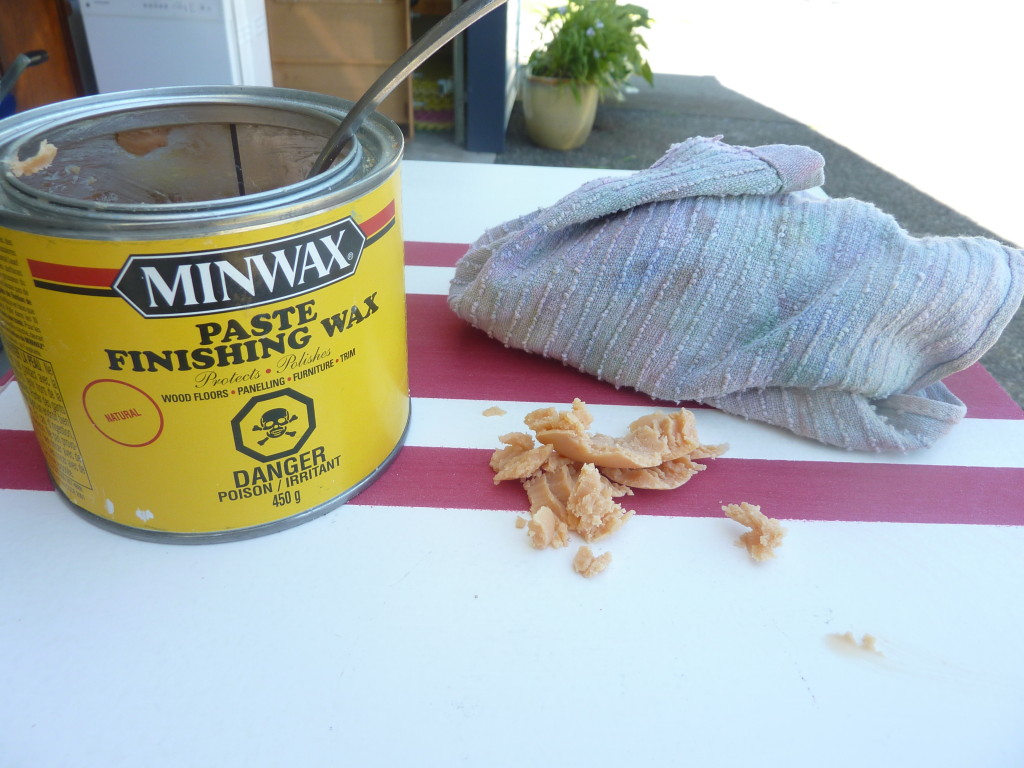
Now wax. I smeared some on with a (CLEAN) rag, left it a few minutes, then buffed off the excess.
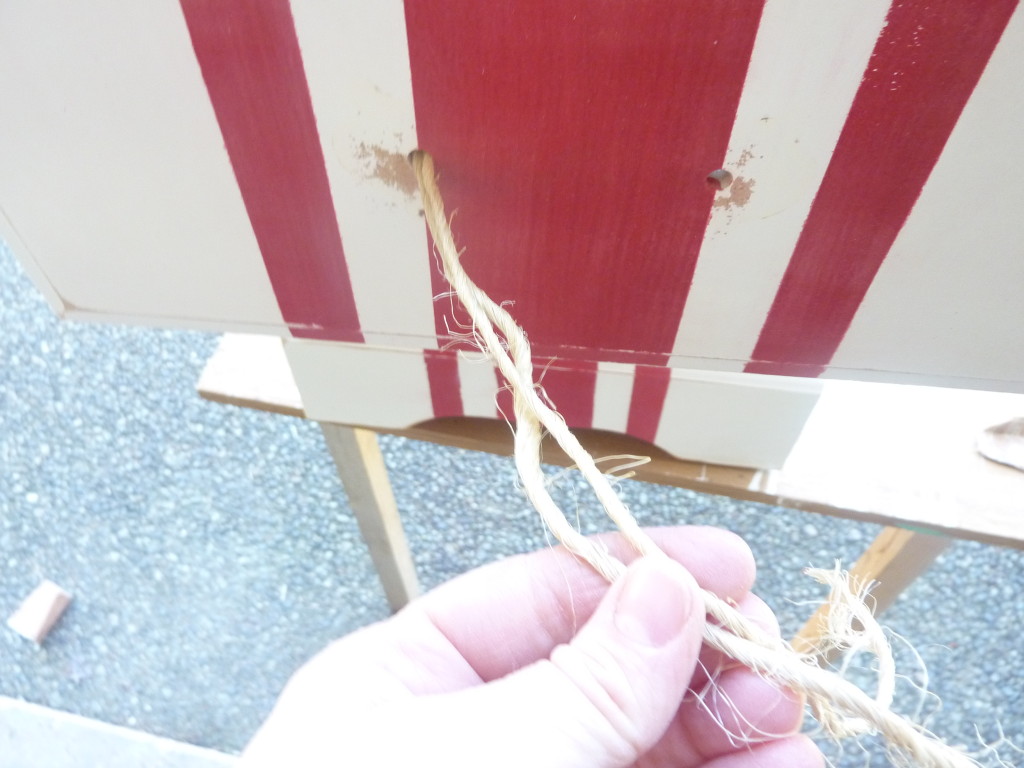
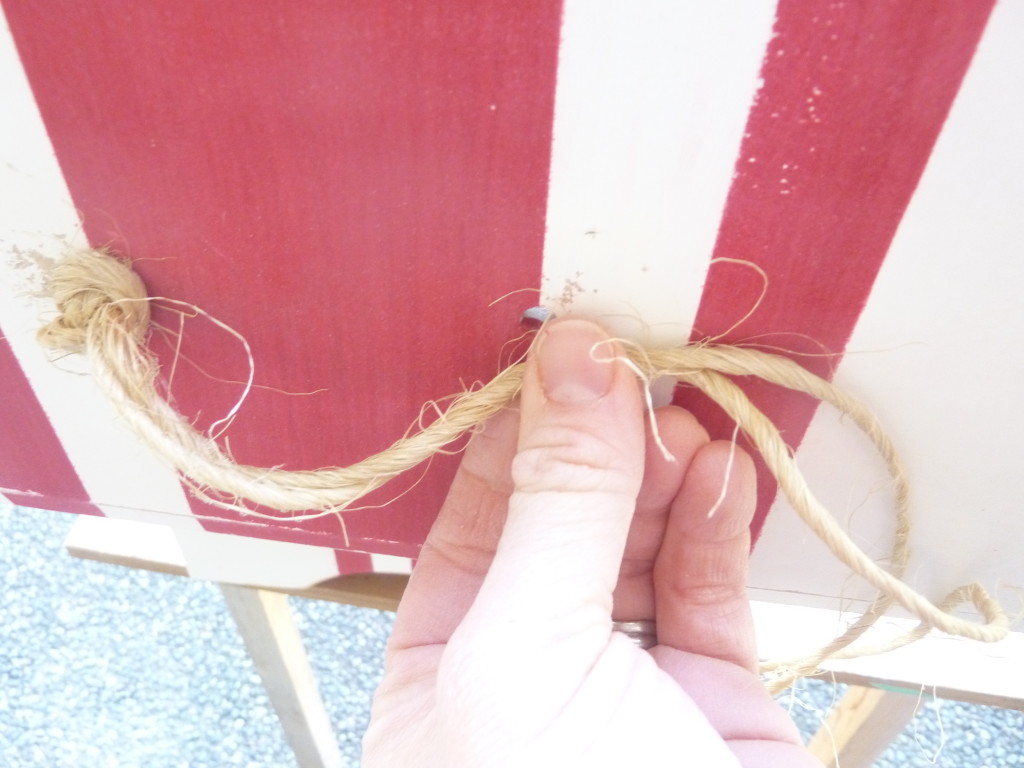
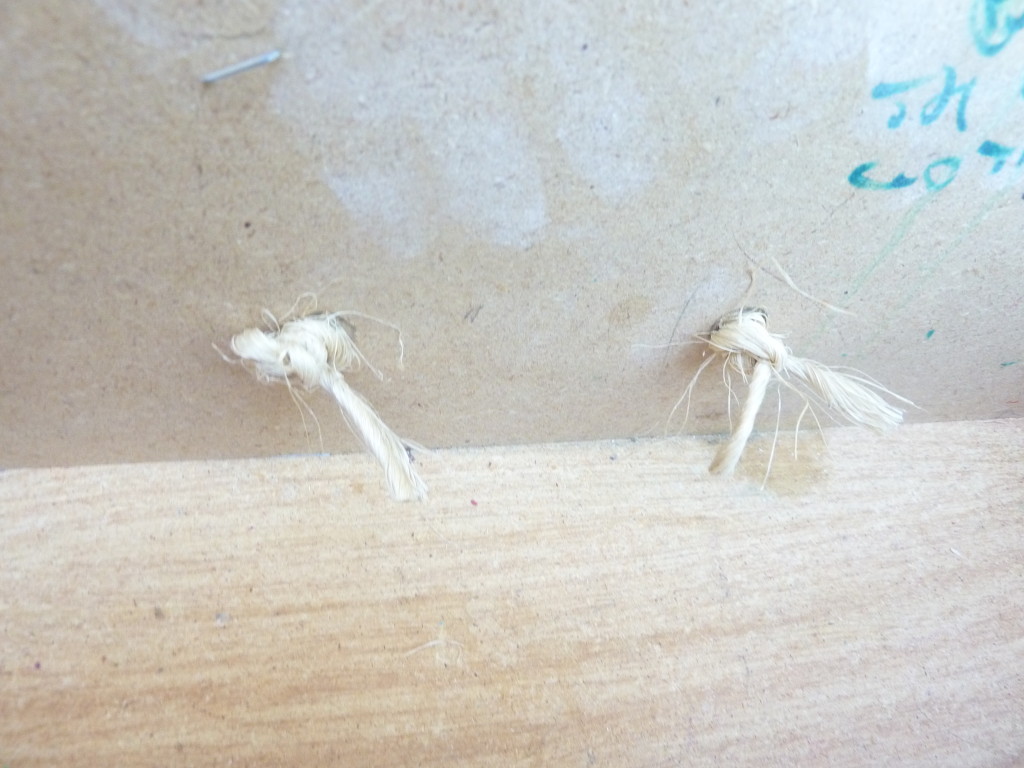
To make the handles, I used some old twine we had in our garage. I cut two pieces the same length, tied off the length I wanted for a handle, fed the open ends into the holes left from the old handle, and then tied double knots inside the drawer to secure the rope handle.

I am pretty thrilled with how the whole thing turned out! For a free nightstand and $1 of craft paint….
Before and After…

Thanks for reading. And remember my housie friends, HOME isn’t built in a day. Enjoy the journey.

This post was featured at:


I may link up at some of these fabulous places below, for more info check out housie parties:
Make the Scene Monday , Monday Funday , Give Me the Goods Monday , Mop It Up Monday , Craft-o-Maniac Monday, Pretty Things, Party in Polka Dots, Project Inspire{d} , Take a Look Tuesday, TCB Get Your Craft On. Tasteful Tuesdays., Share It Link Party, Assets and Efforts, Inspire Me Tuesday, Wow Me Wednesday Whimsy Wednesday , Swing Into Spring Party, From Dream to Reality, The Inspiration Exchange, Fine Craft Guild , , Work it Wednesday, Thursday’s Temptation, Hookin’ Up With House of Hepworth’s, Live Laugh Rowe Live Laugh Linky, Transformation Thursday, Thursdays Are Your Days, Real Family Fun, Pinterest Power Party,, The Weekly Creative , Party Junk, Pinworthy Projects , Weekend Wrap-Up Party, Weekend Bloggy Reading, Strut Your Stuff Saturday, Spotlight Saturday, Get Schooled Saturday, Overflowing With Creativity , Sundae Scoop , Suburbs Mama , That DIY Party


Thanks for the information. Your nightstand turned out very cute! I was wondering about making chalk paint from craft paint as I have several small projects for which I need different colors. I’m going to try it.
Hi Martha! It works….sands off much more easily, but once you add the wax to protect it all it works perfectly!! Mine hasn’t chipped off at all once protected with wax:) Best of luck!!
Beautiful! I love the red stripes! Great job!
Navy Wifey Peters @ Submarine Sunday Link Party
Thank you T’onna! It is super fun for my little boy’s room:)
Much better! and the rope pull is perfect 🙂
Thanks for sharing on Project Inspire{d}.. Pinned!
Nancy
Thanks Nancy!! I think the rope handle is my favourite part too!
Turned out so good! Love the red & white and the little rope handle is perfect!
Thank you for sharing at Give Me The Goods!
Amber@ Dimples & Pig Tales
Hi Amber! Thank you, and thanks for hosting!!
Awesome job. I am sorry to say that the night stand was pretty ugly before you got ahold of it.
I have been trying to come up with a paint color for a tall skinny cabinet in my entry and I think I might just have found the solution. Now, what color should the stripes be?
Hi Carol!
It wasn’t a prize before, that is for sure… it was definitely of an era. Reminded me of my youth and the Sears Catalogue. Hmmm… sounds like a fun solution for your entry hall cabinet!!
Krista
Love what you did!!! I love the red stripes.
Thank you Katie! I love the way the red stripes look in my son’s room with his red and white chevron pillow and new red and white striped throw…
What a great stand!! Love the stripes!! I can’t believe how much this cost you. $1.00, wow;)
Thanks Mandy! It was a freebie, so 1$ worth of craft paint since I owned everything else. I love the rope handle the best I think:)
So Krista is DIY chalk paint similar to Annie Sloan Chalk Paint? I am very new to this wonderful world of chalk paint, but think it is very expensive. This DIY is very affordable and I love the night stand.
Hi Pat! I have to be honest, I haven’t tried ASCP… I have only made my own so I can’t fairly and reasonably compare the two. But it is similar in the way that you don’t need to prime (most things) and it makes distressing much easier and you also wax it when finished. I need to try some ASCP soon so I can fairly compare it with my homemade version:)
Fun, fun, fun. This turned out so cute. Love it. Hugs, Marty
Thanks Marty!
Wow, Krista!! It is amazing! I love the red grain sack stripe and the rope handle is genius!
Thank you Jenna! I think the little rope handle is my favourite touch…. kind of on a rope kick right now:)
Your nightstand makeover is cute! I love red and white (my fav color combo). I was interested to see how you had taped off your lines since I was planning on doing this same paint treatment on a large dresser.
Hi Manuela!
Another reader gave me a tip to keep the lines from bleeding- after you tape first paint the edges with your underneath colour (in my case that would have been white). Let it dry. Then paint your stripes. Any bleeding will be in the first color so you will get nice crisp lines. Good luck!!
Looks great!
Thank you!
I didn’t know that! This turned out super cool! Thanks for sharing at Pinworthy Projects.
Thank you Carrie! And thanks for hosting:)
Totally rocks! Nice work! I have to try that chalk paint idea!
katie@mydiyhabits.com
Thanks so much Katie! Good luck if you try it!
That look is just my style!
Love it,
Deb
Thanks Deb! That is a great compliment since I love your style!!
ah! Krista, you just made my day! I love painting furniture with acrylic paint and now I will have to go and get some Plaster of Paris! 🙂 the nightstand looks perfect, you did a beautiful job Krista 🙂
Thanks Ingrid! Can’t wait to see what you come up with:)
Hi Krista! I have never tried this, but I have read that if you do striping like that… first, paint over the edges of the tape with the base colour – for example your white. If it bleeds under, it is still the same colour as the piece of furniture. Let that dry, THEN paint your stripes (red). The white will have sealed the tape, and you won’t have any bleeding under the tape. It’s an extra step, but it might help!
That is such a fabulous tip Nicole! Thanks… I will have to try that next time! Luckily for this piece I planned to distress it anyhow and sanded off the rough bits… but it would have been super frustrating had I wanted a clean line!! I am filing that tip in my memory for future use:)
I love the stripes. I repainted our old nightstands awhile back and I love the way they turned out. Do you use the wax on all your painted furniture pieces (or just on chalk pieces)? I’ve noticed that my pieces, even though they’ve fully dried, things stick to the tops, like a lamp on the hall table I repainted it gets stuck to the table. I’m not sure if I’m forgetting a step, or what since I’m new to this DIY stuff.
Hi Andrea!
I have only used wax on my chalk painted pieces, but I have had the same experience as you the odd time… it might work well on all kinds of latex finishes. Next time I use regular paint I might have to give wax a try- I do love the protective coating it gives!
So stinking cute! Love this:)
xo
amy
Thank you Amy!
I was just wondering why you didn’t just use the craft paint. What is the advantage of mixing it with the plaster of Paris? Does it make it adhere better?
Hi Lynn!
Good question! I have been doing a lot of work with DIY chalk paint lately like my yellow side table, tv console, laundry room cabinets etc. and love the way it makes pieces very easy to distress. The addition of the plaster makes the paint very sandable (almost a little gritty) and it is much easier to sand some off afterwards to reveal the underneath. I had done some serious distressing on the original white nightstand and was leaving a lot of the wood (or MDF) showing underneath so I wanted the red stripes to look aged and distressed as well. So that is why I decided to go with the chalk paint instead of straight ol’craft paint. If I wanted it all crisp and clean and new I think the straight craft paint would work fine with a top protective coat like the wax or a poly. I think the plaster of paris also makes the DIY chalk paint adhere better as you don’t need to prime most things when you use chalk paint. I have painted a lot of varnished furniture (and faux wood furniture) with the DIY chalk paint and after you distress your piece you wax it to give it some sheen and protect your piece and paint job.
Thanks Krista! That all makes sense now! I’ll have to try it one of these days!
No problem Lynn! Good luck if you try it!
Great makeover! I grew up with that same bedroom furniture set. My mom still has it in her guest room at home! Love the red stripes. Very eye-catching. You use your Magic Bullet to make paint? Crazy girl. I hope you don’t make smoothies in it at snack time, too!
Hi Bronwyn! We have two of the corresponding dressers as well… our friend who gave it to us gave us her old dresser and then her parents gave us the sister’s old dresser and nightstand. Guess they had matching sets as little girls! We have repainted them for use in the house as well, they are nice solid good quality pieces of furniture. LOL the blender! I have a certain cup and blade that I use for my ‘plaster’ mixing so I don’t transfer plaster into my boys’ shakes:)
wow looks great! thanks for the recipe – I have yet to try chalk paint because of its high price tag…good to know I can make my own!!
Hi Cheryl! If you want to use DIY chalk paint I have other recipes for it using regular latex as well – I have done quite a few projects now with it and have a different tutorials posted. Try the yellow side table project or my tv console
I really like the red stripes with the wider stripe in the middle – looks very nautical!
Thanks Petra! I was thinking grainsack but I think the outer stripes are too thick for that… I think you are right on track with the nautical. My sister in law thought it looked like racing stripes though… so I guess it can go many ways:)
Krista your nightstand turned out lovely! I love the red and white together, and DIY drawer pull. Great job creative lady!
xo, Tanya
Thanks Tanya, I can’t wait to show you how it looks in my son’s bedroom!
Super cute! Love how it turned out. Thanks so much for the recipe. I never knew you could make your own chalk paint like that. I’m going to try this soon!
Thanks Stephanie! I wanted to see if it works… I usually make DIY chalk paint with regular old latex paint, but this worked too. Not sure if it would hold up as well for a whole piece… I will have to try that next. After you sand what you want off, the wax is really the key to protect the whole thing.