
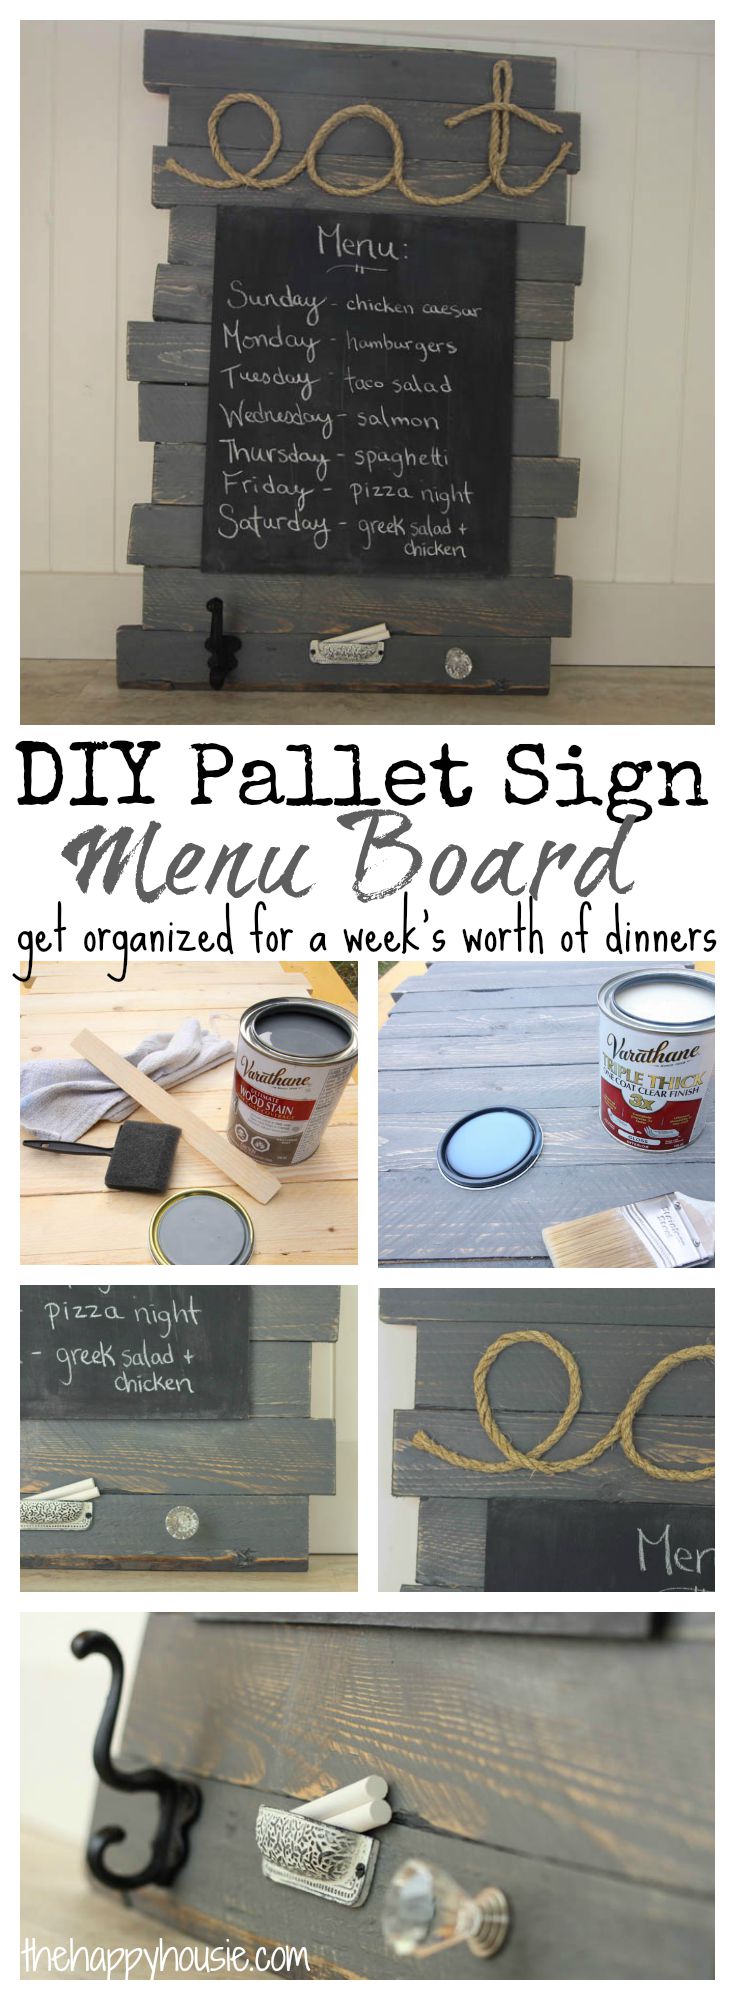
DIY Pallet Sign Menu Board
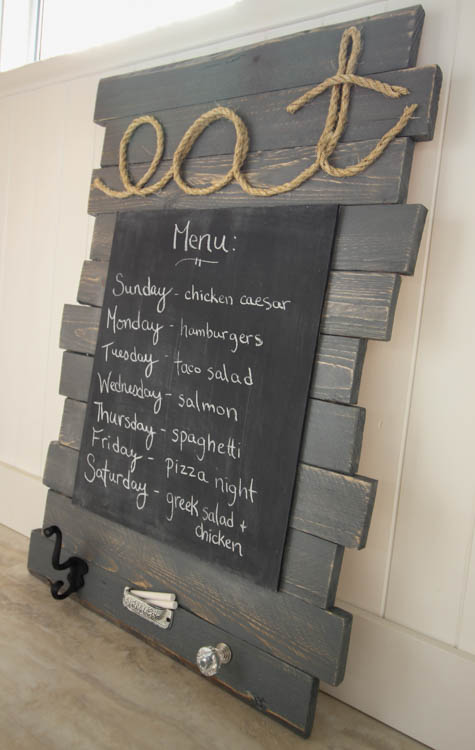
Here is my DIY pallet sign menu board that keeps the family in the loop for our weekly meals!
It’s been a busy hectic summer. Lots of renovating. Remember that big house reno I shared about way back when? Ya. That.
I have SO.MUCH.TO.SHARE! Once I can find the time to sit down and get some pictures ready. So far it has been a stream of projects mixed in with some holidays and summer days with the boys. I’ve been trying to keep it all in balance and haven’t had a chance to share many of my DIY projects with y’all lately.
But I am finally here with an actual full-blown project today; and I’m super excited about how this DIY Pallet Sign Menu Board turned out.

I’ve got to admit… meal planning isn’t my strength. I dream of having my family meals for the week all planned out on the weekend; groceries bought; eggs boiled; veggies chopped; lettuce washed… everything ready for a week of healthy family eating.
Unfortunately, the reality apple often falls far from the tree. But with the school year quickly approaching I figured it was the perfect time to tackle a little DIY project that would help me be more organized this coming school year: and that’s where this DIY Pallet Sign Menu Board comes in.
Wooden Menu Board
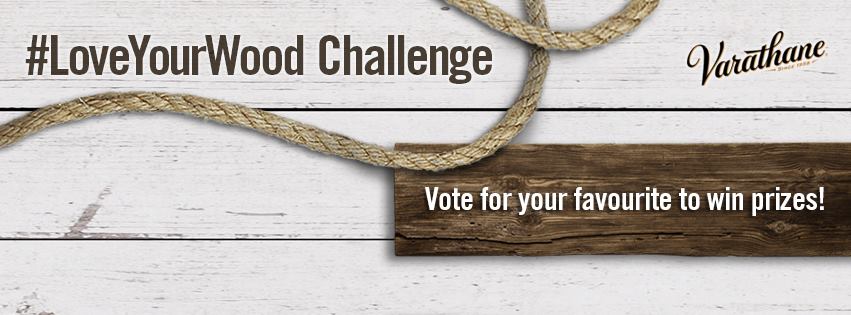
It also fits in perfectly with a couple of challenges that I was recently invited to participate in. And I’m always up for a good DIY-challenge. Recently, Varathane Canada invited me to participate in the #LoveYourWood Contest. They sent me a little gift pack in the mail with some Varathane projects, 5 random items, and a Visa gift card to buy additional materials and supplies. The idea was that the bloggers involved have to use 3 out of the 5 random items along with the Varathane products to create something… anything, really. And my new DIY Pallet Sign Menu Board was it, for me!
Here is how this went whole project went down…
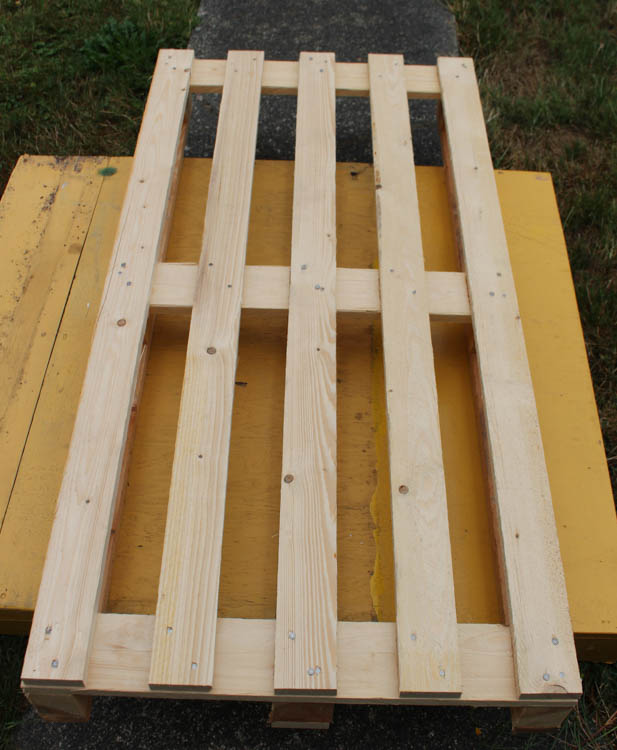
Pallet (this happens to be the pallet that our laminate flooring was on when we picked it up recently at The Home Depot).
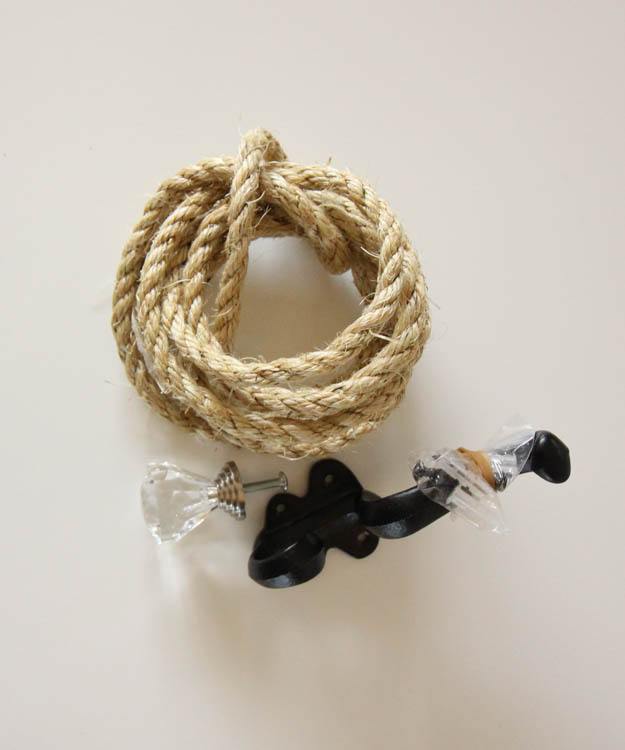
Random items sent along with my Varathane products….
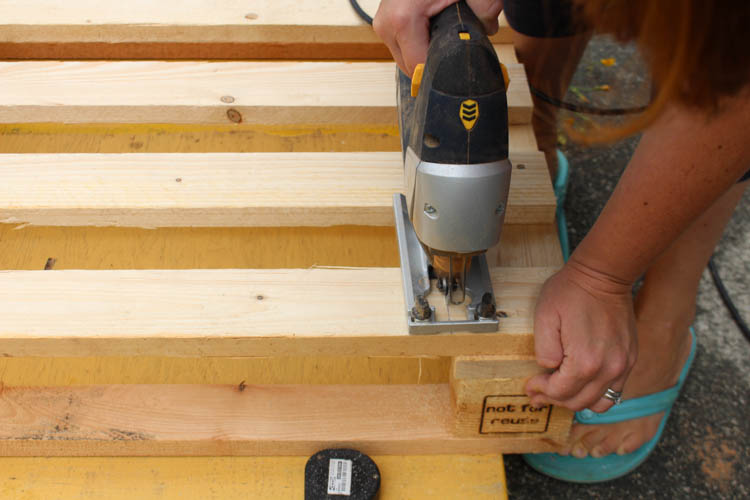
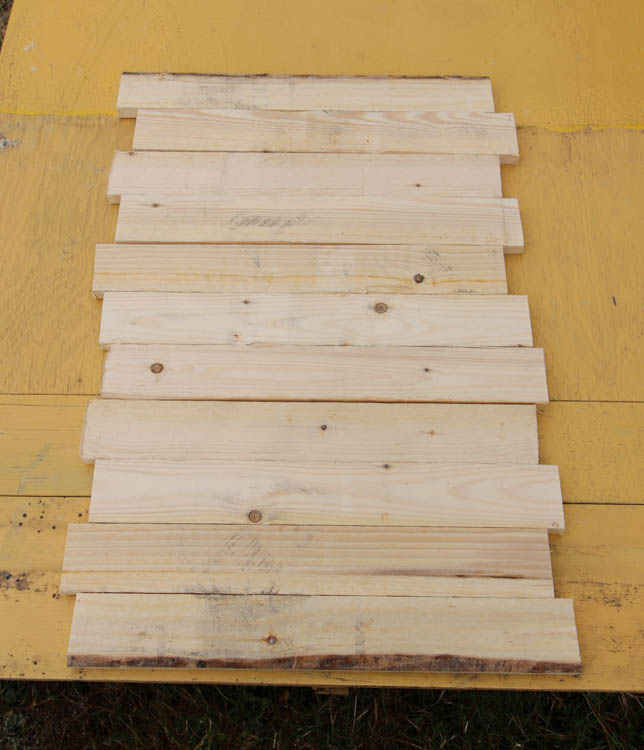
A power jigsaw to cut my boards off the pallet….
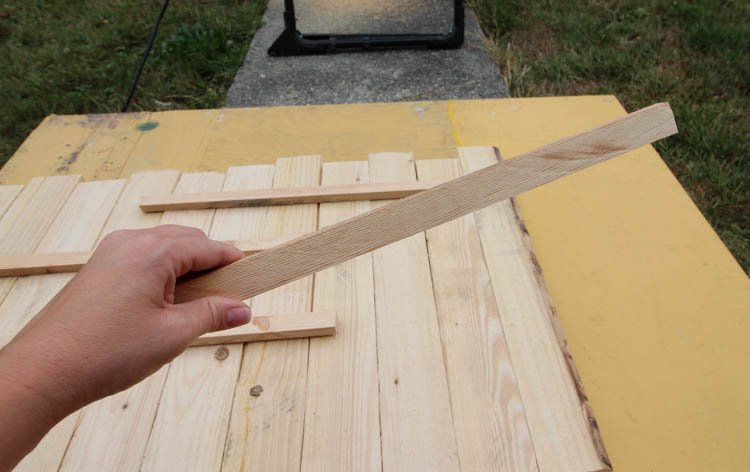
Some additional strips from the pallet that we ripped down with the table saw; then predrilled and screwed them into the back of the pallet strips to hold the sign together…

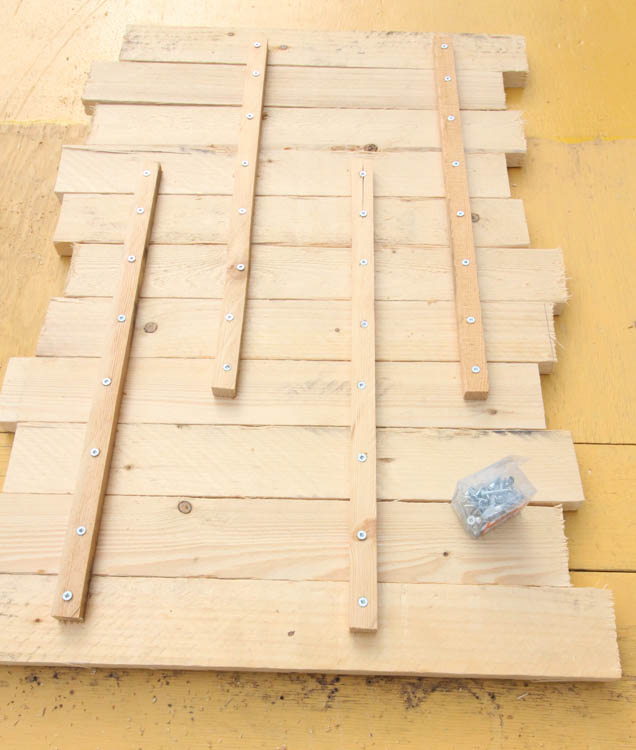
And the front….
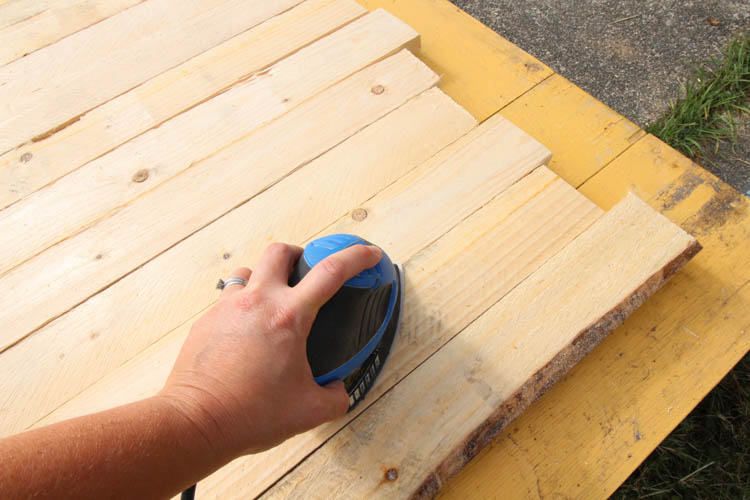
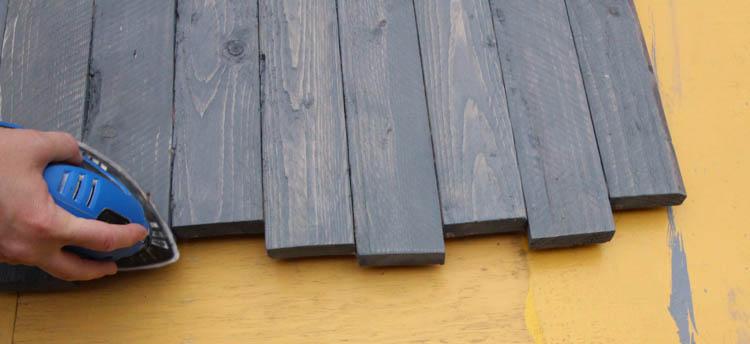
Then a little palm-sander action to smooth and prep the wood for staining…
My Weathered Grey Varathane Stain {how lucky was I to get this colour?!?}
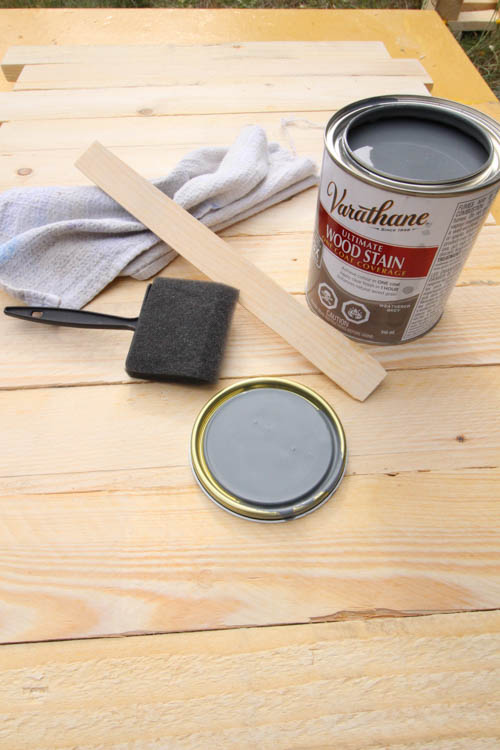 Follow the instructions- paint on, wipe off the excess. Don’t let it sit as long if you want the wood grain undertones to show through. Let it sit a little longer if you want a more solid colour finish…

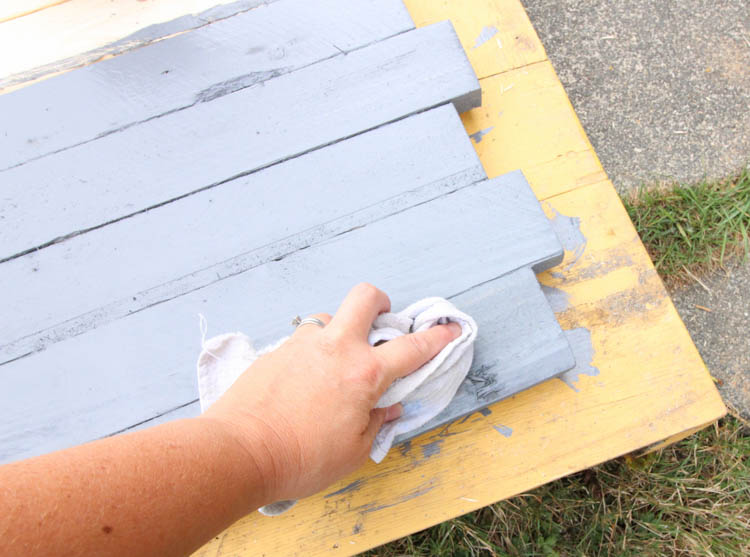
I let it sit a little longer then I meant to {or it could have been the August heat} so I used my palm sander again to distress the finish a little…
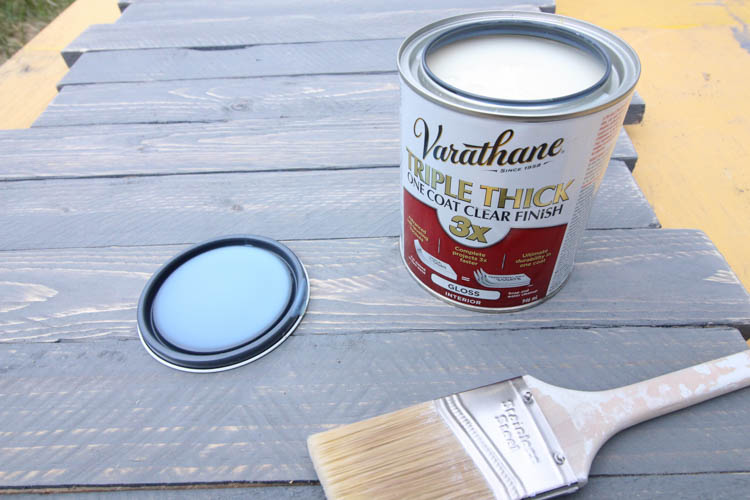
Followed by a Varathane Triple Thick 1 Coat Clear Finish. How awesome is ONE. COAT?
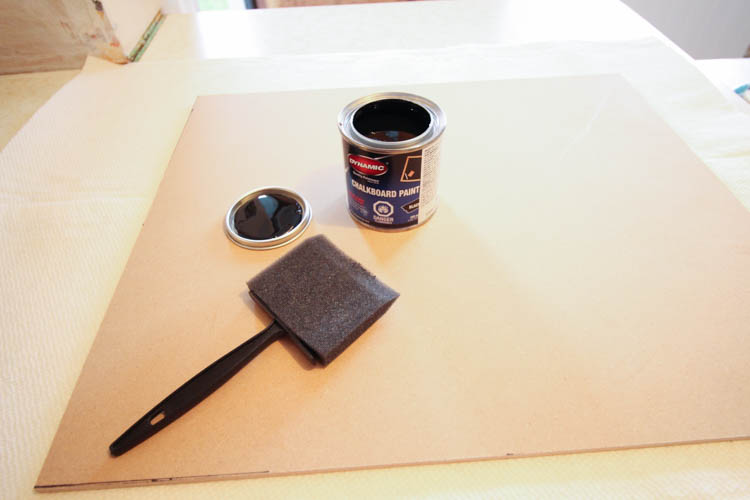
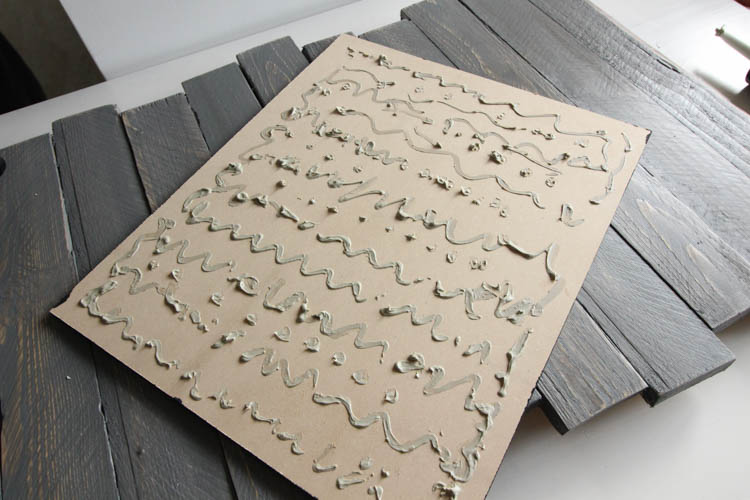
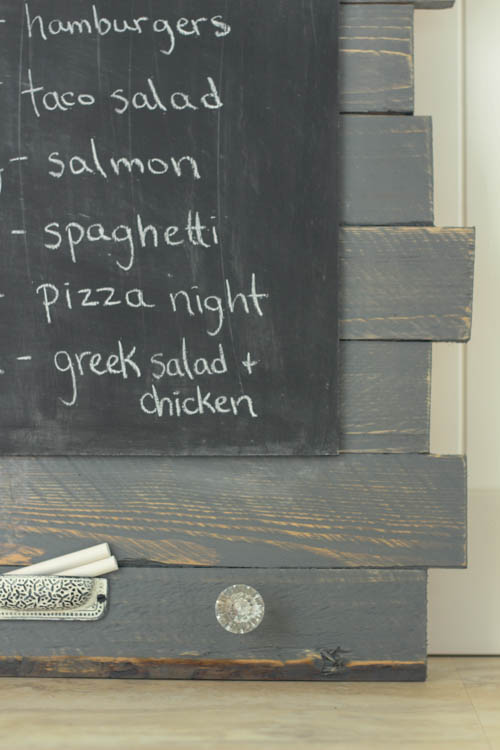
I whipped up a little chalkboard out of a spare piece of MDF painted with some chalkboard paint…
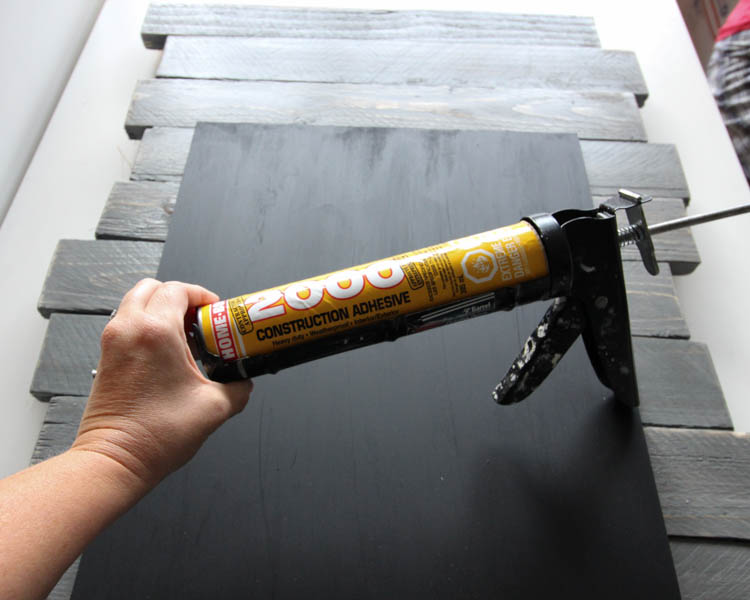
And attached the chalkboard using some construction adhesive…
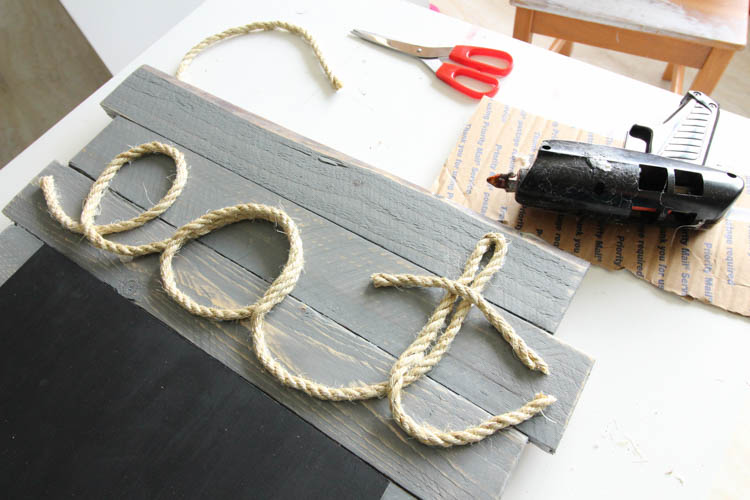
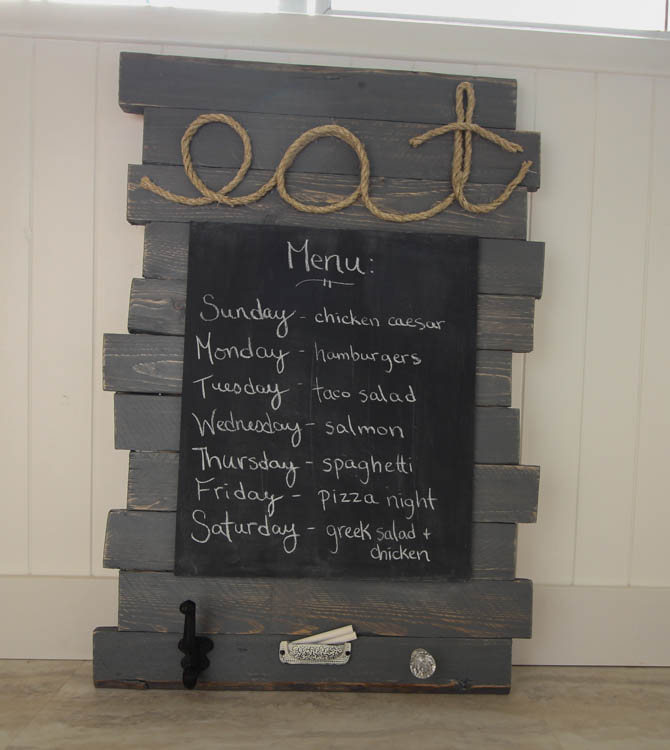
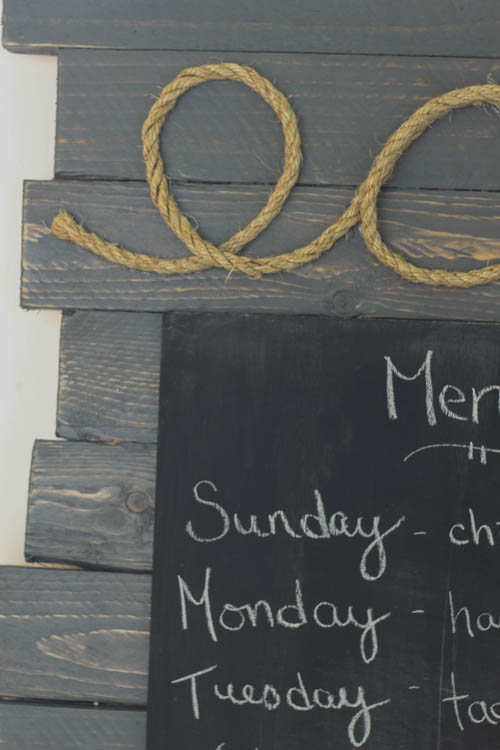
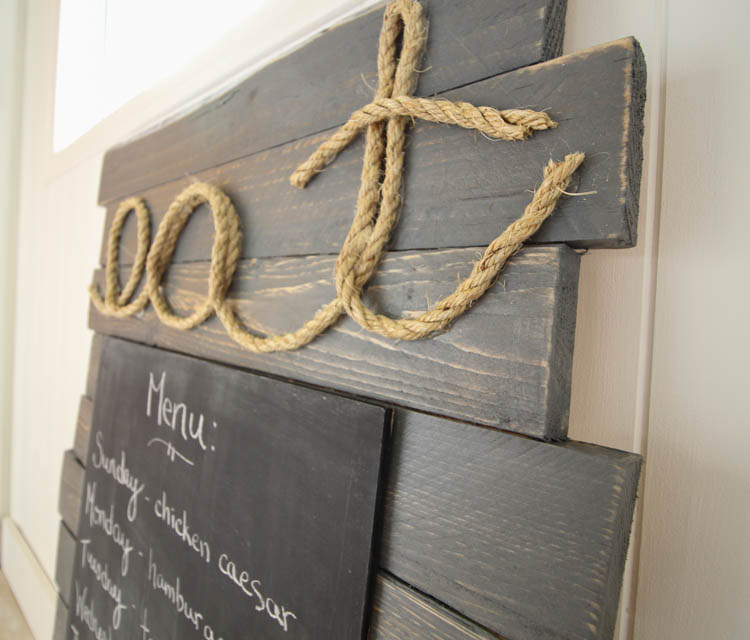
The final, finishing touch was my random objects: I used the rope to spell out the word “eat” {hot glued onto the top of the sign}.
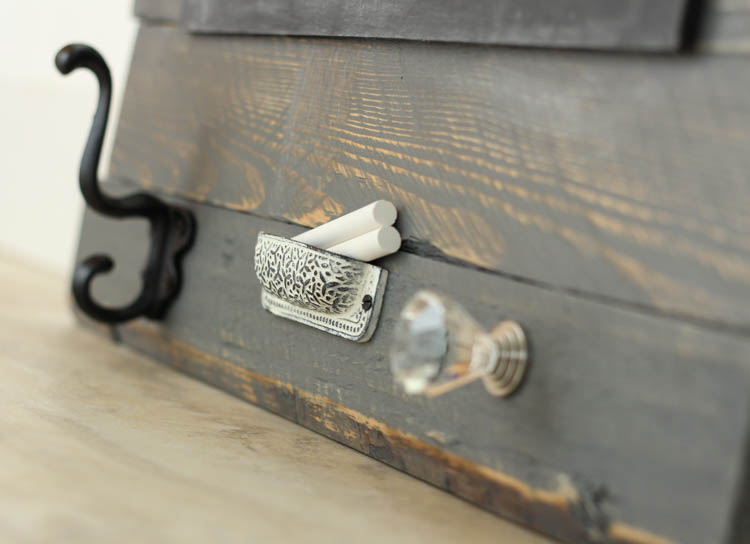
I then attached the hook and glass knob to the bottom of the sign along with a little cup pull that I picked up at the hardware store that I figured would be the perfect chalk holder. I thought you could hang any manner of things off the hook and glass knob – oven mitts; recipe cards, your purse. Whatever you want, really.
All done!
I would love to hang it on the end of our Pantry Cabinet in our Kitchen – but the hubs isn’t so sure. I am thinking that a bunch of command strips might be in order to hold it up, as I don’t really want to drill into my brand new cabinet.
Would you find this helpful? Want to give it a try?

I would absolutely LOVE your support in this contest.
You can vote for me by heading over to the #LoveYourWood Contest on the Varathane Facebook page to vote for my project – I would be super thankful for your support {there is a cash prize up for grabs!}.

And, remember I said that there was not ONE but TWO challenges that I got to participate in with this project?

Well, you might remember last spring during the One Room Challenge when I shared my DIY Giant Pegboard wall as part of my Craft Room makeover? Well, today I have teamed up with those lovely POWER TOOL CHALLENGE ladies again; this time to tackle a project using a Jigsaw!
And, don’t forget – you can cast your vote (and check out the amazing projects that everyone else created at the #LoveYourWood Contest on the Varathane Facebook page . I would be completely appreciative of your support!!

![]()
![]()
![]()
![]()
![]()
![]()
![]()

That stain is amazing! And now im hungry 😉 lovely menu board!
Thank you so much Corinna! I love the stain colour too… I need to find another place to use it soon:)
Cute! If only I were organized enough to know what we were eating every day!
You are soooo lucky to get that grey stain and the glass knob. Perfect for your style, girl. I love this DIY so much. Great job!
Hugs, Jamie
Awesome menu board! I love the rope text, great idea!
Thanks Virginia! The rope is my favourite part as well!
I love this – especially love the chalkholder! Voted for ya!
Thanks so much Jeanie!!
So I know this post is about the menu board… but I’m loving the rope lettering! That would be so so much fun at a party 🙂
I know, Colleen! Isn’t the rope lettering fantastic! I saw something similar on a wooden sign at Home Sense and knew I wanted to use it someday. It just might be my favourite part of the sign…
Off to vote, Krista! You did an amazing job! I love having our menu posted on a chalkboard as well!
Thank you so much Kendra! And I truly appreciate your vote of support!
Love your menu board Krista! I’m going to pass the stain information onto my son who is doing a barn wood look on a wall in his house. I’ve only taken apart one pallet and vowed never to do it again…until I read this. I never thought to use my jigsaw to take it apart! Thanks to you I’ve scheduled a date with the other pallet collecting cobwebs in my stash 🙂
The stain is fabulous Marie! It would be perfect for a “barn wood” feature wall. If you are doing a sign that only requires shorter boards, then you don’t have to tackle the crazy job of taking out those nails they use on pallets. You can just cut through the in between pieces! Good luck with your pallet project:)
What a great idea for meal planning. It’s also a good way to end the never ending question of, “What’s for dinner?”.
I’m pretty good about planning the meal and buying the groceries to make the meal, my problem is actually doing the cooking. During the school year I cook a lot on Sunday so all I have to do is reheat.
I voted for you!
I think that is a great idea as well, Paula! Have it planned out but then have lots of prep and cooking done ahead of time. I need that kind of organization in my life!
Love it! I want to try that gray stain, that is so pretty! I love all the knobs and hooks you added too!
I LOVE the grey stain too, Dede. I have to think of somewhere else to use it! The knobs and hooks will be perfect once I get it hung up… I can see my cute little oven mitts there now. I better now actually “use” my pretty oven mitts though or I bet I will get them covered with food:) lol
You got my vote, Krista! This is so cute! Having my meals planned out for the week is such a huge help. No struggling to come up with an idea at the last minute! This project was perfect for both challenges. 🙂
I hate last minute “what to cook” scenario Christy – though I often end up there. I am determined to be more organized since I will be working full time instead of 4 days a week now that Finn starts Kindergarten. I just have to figure out how to hang it without damaging our new cabinets- let me know if you have an idea!
This is so awesome!! I love the hook and knob, as well as the use of the rope! The menu board looks fabulous!
Thank you so much Cher – I am happy with how the random objects were incorporated:) Once I hang it I can use them as hooks!
I can’t plan a menu anymore to save my life… but I’d definately give it a go with a fun menu board like this one:) Even without kids in school anymore this would motivate more organizing in the kitchen!
I agree- it could be back-to-school or not. But I am determined to be much better organized this year, especially since I am going from teaching 4 days a week to teaching 5 days now that my youngest is starting Kindergarten. I NEED to be organized! lol Thanks for organizing the challenge, Wendi!
This is an awesome project that can be used in so many ways! Great idea, Krista! Headed over to vote. 🙂
Thanks so much Larissa!!