
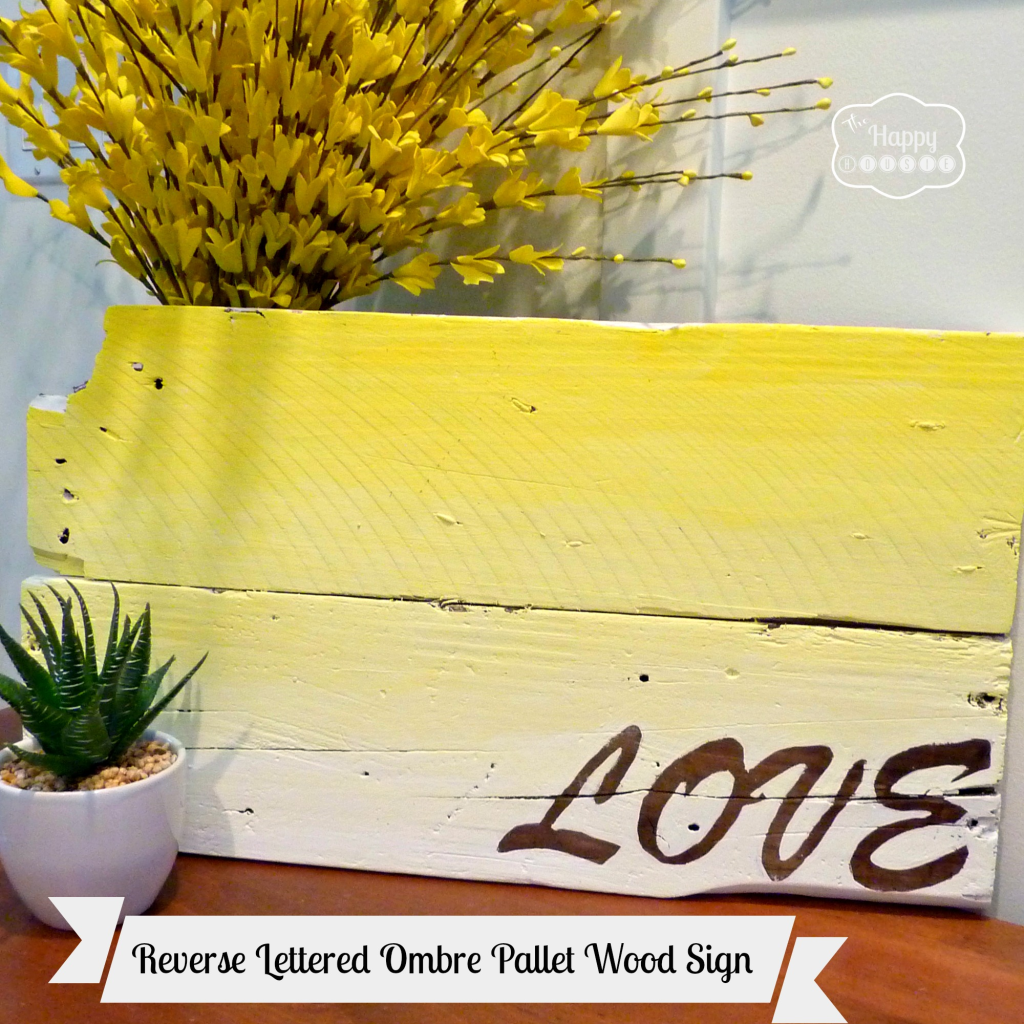
DIY Pallet Wood Ombre Sign with Wood Reveal Reverse Lettering
Today I am excited to share with you a new little DIY Pallet Wood Ombre Sign I made this weekend that features reverse (or wood reveal) lettering.
I was out for a walk with my family the other day when I happened upon an old piece of pallet wood that had somehow ended up on the side of the road. I had wanted to make a sign out of pallet wood for a while so I quickly grabbed it and ported it back home with me.
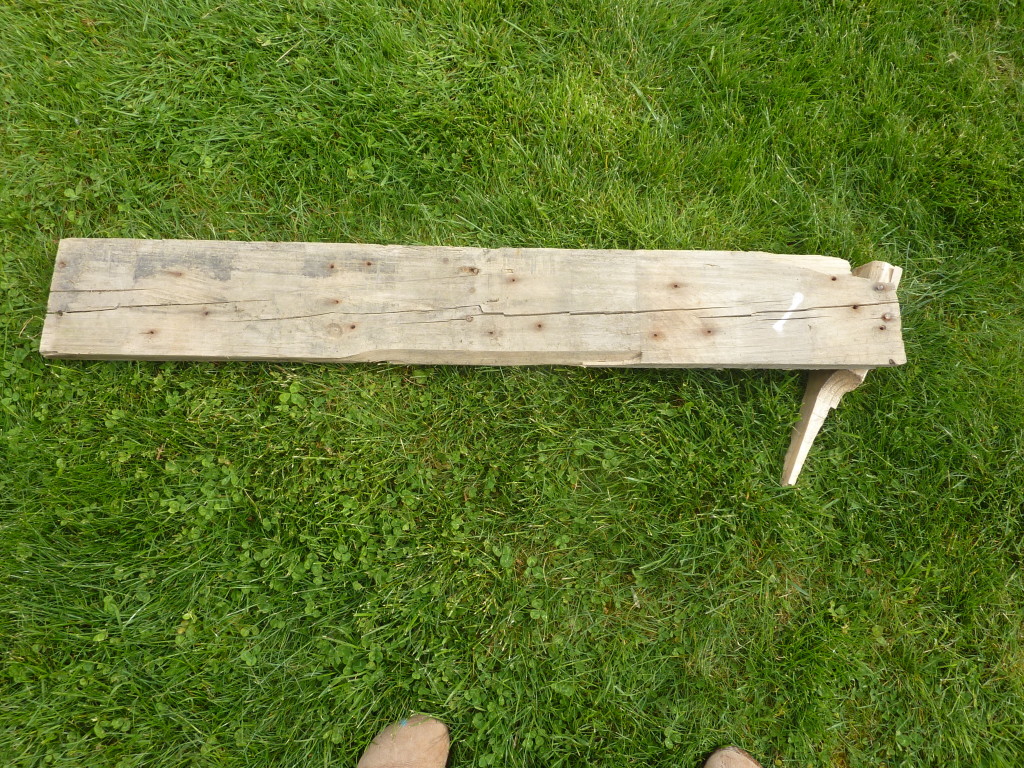
There was still a piece of the pallet attached at one end of it but my husband helped me detach it and removed the remaining nails. It was nice and rough… just like I had hoped.
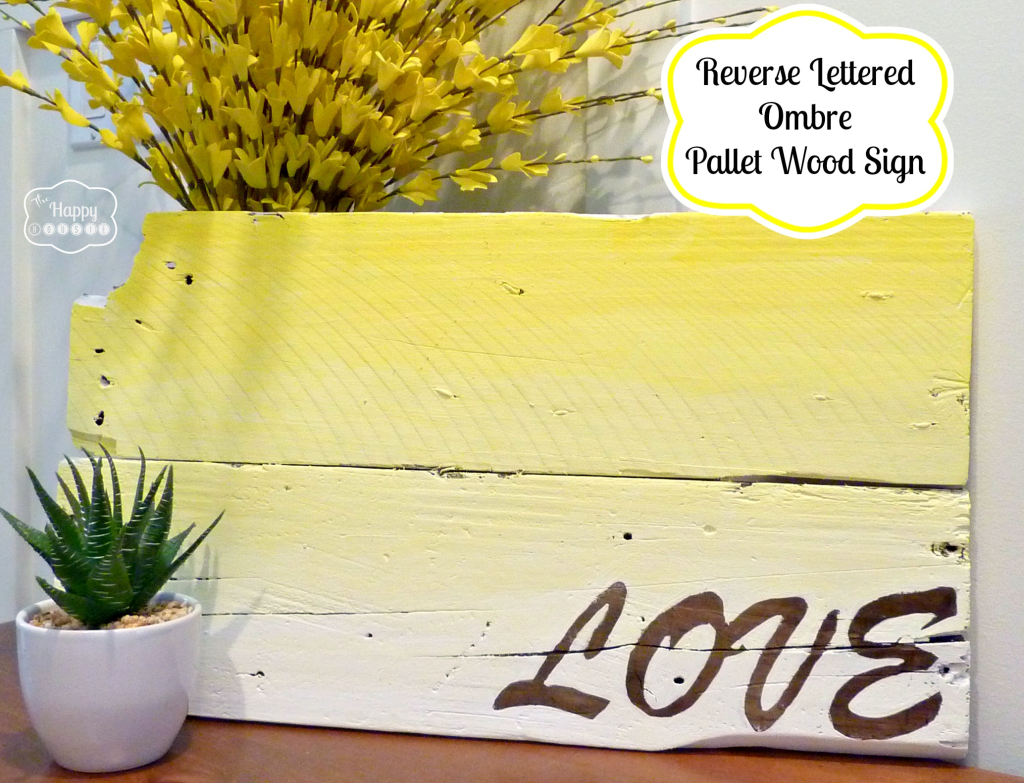
With the recent changes in our living room some of my favourite art had been displaced and has found a new home in our bedroom… where the gallery wall above the dresser has been transformed. I wanted to create a small pallet sign that would fit in an empty spot on the bedroom wall.
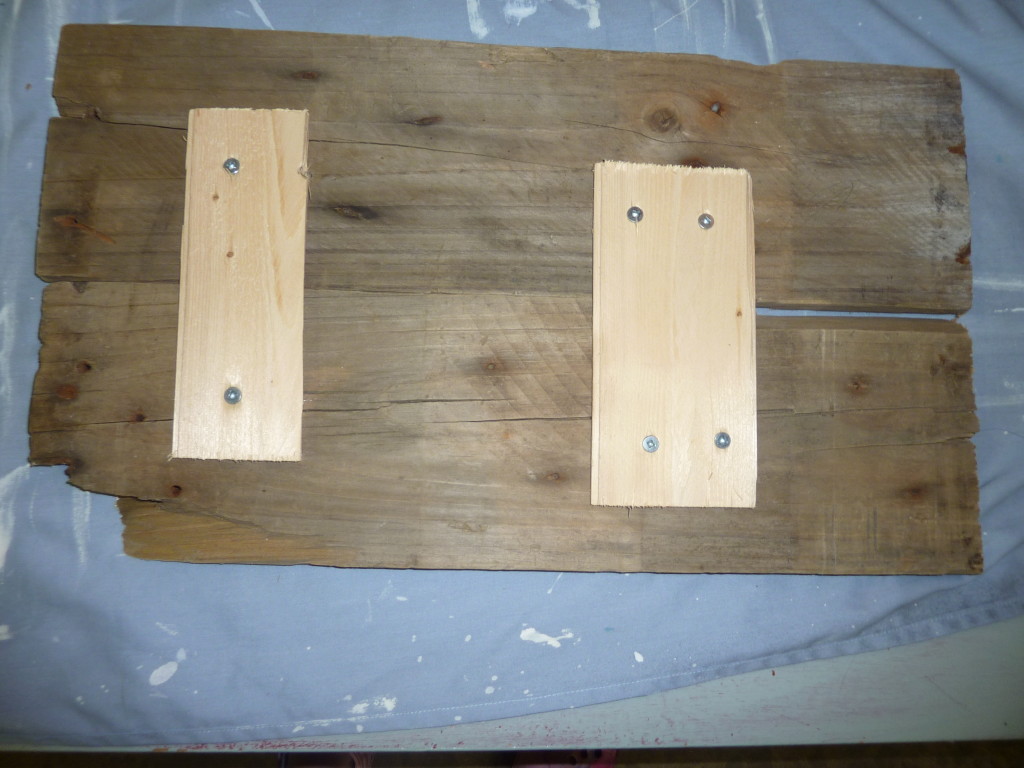
To fit the space I wanted the sign for, we cut the piece of pallet wood in half and attached the two boards together at the back with using some extra pieces of paneling we had leftover from our laundry room paneling project.
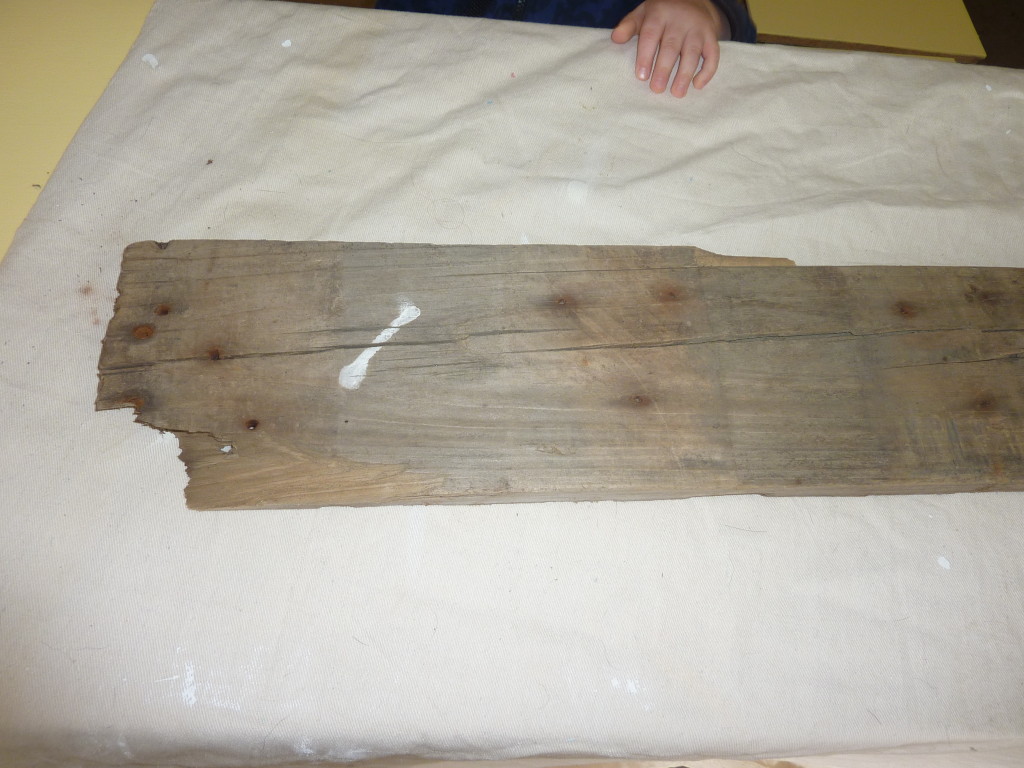
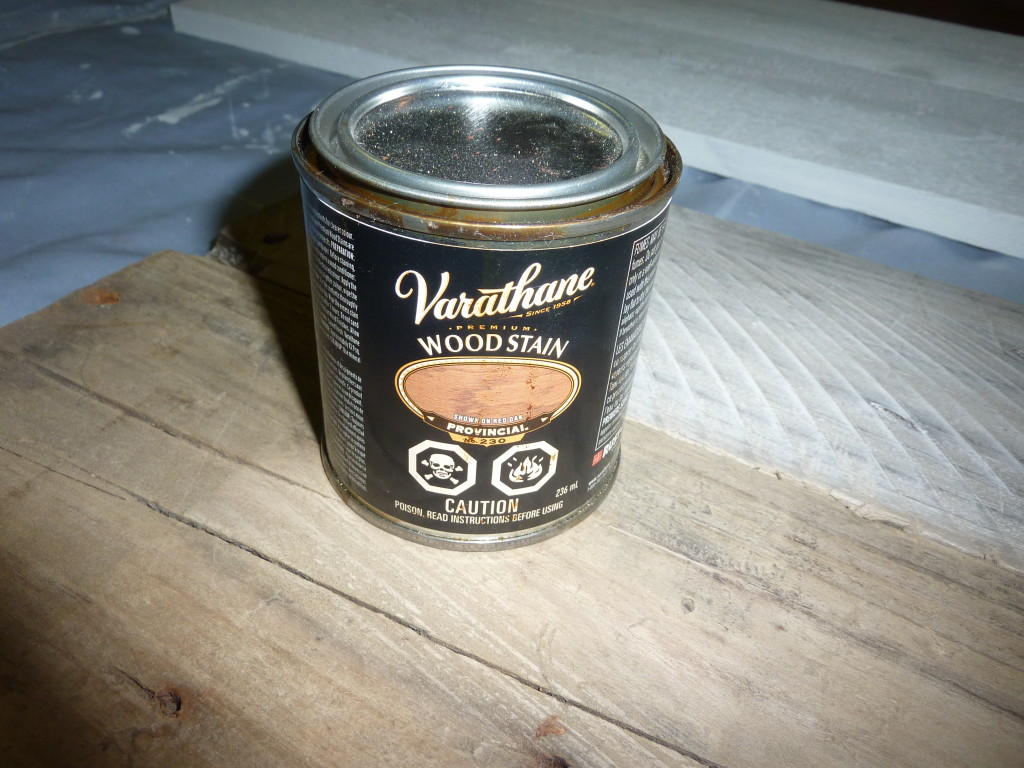
I wanted to bring out the color in the wood with some stain because I wanted some of the wood to show through on the finished sign.
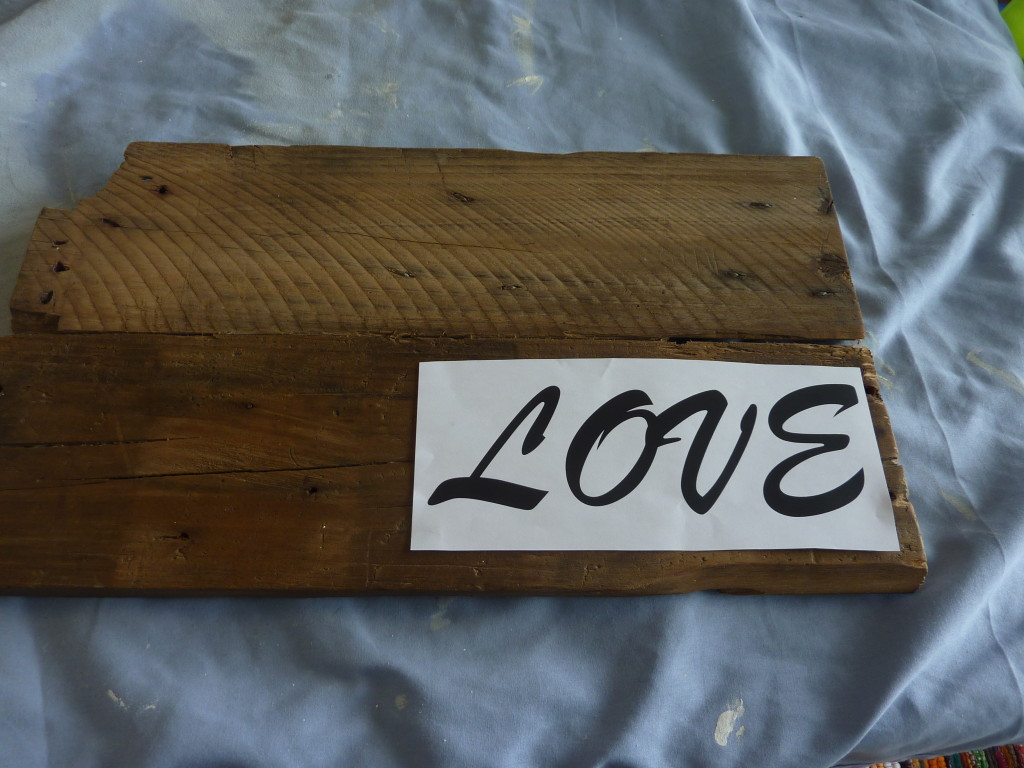
I toyed around for a long time with what I wanted the sign to say but decided on one simple word… I printed it out and chose a placement for my letters.
Next I shaded the back of the printed letters with a pencil.
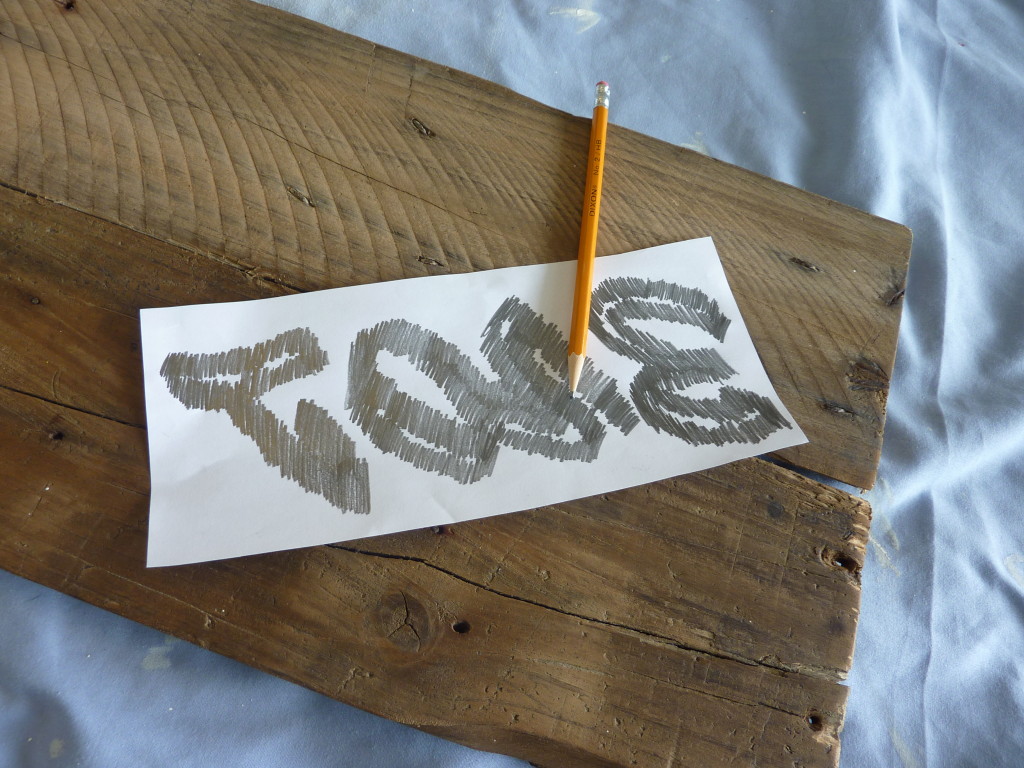
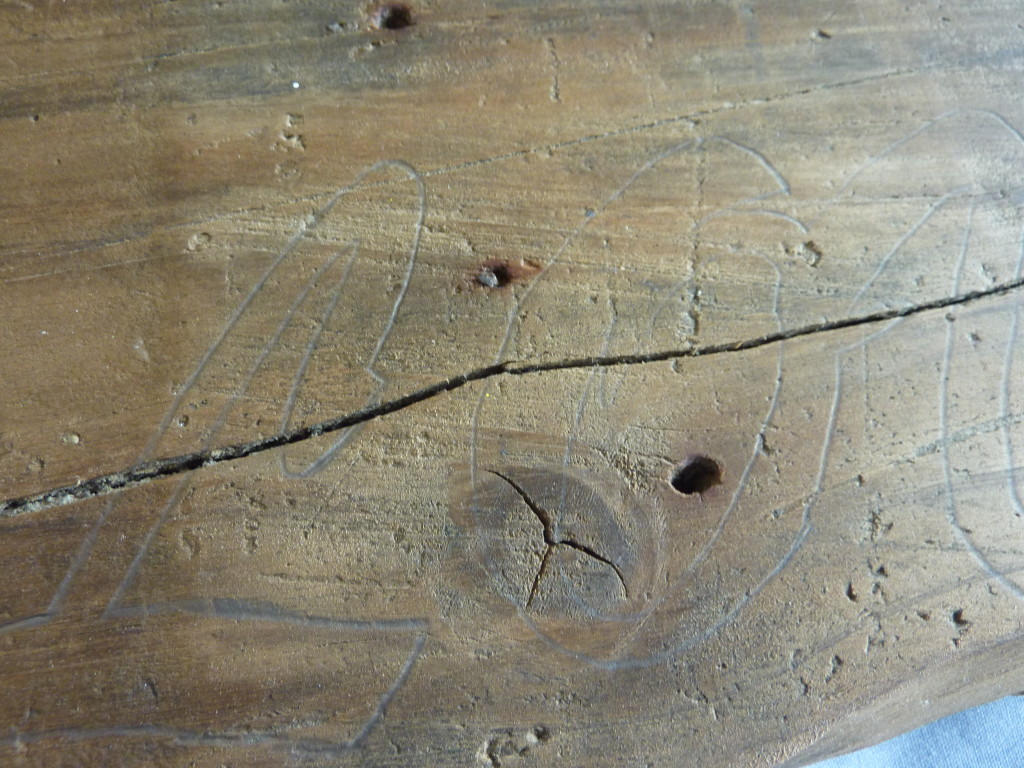
Then I placed the word down on the wood and traced around the letters with my pencil.

The penciled back of the paper acts like transfer paper and leaves an imprint of the letters on the wood.
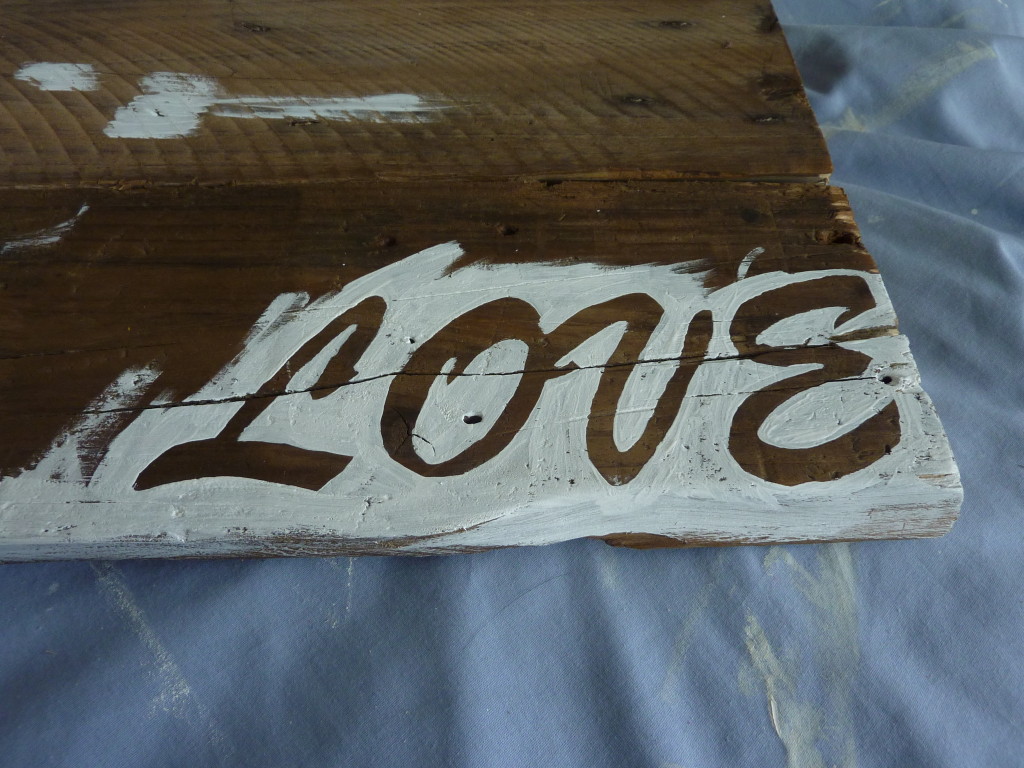
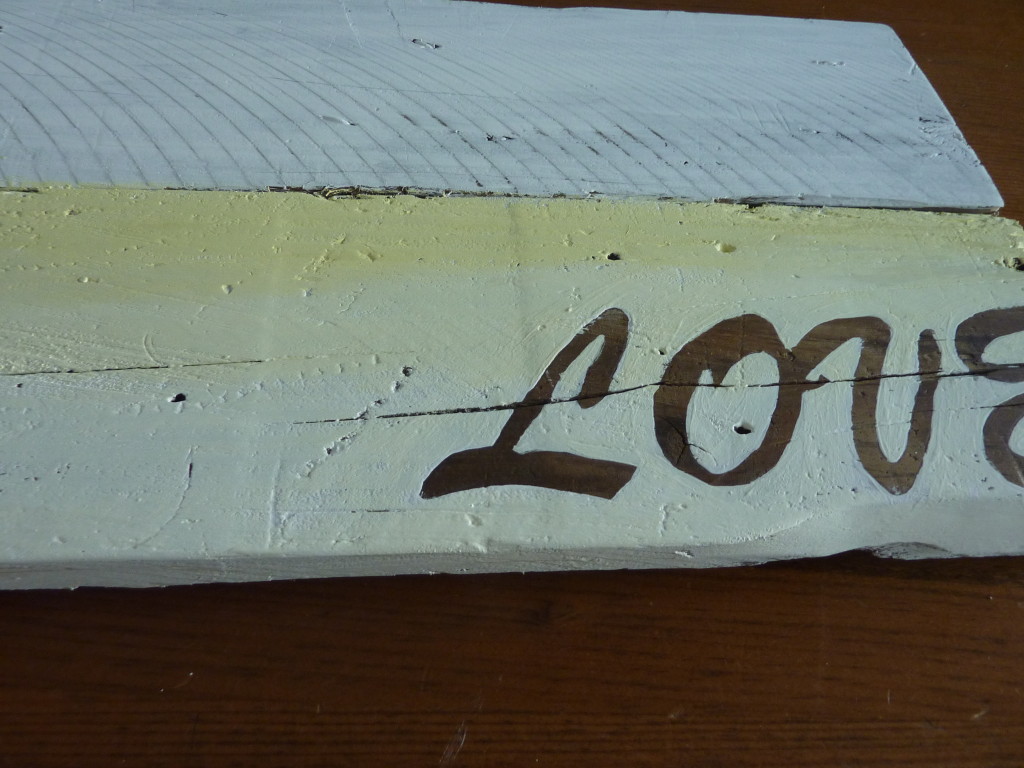
The next step was to paint… I wanted to leave the word LOVE showing through in the wood so I painted white carefully around each of the letters.
Next I filled in the rest of the sign with my white craft paint.
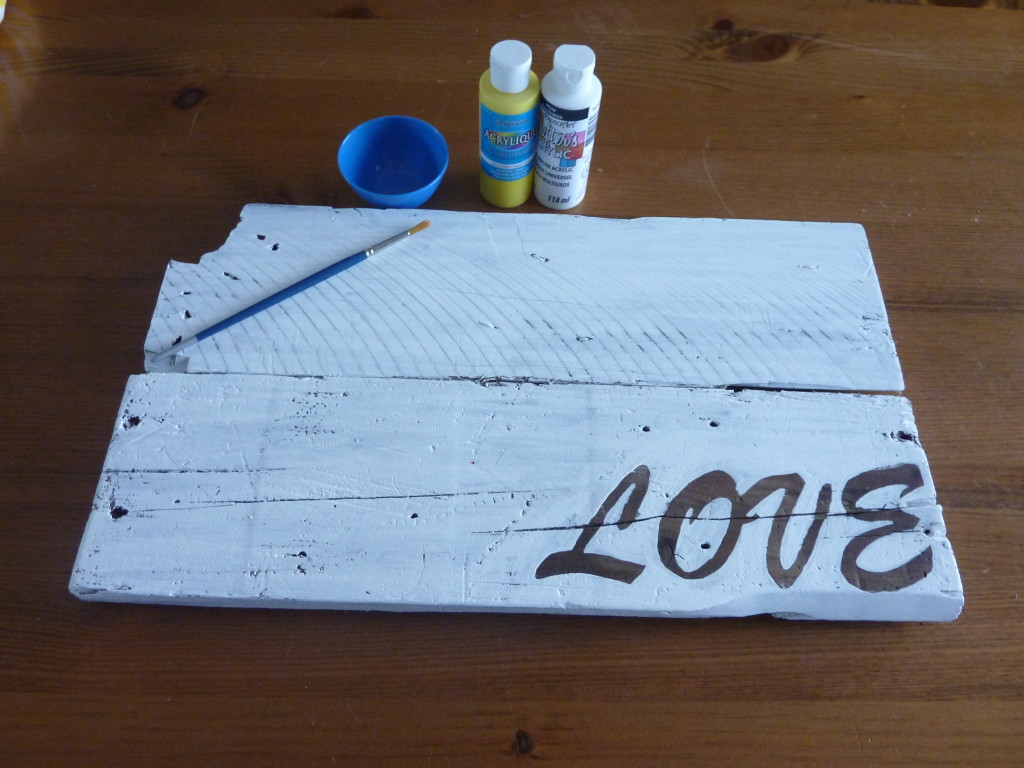
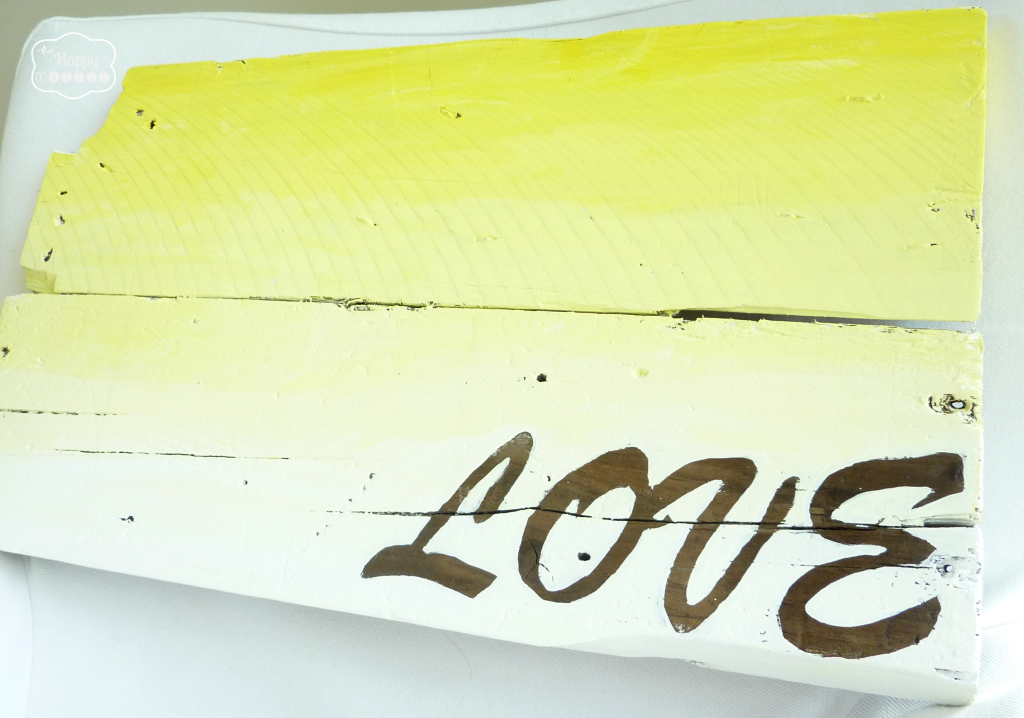
I wanted to create an ombre effect to the sign, where the color started out white at the bottom and gradually darkened to a bright yellow by the top of the sign. To do this I started with white, added a few drops of yellow, painted… added more yellow…. painted… and kept moving up the board in this manner.
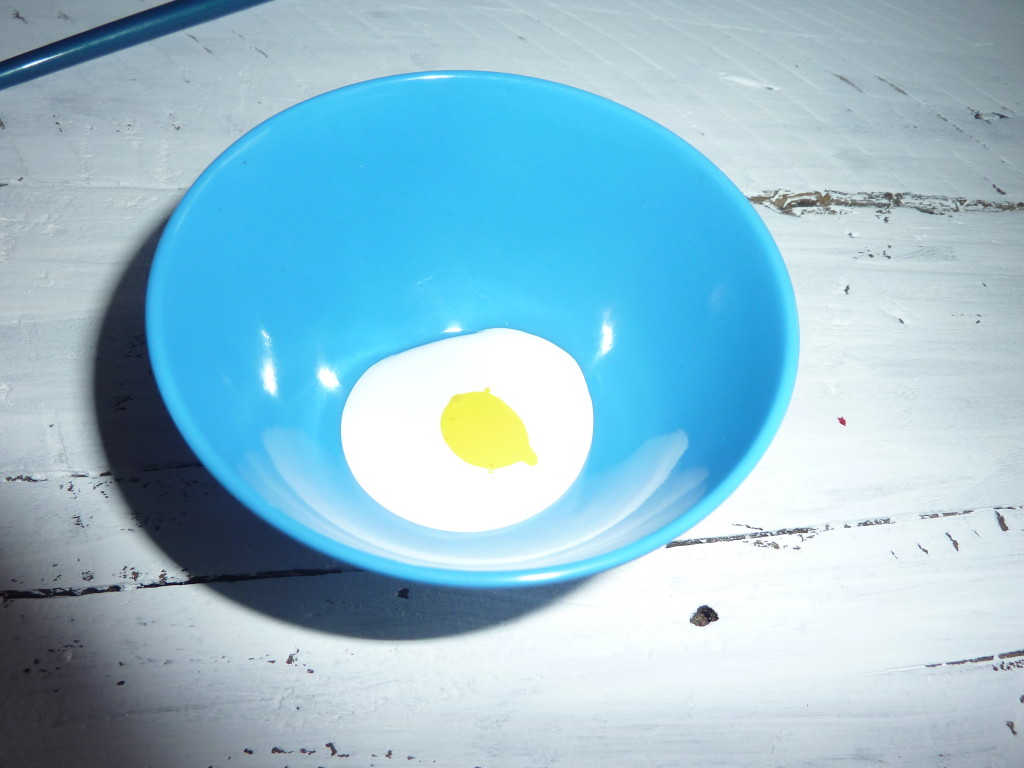
You can`t really screw it up… it is only craft paint and you can play around with the fading and color strength until you get the effect you like.
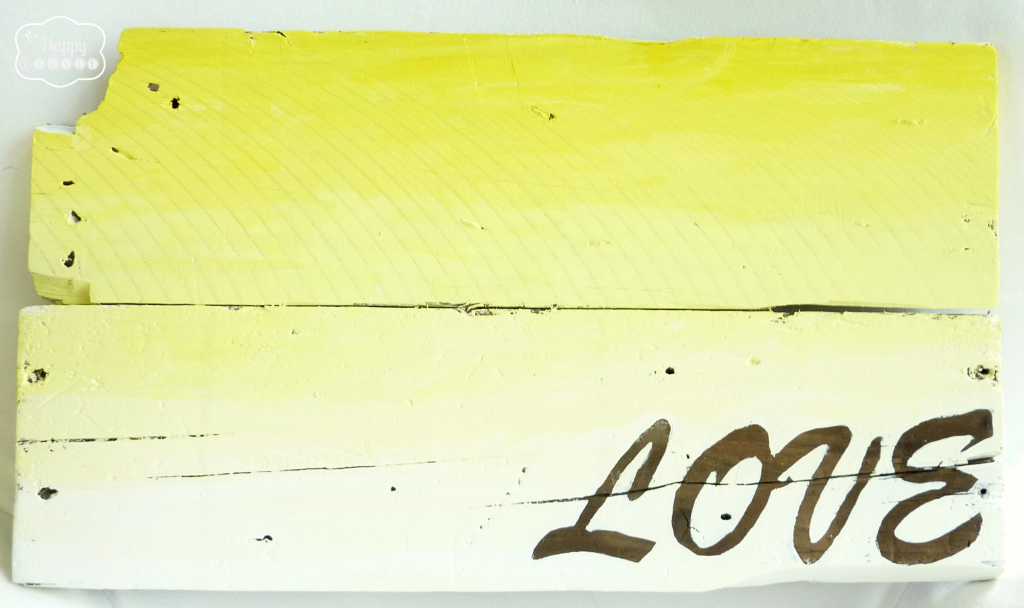
I’m really happy with the way it turned out… I especially like the way the natural wood shows through in the word LOVE.
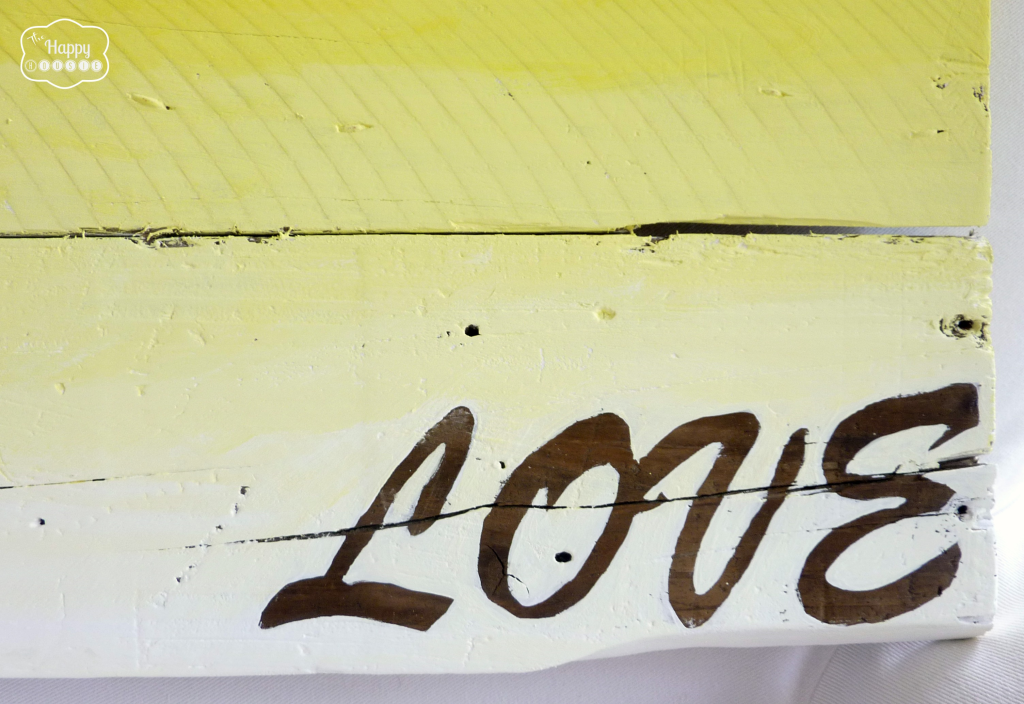
I also like how the rustic nature of the pallet shows through with all the cracks and gouges and nail holes.
I can’t wait to get it up on our newly refreshed master bedroom gallery wall…
Have you ever made something out of pallet wood? How about a wooden sign? I would love to hear about it!
Thanks for reading! And remember, my housie friends, HOME isn’t built in a day. Enjoy the journey!

This project was featured at:


I’m linking up at some of my favourite Housie Parties and


Thank you for sharing Krista!
I run a website about Sustainability. Would love to feature you and your reclaimed wood projects sometime.
Would you be interested in contributing? I’m still working on getting it launched, so it wouldn’t be until January, but just in case you are interested, please feel free to contact me at info@ellumelife.com
Again, thanks for the very helpful tutorial!
Elisabeth
That is so cute and clever!
Stopping by via Aubrey’s Blog, she mentioned you in her Weekly Round-Up post!
Thank you!! Wow – how cool!! Thanks for letting me know:)
Love the sign, the yellow is so pretty. Thank You so much for sharing on last weeks party. Hope to see more from you on my next party.
Thanks Rita! I will be there!
Krista
I LOVE that you used the good ol’ reverse letter pencil shading technique. Can’t wait to make a copy-cat version.
Awesome Becky!! I would love to see it!! Post a pic on our FB page if you want:)
So pretty, Krista! I love the ombre yellow 🙂
Thank you Chelsea!!
Wow! That’s adorable! Thanks for sharing at Pinworthy Projects.
Hi Carrie! Thanks so much!
That reverse stencil trick is so awesome, thanks for sharing.
Thanks Danielle, I really liked the reverse stencil and how it ties in with the wood dresser top in our bedroom (now that I finally have it hung up!).
This looks great! I’m planning on making this to use as a backdrop for food photos. As soon as I can find some wood.
Hi Alyssa! Just keep your eyes out for pallets… I see them all over now, and you can always check with businesses to see if they are getting rid of them. Good luck!
Krista
Oh Krista!! You did a FABULOUS job on the sign! LOVE IT!
Thanks so much for sharing this at The DIY Dreamer… From Dream To Reality last week! Looking forward to partying with you again tomorrow evening!
Hi Christine! Thank you:) And thanks for hosting!! I love your party,
Krista
What a pretty sign, Krista! I love the reverse lettered, letting the wood show and the ombre effect is awesome! I have never try to do it, it scares me a bit
Hi Cristina!! It was easy… you would blow it out of the park!!
This is awsome!! I absolutely love the yellow ombre. Smart stenciling-trick too!
Last summer I made a wood sign of my own, that I’m still kinda in love with 🙂 http://artby3s.blogspot.se/2012/08/words-to-live-by.html
Therese
Hi Therese! I checked out your sign – it is absolutely perfect! I love the saying you chose:)
Krista
This is really cool! I love the reverse lettering to show the wood underneath.
Thanks Elise!
Krista ~ this is just darling! I love the fun yellow color.
I’m visiting you today from The Girl Creative. I co-host a Linky Party Tuesday (open thru Sat) and I’d love for you to link up! I hope you get a chance to stop by, link up and leave a comment, too!
~ Megin of VMG206
Join me each Tuesday for Brag About It Link Up Party
Hi Megin! Thanks so much for the invite… I will check it out for next weeks entry:)
Krista
I LOVE this sign! Well done! I have a ton of leftover pallet wood from a wall I did, I’ll have to make one of these 🙂
Hi Justine! Thanks… it was pretty quick and easy – I have it hung now and am loving it:)
Krista
I’m too OCD with painting to do ombre. Don’t get me wrong. It looks awesome. I have to give you props for doing it because I know my hand wouldn’t be able to. I would reflexively paint straight lines and get frustrated with the shading of the color. I love yellow by the way. I always find myself instinctively drawn to it. Our kitchen is yellow. It is getting re-painted soon, but just a different, less in your face, yellow.
However, I WANT to do something similar to this in our bathroom above the toilet with “Life is Better Barefoot”. I think I might stick with buying a canvas print from Wal-Mart and then adding my works in paint.
I love doing stencil transfer. It seemed so simple after I found a tutorial on Pinterest. I recently made (but need to post about) a poster for the boys that says, “Sometimes, being a brother is like being a Superhero” and used the technique.
*coming from A Stroll Thru Life, Inspire Me Tuesday Linky
Hello Vague! I kind of thought the messy shading was fun and freeing after doing the straight lines… I liked how you couldn’t really screw it up:) I love that saying “Life is Better Barefoot”… I have a plaque that says “Sometimes being a brother is better than being a Superhero”… fun! I would love to see yours:)
Krista
Love this! I think my whole house is going to end up with yellow accents if I keep looking at your site:)
Nicole
I am on a real yellow bender these days it seems!!
I love the sign and the ombre effect. So pretty! You must have quite the steady hand for paiting. Impressive. Thanks so much for linking up at the Real Family Fun link party! Hope to see you next week.
KC
Thank you KC! Thanks for visiting in person!!
Krista
What a great idea to do the reverse lettering. Love it 🙂
Thanks so much for sharing on Project Inspire{d}. Pinning 🙂
Nancy
Thanks Nancy!! And thanks for the tip about the paper/pencil/stencil/tracing paper…
Krista
What a pretty sign, Krista! It looks amazing in the vignette you created~ summery, bright and cheerful! It’s the perfect accent for spring/ summer!
Thank you Kim! I am really happy with how it turned out… now to get it up on the wall:)
This is so pretty! Love it! The ombre effect gives it a really nice touch! Love that it is reversed!
Thank you Katja! A bit of a fun change… I wanted some wood to show through to tie in with the wooden dresser top in the master bedroom – it is going to live on the gallery wall above the dresser (as soon as I get around to actually hanging it!).
Krista, speaking of Love, I love this project! We must be on the same wavelength. . . I just completed a sign using yellow and a word. : )Thanks for sharing!
Hi Kimberly! Can’t wait to see what you have created!
Oh this turned out just lovely!! It is so beautiful and I just love the ombre, job well done. 🙂
Thank you Amanda!! And thanks for your inspiration – I am working on another sign right now and using some of your tips:) This sign was considerably smaller than your fabulous beach one!!
Krista
So great, Krista!!
Jamie
Thanks Jamie!
I agree with the sentiments above…you really knocked this project out of the part! I have a particular love for old pallet boards (as you may already know) and I especially love how you did a reverse effect with having the wood define your letters. Just stunning!
(And I’m rooting for you with this giveaway. Just think how much easier it would have been to cut the letters from vinyl…oh the many woods signs you’d be whipping out!)
Hi Lauren!!
I would love a silhouette but am international so I couldn’t enter! Darn! Hopefully one of these days:) Thanks for your awesome comments about the sign!
Krista
Why is it that all of the people who I think would ROCK it on a Silhouette live in Canada?! Is there some kind of conspiracy I don’t know about?
Lol! I guess I will have to find me another source:)
This is beautiful! I use that transfer method for doing chalk art.
I love making pallet signs too! I made a bike parking sign which I’m loving!
Hi Kathryn!! I saw your bike pallet sign – so inspiring. I absolutely loved it!!
Krista
That’s really cute! I like the reverse stencil. =)
Thank you Kelly!!
Great Project!
Deb
Thanks Deb!! I am thrilled that you (and Nancy at Artsy Chicks) revealed your pencil/stenciling secret!
Krista
This is so beautiful, Krista! I love the wood peeking through the letters, and the ombre is perfect. Hope you are having a wonderful week!
~Abby =)
Thank you Abby:)
great project Krista! what a good idea you had when you picked up the wood (I would’ve never had the idea to pick it up and do this with it!) 🙂 & Of course, I am loving the color yellow you choose and the ombre effect; it’s so pretty, happy and lovely! 🙂
Thanks Ingrid!! Something else in our favourite yellow…. it seems to be my colour of the season… or perhaps year!!
Krista
I really, really love your sign! What a great recycling idea. And your colors…how beautiful…the streak of yellow is a brilliant way to draw attention to the piece. Thanks so much for sharing…have a beautiful day!!!
Hi Kristine! It looked pretty flat in all white… and I have wanted to try something ombre for a while… so the perfect solution!!
Krista
I love how this turned out Krista!
Thank you Sarah!
Love the ombre effect! Very cheerful. Can we see it hanging on your wall?? : )
Thank you Bronwyn! I guess that means I need to get around to actually hanging it….
🙂 Krista
Krista,I love how it turned out !!! I will try this soon.
Yay Peggy!! It is one of my favourite projects in a long time… I think it looks better in person too:) If you do try it then please post a picture on the happy housie facebook page!
Krista
Krista, what a lovely sign and great tutorial! Your painting skills are so neat and impressive! Thanks for sharing and I hope you enjoy your week. Happy Memorial Day! Oh and pinning, of course! 🙂
Thank you Cindy!! I think my painting skills are a little rough but the camera was forgiving:) Thanks though!!
Krista