
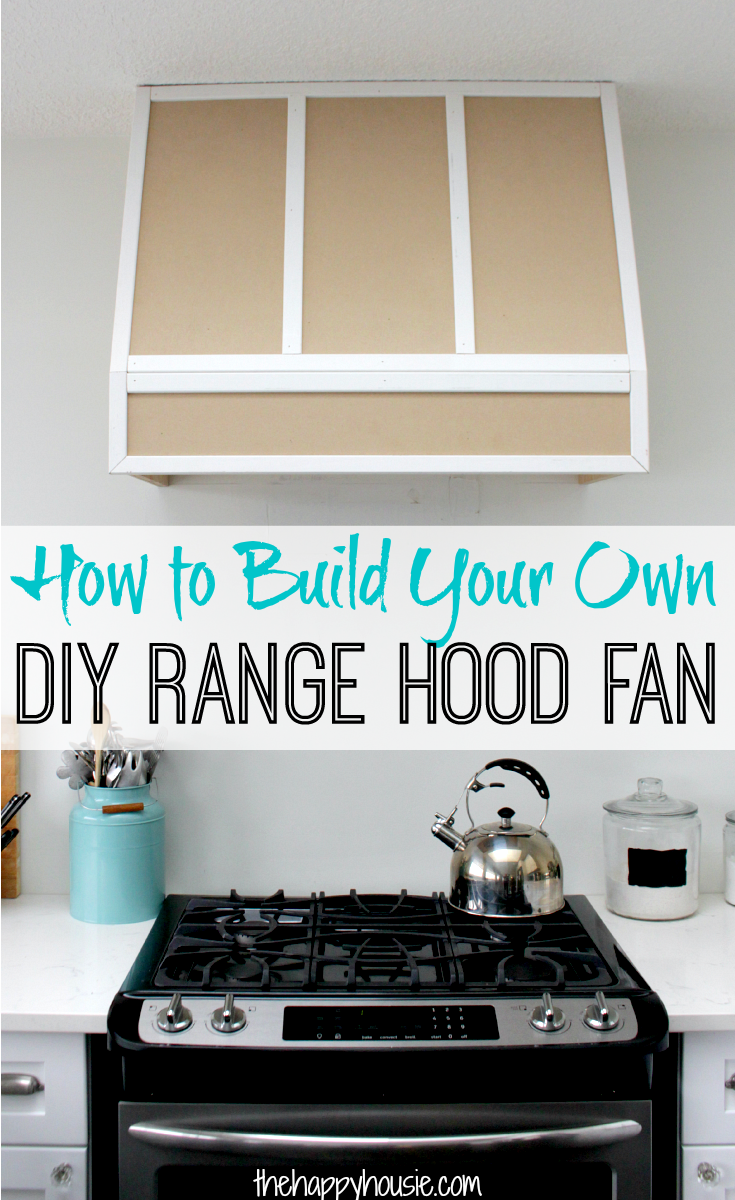
How to Build a DIY Range Hood Fan {for a Broan Insert}
In this DIY tutorial I will show you how to build your own range hood fan!
Well, another exciting home project is (nearly) finished in our ongoing on-verge-of-becoming-a-saga-kitchen-renovation. We have built and installed our DIY Range Hood Fan with our Broan Insert from build.com.
I am breathing a sigh or relief after this one. It actually was a lot easier then I thought it was going to be, but we went back and forth for so long trying to make a decision about exactly what design we wanted that I am glad to have finally made a decision and gotten on with it!
And today I have a very long and detailed tutorial for you, in case you ever decide you want to tackle a DIY project like this. Now that it is finished (aside from painting), I would say it was well worth the effort.
Materials:
You do need access to some tools to build this wooden hood fan. We used a table saw, a nail gun, and a drill. The materials were 3/4″ plywood, some 1/2″ plywood, 1/4″ MDF, and MDF corner molding and flat molding for finishing it off. We also used wood glue, clamps, and a straight edge and pencil for marking where to nail during assembly….
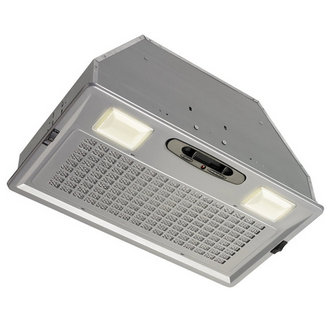
Of course the most important part of this DIY was the Broan PM390 Custom Range Hood Insert that we ordered from build.com. This unit has many awesome features as well as the option to be recirculating, but we had some new ducting installed so that we could vent ours outside.
Process:
Okay, I want to make this as simple to understand as possible.
Keep in mind that I am only a “learning” woodworker/builder. I had a great deal of help in executing this project – my Dad was really the brains behind the operation. He is a master woodworker and has built entire kitchens from scratch before. But I did work along with him for the process and I learned a ton!
I’m hoping that by sharing this project, I can help other more ‘beginning’ woodworkers get a good grasp on how to complete a building project like this.
How To Make A Range Hood Fan Cover
The basic idea was that we built a frame to house the Broan hood fan insert out of (mainly) 3/4″ plywood. We then hung the frame on the wall, installed the Broan insert, and faced the frame with 1/4″ MDF and then moulding.
The last step will be painting, but I have something special planned for that and will share that in another post.
Just so you can get a visual of what we were working towards as I show you the tutorial pictures, this is how the wooden frame looked when we were finished construction it…  For simplicity sake, I am going to number the pieces and explain them to you:
  1 – are the side pieces. We cut two of these out of 1/2″ plywood. You could also use 3/4″ plywood which is what we used for the rest of the frame, and adjust your measurements accordingly.
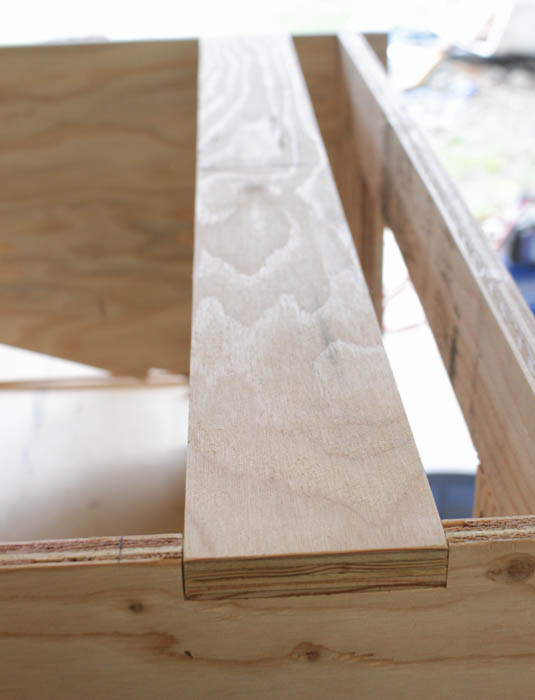
2 – is the base piece. This is the piece that houses the actual Broan insert (see the cut out portion in the center – we cut that out according to the sizes indicated in the instructions that came with our hood fan insert. Read the instructions and safety warnings on your insert FIRST.
3 – these pieces I called the framing pieces. We used them for structure and support – the back ones were used to hang the finished frame on the wall. The front ones were used to attach the MDF facing piece to once the frame was attached to the wall and the hood fan was installed.
4 – this piece I called the “face piece”. It is a straight 6″ tall piece, after which the hood fan slants up and back at an angle. I labelled the finished fan here: 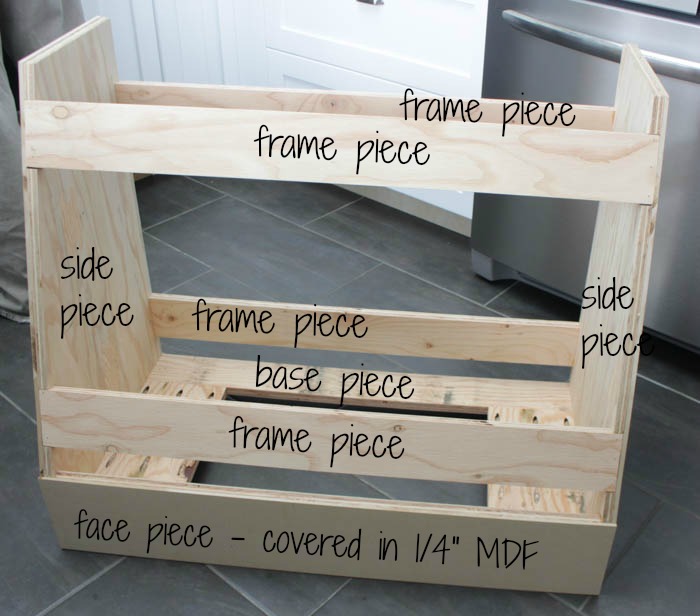 Okay, here is how we cut the wood for the frame:
 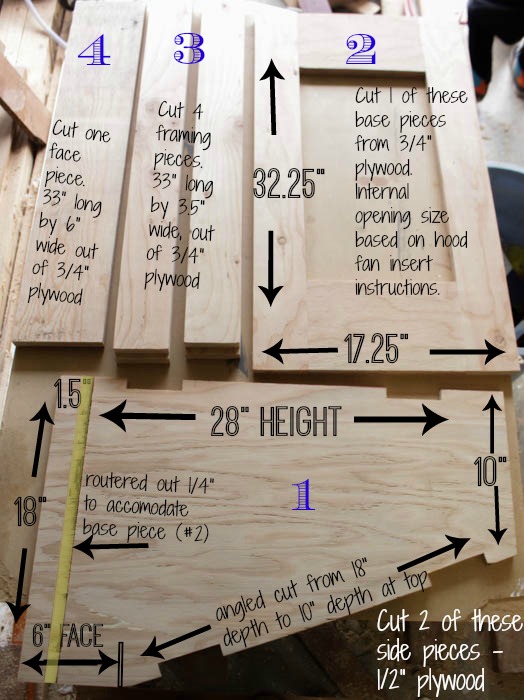 If that doesn’t make sense and you are confused, comment on this post or shoot me an email at krista@thehappyhousie.com and I will try to answer any questions you have.
Let’s move on to the actual assembly…
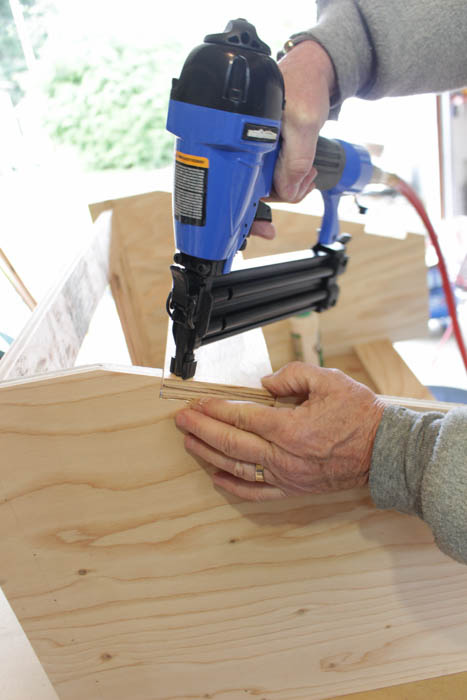
We started by putting wood glue into the routered out section along the side pieces (one at a time). 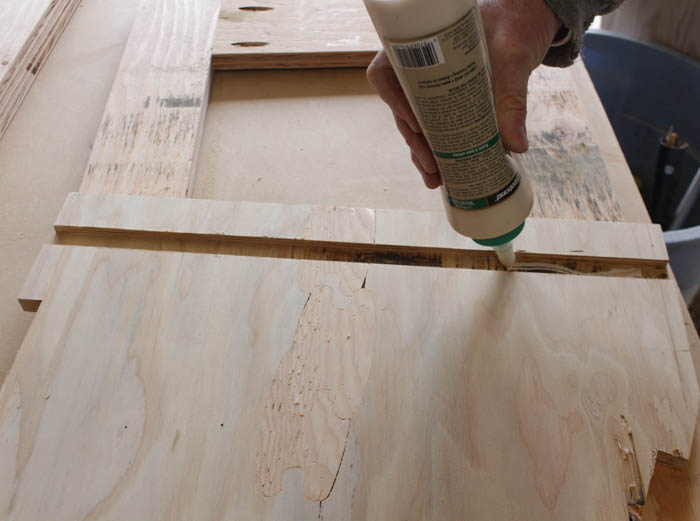 Then we slid the base piece into the routered out section, marked the line for the base piece along the exterior of the side using a straight edge and a pencil, and nailed into the base piece through the side of the side piece along the marked line…
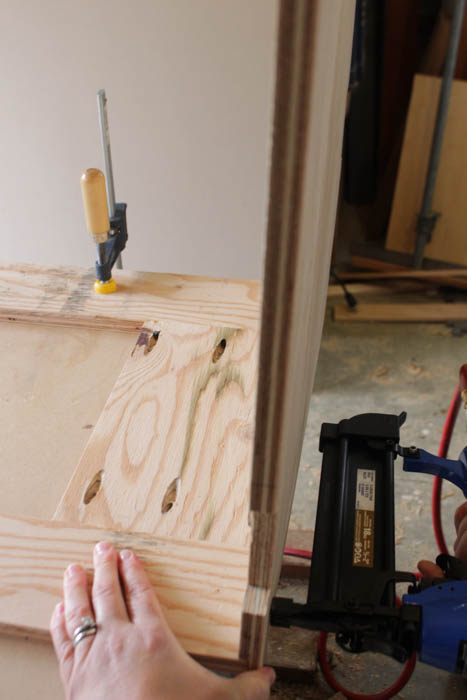
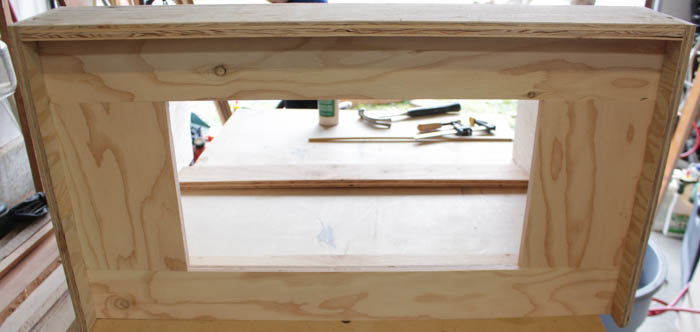
 Once the base piece was glued and nailed to both side pieces, it was time to attach the 4 frame pieces to the front and back. We used wood glue and then nails to attach them…
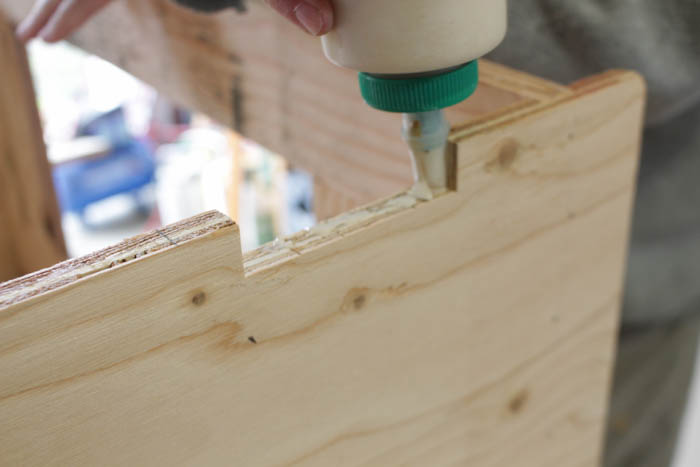

We used a large clamp to hold it in place while we glued and nailed… making sure to keep things flush before nailing it all together. 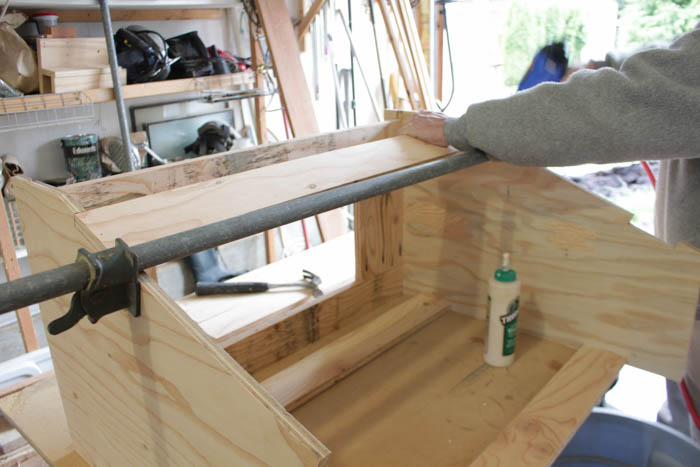 After the 4 frame pieces were attached, it was time to attach the 6″ wide face piece.
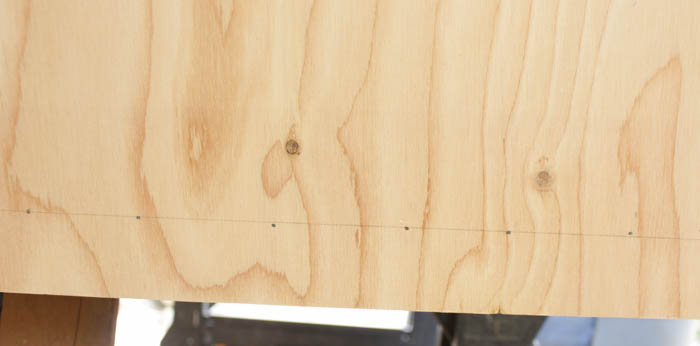
 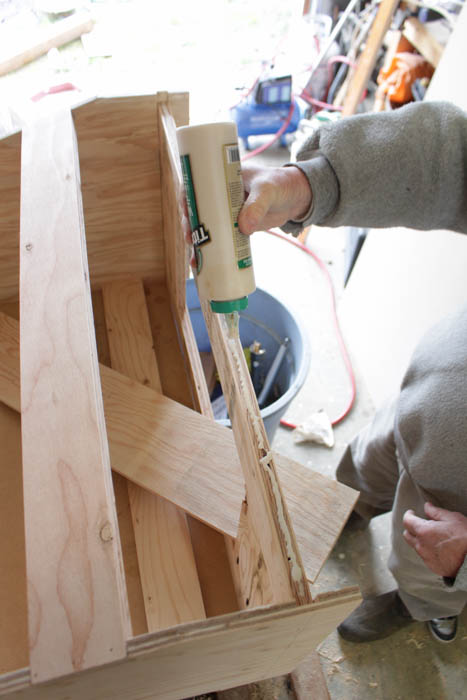 You can see here that we continued to mark with a pencil where we should nail so as to make sure that we didn’t miss the plywood we were nailing into…
 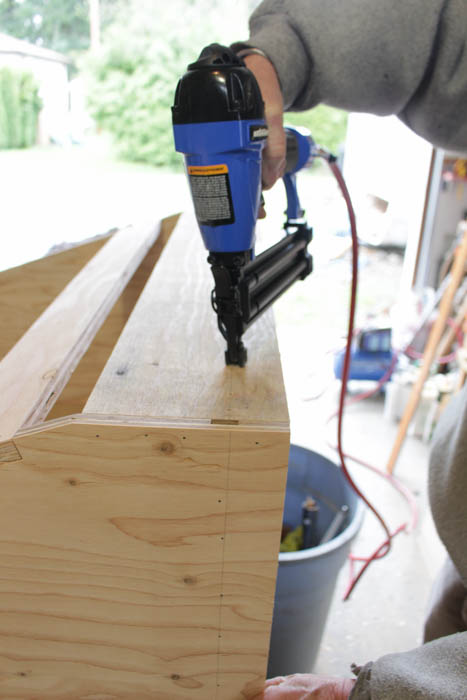 And the wooden range hood frame is complete!
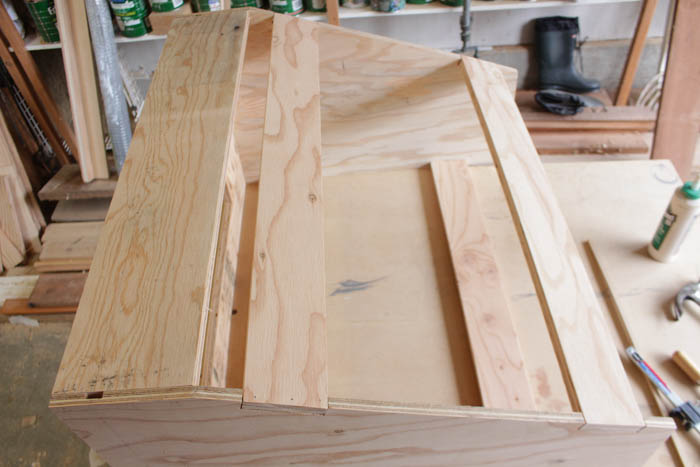
Next we cut pieces out of 1/4″ MDF to face the exterior of the frame and give it a smooth finish to paint on… We traced the sides of the hood fan cabinet onto the MDF and then cut them out on the table saw. Also we measured and cut pieces for the 6″ face and then the angled face up the front of the unit. 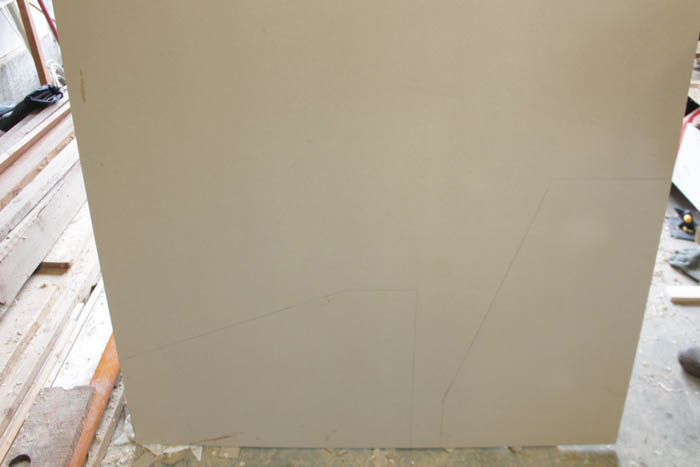 We attached the MDF to the sides and the 6″ face piece right away using the nail gun, but obviously had to wait to attach the face piece of MDF until after we had hung the frame on the wall and installed the Broan insert.
Okay… it’s built.
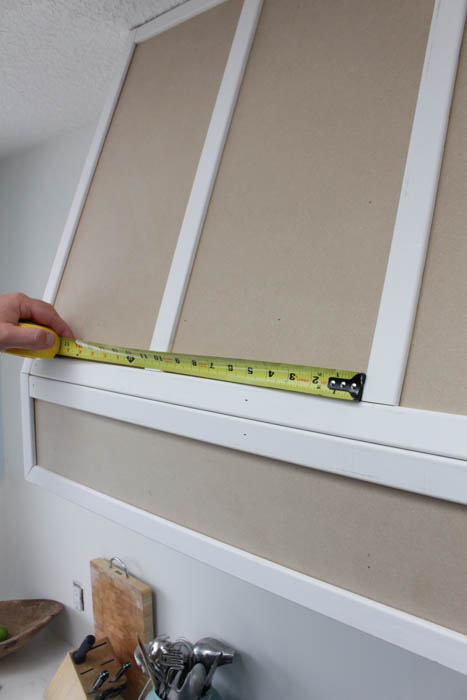
Now is time to hang this baby… 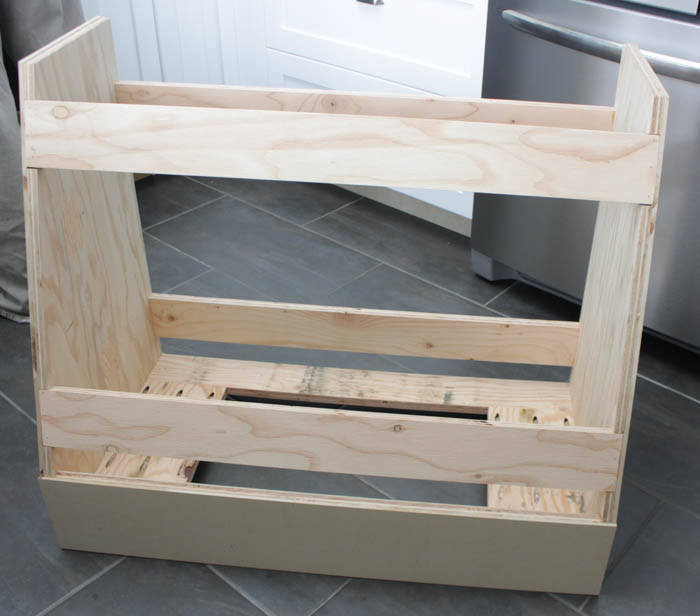 We predrilled holes through the back of the frame pieces where we planned to attach it to the wall (using very long wood screws)…
 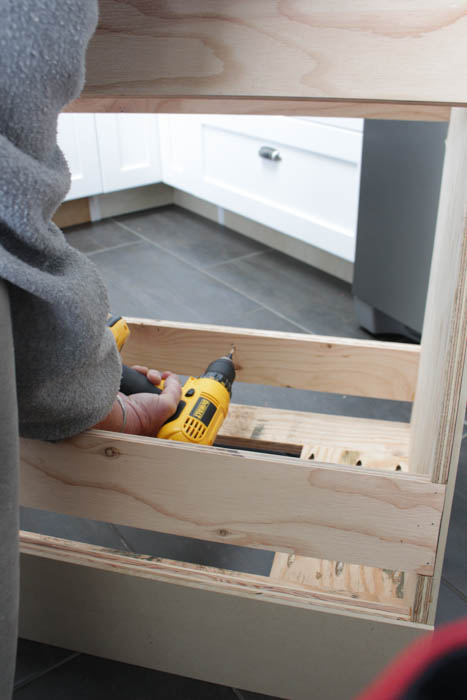 We held it up on the wall. I helped hold it as well, but snapped a quick picture first…
 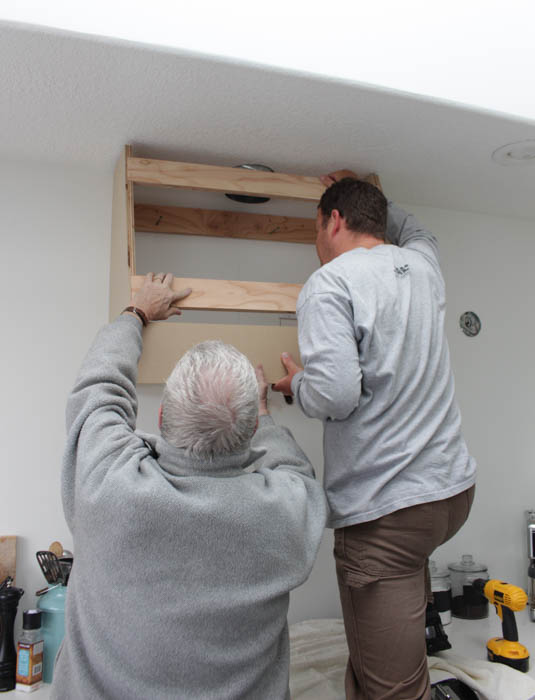 We made sure it was straight and level…
 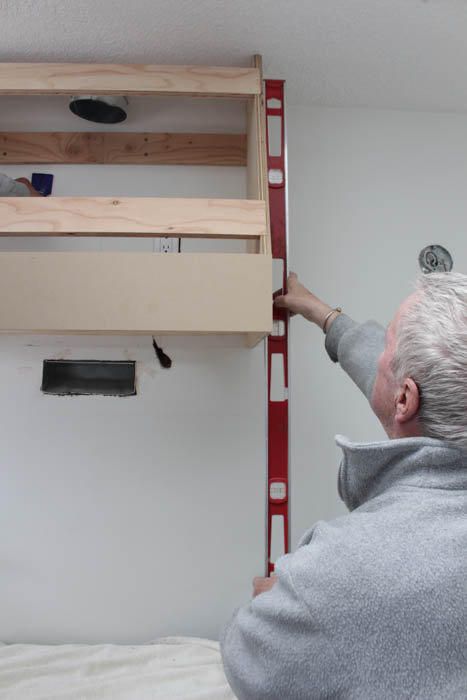 And screwed it into the studs using through the holes that we had predrilled in the back frame pieces…
Then we prepped the hood fan insert… 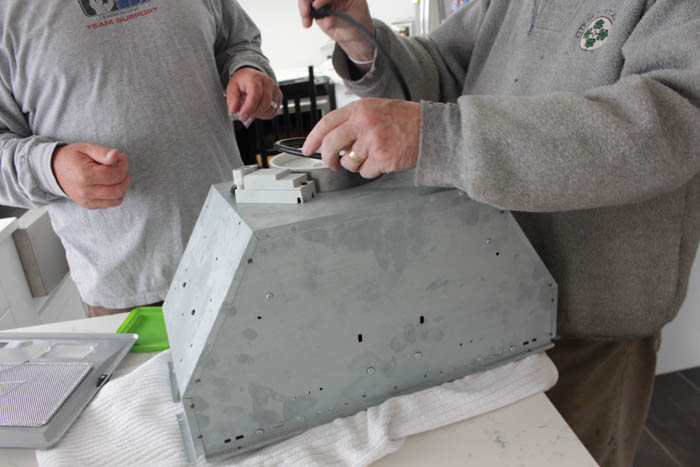 Making sure to review the manufacturers instructions, of course…
 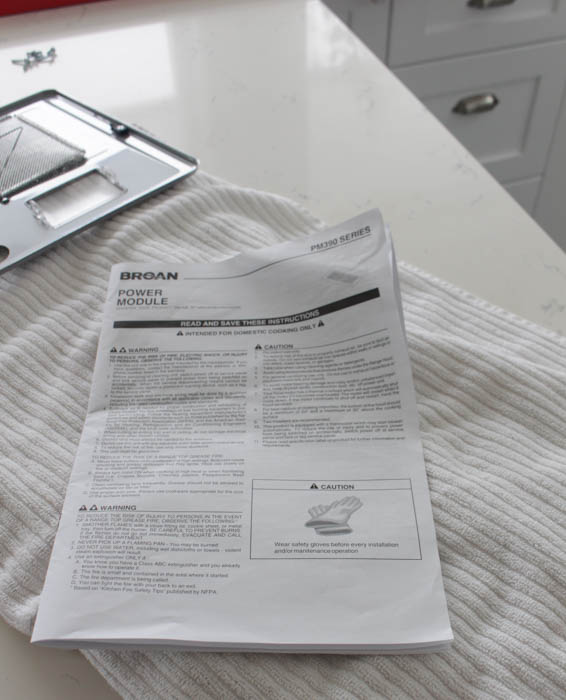 And attached it to the wooden frame we had built according to the directions…
 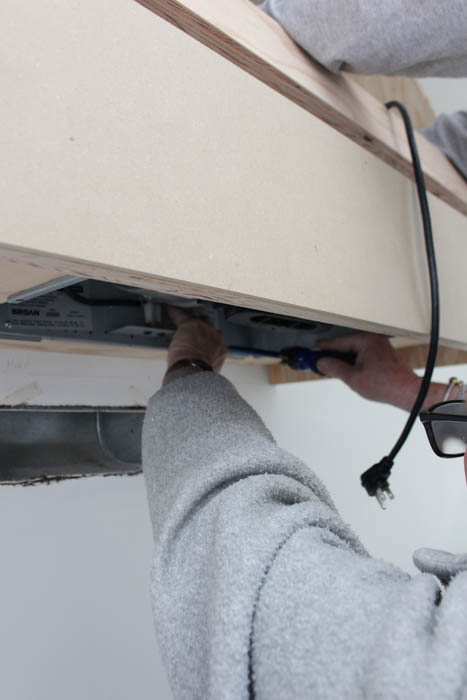 It’s all in place!
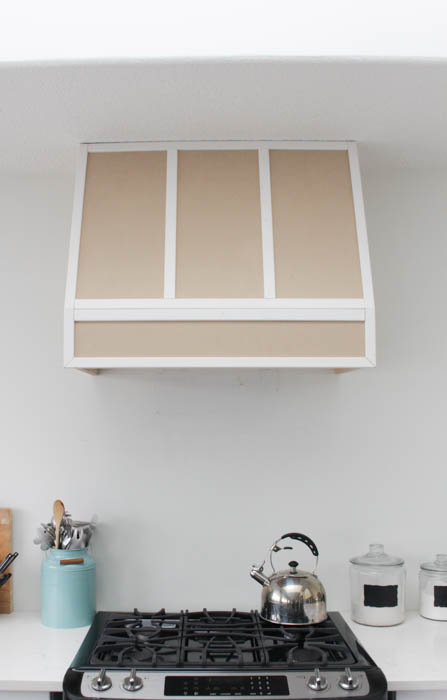
 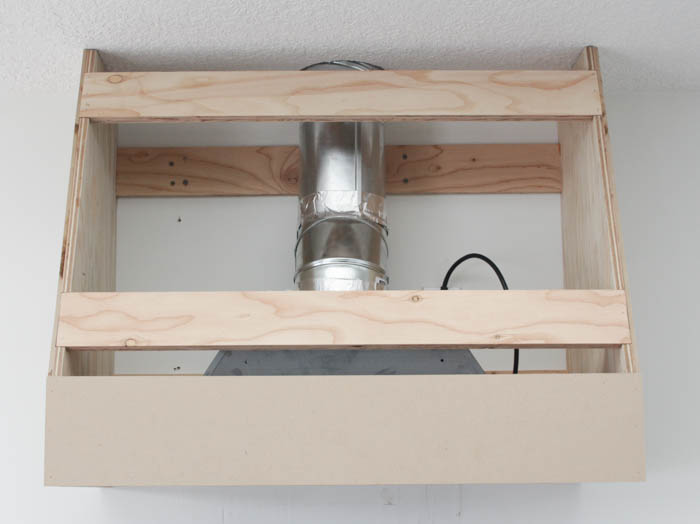 Now since we aren’t going for the slightly edgy industrial look of the metal insert showing, it was time to finish it off by covering our frame with the 1/4″ MDF pieces we had measured and cut to size… The sides and 6″ face had already been covered, so we just had to nail the larger front piece on.
 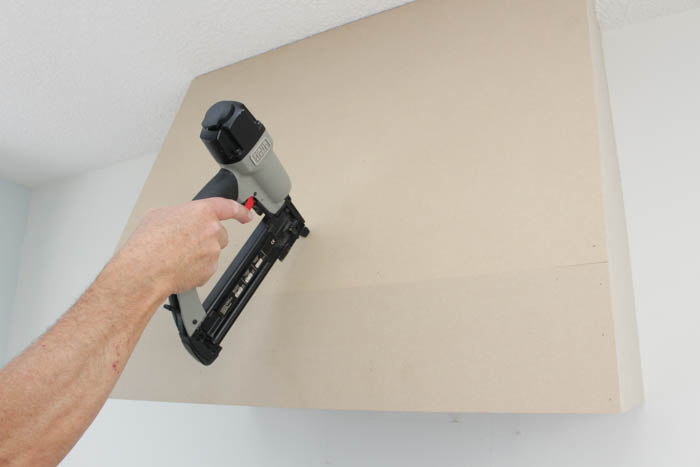 Then we framed it out with some corner moldings…
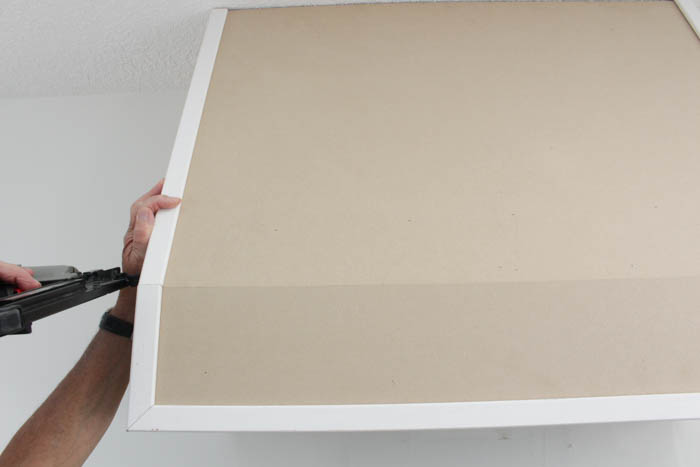
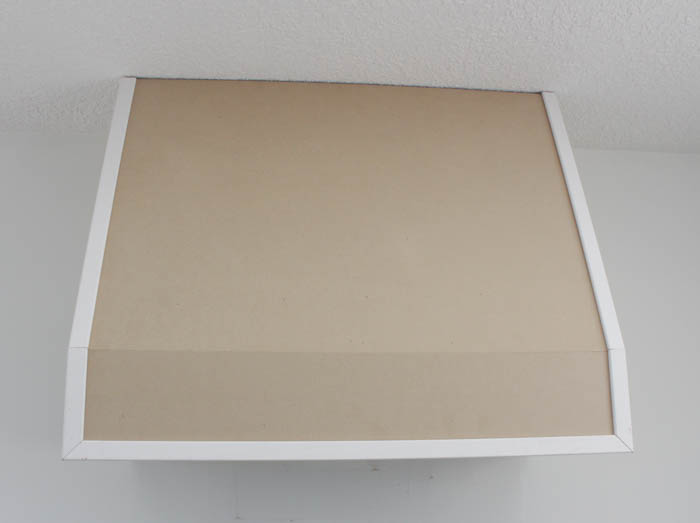
And then some moldings across the front… 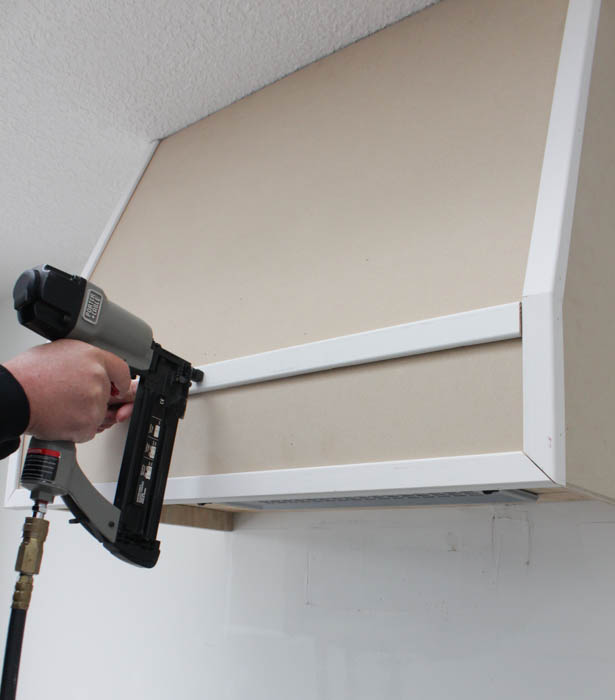
Almost done!
We just need paint! We also plan to add some more moulding along the sides (after the tiling has been completed up to the sides of the fan) as well as add some beautiful corbels underneath it. But it is pretty exciting have a functioning fan after being without one since last August!
Head over here to read about adding corbels and finishing this off
Here is how the Broan insert looks from underneath (we will be painting the plywood that buts up to it as well)… 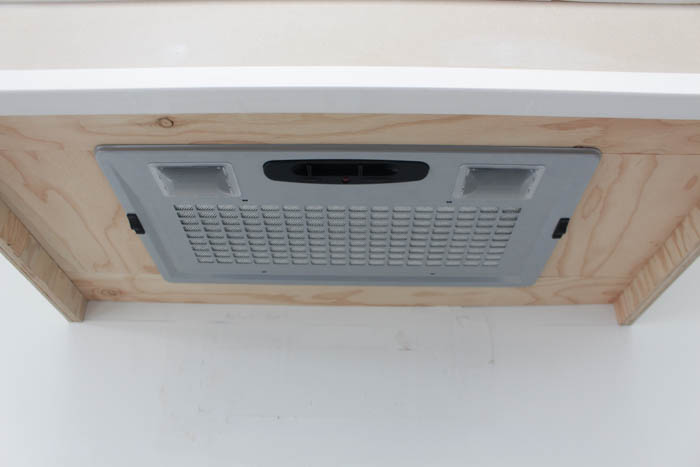 And it even has some great little lights!
  So, I must say, it is pretty exciting to have another functional piece of our kitchen done.
Next up: tile. Then finishing off the corbels/molding/paint for the hood fan. Painting the window trim. Installing the light fixtures. Paneling the ceiling (I still have my fingers crossed on that one). Planking the peninsula. Installing toekick and crown molding on the cabinets. And adding some open shelving.
Almost there?! AHHH!! Sounds like a long list… Wish me luck.
I think I need a coffee… or maybe I should switch to Matcha. This could take a while.
![]()
![]()
![]()
![]()
![]()
![]()
![]()


Great job! I love the way you mentioned the name of the part on each piece! So helpful!
It is grate idea. Home made range hood frame is fantastic and effective. thank you for sharing.
Your custom wood range hood turned out beautifully. I am hoping to update my kitchen this year and they way you did your’s gave me some great ideas on how I could do mine. Thanks so much for sharing your insights.
Hi Krista!
We are getting the same hood insert (Broan PM390)!
I have a couple of questions for you before we make the big leap (and follow your excellent tutorial!).
Do you have any issues with keeping it clean without the 30″ liner? Also, did you wire or plug yours in? On Build.com someone in the Q&A said that this was a plug-in unit. We have an outlet on the wall right where it will live already. I doubt it would be an issue either way, just want to know if we need to call up an electrician to wire it or if we are fine as-is!
We will need to modify the base plans a little as it is going between two cabinets and we have a 30″ space to play with.
Thank you for an excellent tutorial! I love how yours turned out!
Hi Jess, we are about to renovate the kitchen at our new house and I think we will build this again! It wasn’t an issue to keep it clean. And we either hard-wired it right behind the unit, or we maybe had a plug installed there to wire it to. I’m having a hard time remembering that detail right now… sorry!!
have you finished and added the corbels yet I would love to see it all completeed
Hi Ann,
Just search kitchen on my blog (in the search bar on the homepage) and you will see tons of examples of the completed hood fan. But thanks for the reminder – I need to add some completed pictures to this post!
Krista
Here is the post I wrote about adding the corbels:
Wow, this is an impressive tutorial. It never crossed my mind to create a range hood using wood but it turned out great! Looking forward to seeing your 2018 projects!
Looks GREAT!! These instructions will be a helpful tutorial as I attempt to tackle the same. Although I only have 30 inches between my cabinets so will need to adjust measurements. Is your range larger than 30″??
Thanks!
G
Love the project, we are getting ready to do the very same thing. The one thing that I am concerned about however is moisture under the hood. Have you had any issues with moisture or cleaning the wood surface under the hood surrounding the hood insert?
What happen if you nee to troubleshoot or replace the unit, ho will you have access to it?
Looks wonderful.
I was wondering what you thought about building the entire hood out of mdf? Is that advisable?
Hello Damaris! Yes, we did talk about that, but MDF is not a structurally sound as plywood and is more subject to moisture issues (by the steam etc.), so we felt that building the structure of the hood out of wood plywood was a better choice. Thanks for your visit and good luck with your project!
Looks great. If you did it again, would you have insulated inside the enclosure for noise proofing? Or is the vent quiet enough as is?
Hi Jay,
We have found the vent itself to be reasonably quiet so the noise definitely hasn’t been an problem. That being said, we didn’t consider insulating the inside enclosure, and if we were to build the same thing again I don’t think we would be concerned about it. Hope that helps:)
That looks amazing. I love the style you designed. It really looks so good.
Wow Krista, that’s quite the To Do List but the results sound like they will be fabulous. Kudos to you guys for DIYing a range hood. It looks great and I can’t wait to see what it looks like all finished.
I know Marie! The list still sounds so long!! I love the range hood- I’m priming it today and then will do the final paint once the tiles are up. I can’t wait to get the tiling and paneled ceilings finished. The hubs is still dragging his feet on the ceilings. Keeping my fingers crossed:) I can’t wait to see it finished, too!!
Looks fantastic! So glad you’re able to check another thing off your list. These renos that go on and on… Ugh!
I am so glad to check another thing off the list, too Shauna! Now as soon as our tiling guy is ready we can get that finished. The only big job left is the panelled ceilings. We really need to make a call on that one. The hubs is dragging his feet but I know it will look fantastic! I hope to be finished by the end of May:)
Oh my gosh Krista!!! It’s absolutely perfect! I’ve always dreamed of a custom wood range hood just like this! LOOOOOVE it!
Thanks Kristi- I can’t wait to get it painted!!