
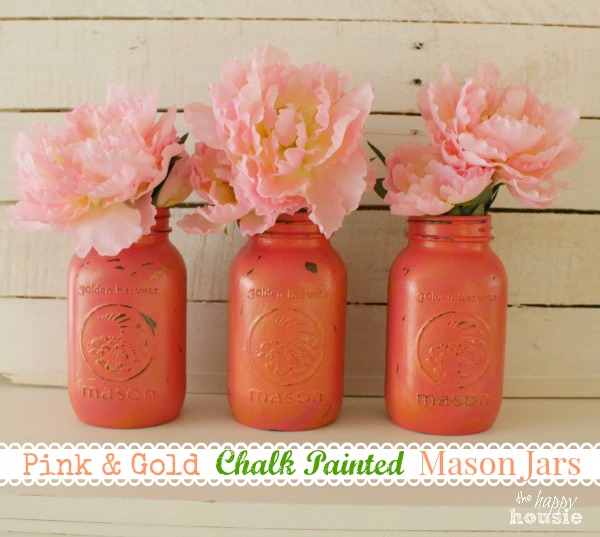
Pink & Gold Chalk Painted Mason Jars {and a May Flowers Blog Hop}
At the first signs of spring I start to think about all the DIY projects I want to do! These pink & gold chalk painted mason jars are the perfect spring inspiration pieces.
Does that ever happen to you? You have an idea in your head of how your project is going to turn out and then you get to some crucial stage and all of a sudden that baby takes a major sudden nose-dive….
Your palms start sweating so much that you can hardly hold the paintbrush? Okay, maybe that part is a little over-dramatic… but it seriously sucks when you think your beautiful vision-of-a-project is about to fail.
Thankfully I managed to rescue this one.
After a big to-do, these pink and gold chalk painted Mason Jars are what I have to show for my attempt. Detes on the alm0st-fail coming up.
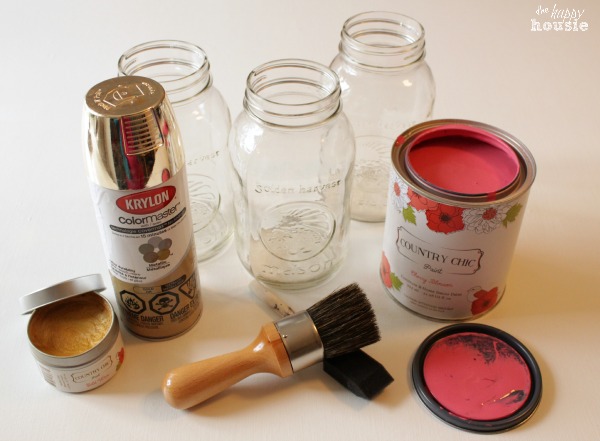
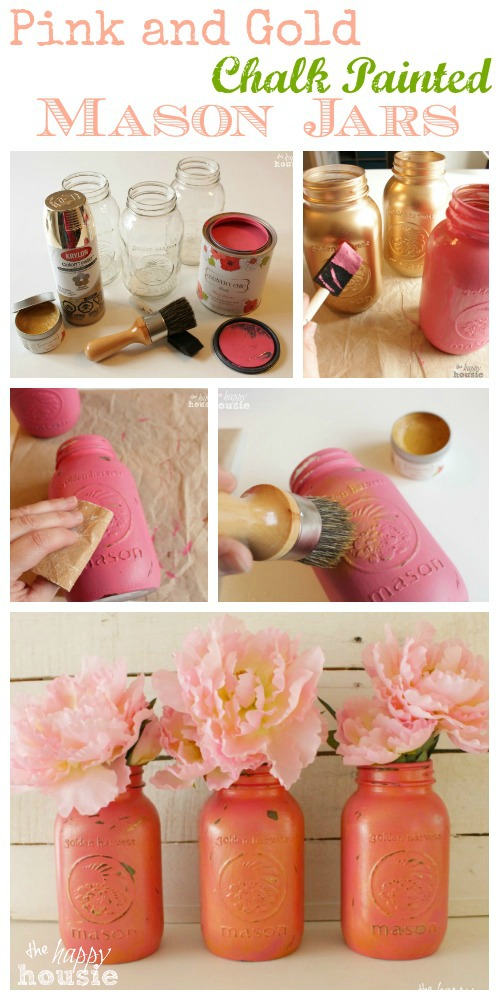
To make these I used:
Mason jars, gold spray paint, Country Chic Chalk Paint in Cherry Blossom, Sandpaper, Gold Wax
My vision was that I would spray paint the jars, then chalk paint them in pink, and lightly distress so that the gold spray paint was showing through. That would have been beautiful, right??
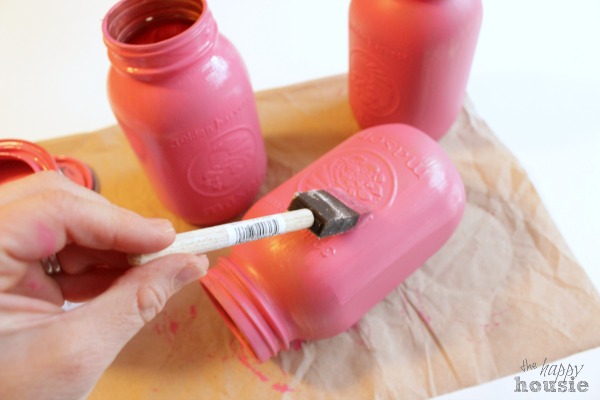
So, I started by giving my Mason Jars a few coats of spray paint on the outside of them.
(In retrospect I could have painted the insides, I wonder if the gold would have shined through the glass nicely. What do you think??)
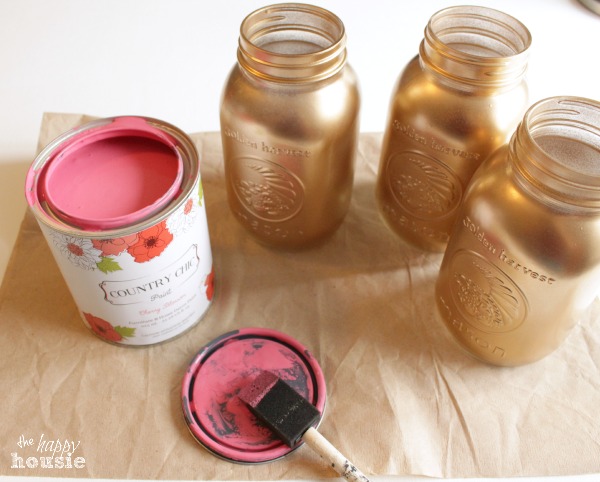
Once the gold spray paint was dry I gave them a couple of coats of the Cherry Blossom Chalk Paint.
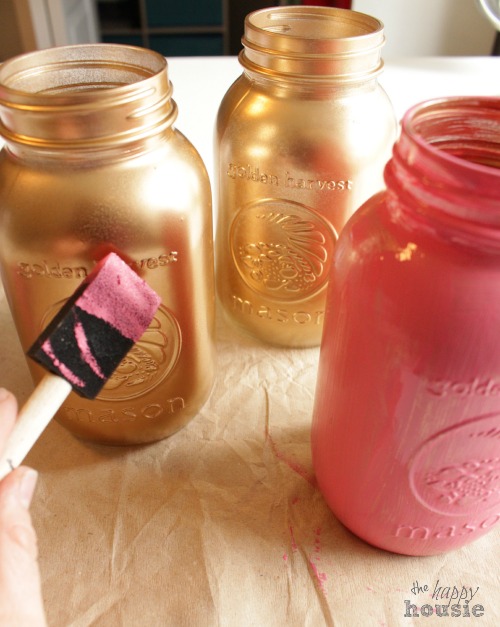
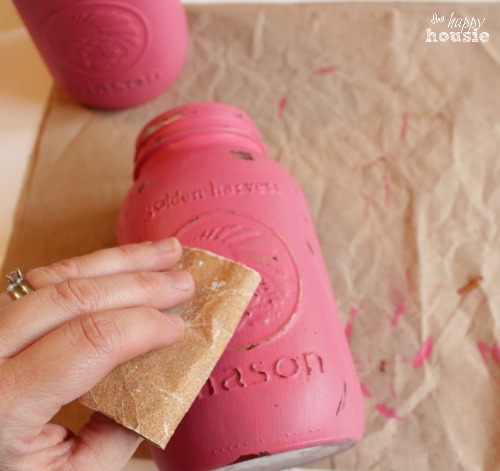
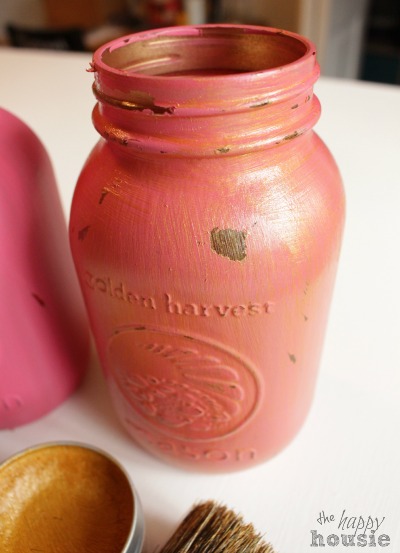
I let the jars dry overnight and then TRIED to lightly distress them with some sandpaper.
This is where the almost fail comes in.
The cherry paint was NOT the only paint that came off. In my vision-of-a-project, the Cherry Blossom Paint distressed nicely revealing the beautiful gold underneath.
In my reality-of-a-project, the gold came off (mostly) with the ‘distressing’ as well.
In some spots I was able to distress and keep the gold intact… ah well. They can’t all go as expected I guess.
I wanted to add a little bit of extra golden sheen so I used some of the Country Chic Gold Wax.
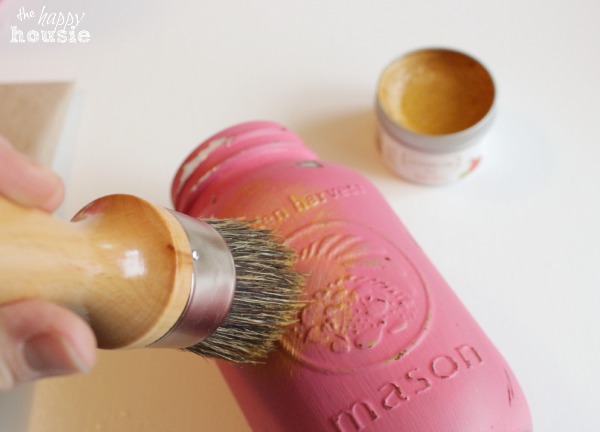
Can you see the difference between the pre-wax and post-wax jars?
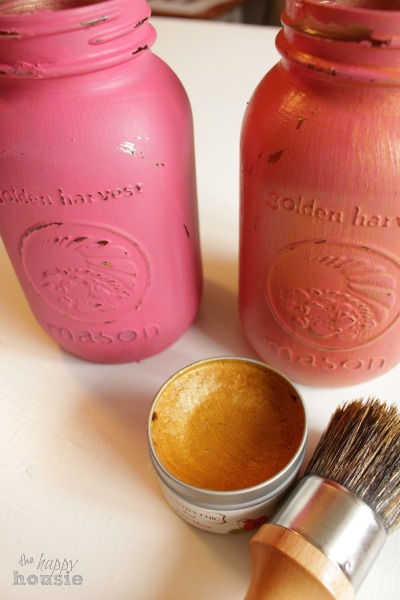
I love how the gold wax gave the jars a coral sheen.
I decided the leave the wax on for a few days to dry out so I could keep as much of it on the jars as possible- it has such a pretty look. After a few days I gently buffed off the excess with a dry cloth.
Done!
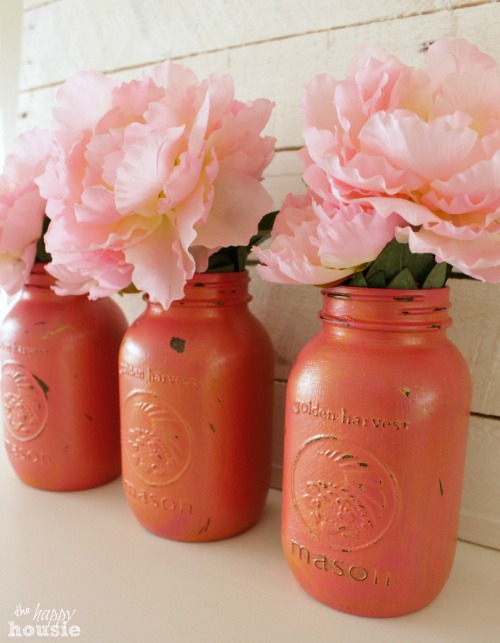
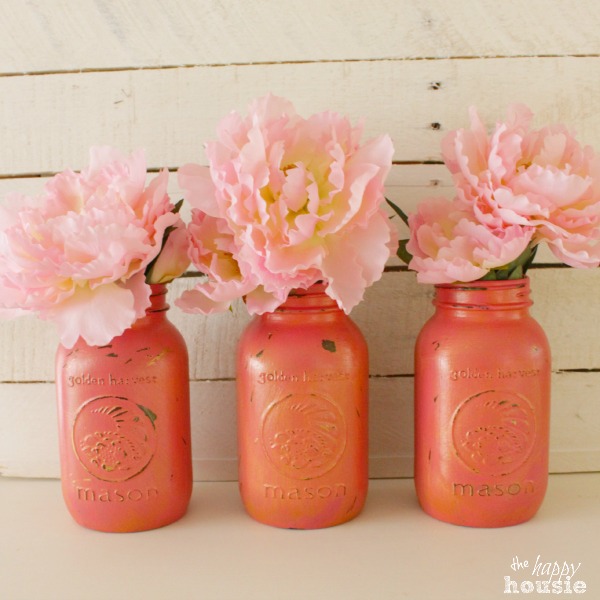
So what does one do with three coral/pink/gold chalk painted mason jars? Use them for spring flowers of course!
And on Friday I will be back to share how I used these on our latest Mantelscape. I am loving the pastel and gold together!
Like this?
Pin it to remember it!
This month I have teamed up with 11 other fabulous crafty blogger gals to share some amazing May Flowers themed projects… each of the images below are a direct link to the project! I can’t wait to visit them all myself!!
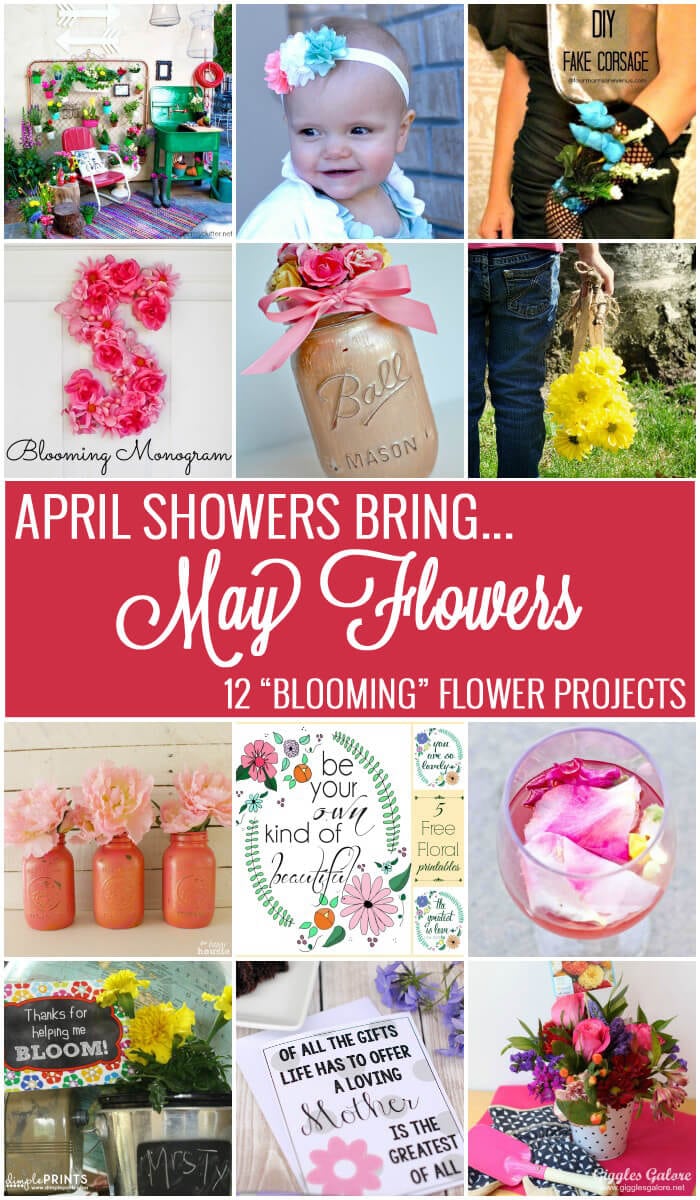
That’s What Che Said… | The Cards We Drew | Cherished Bliss
The Happy Housie | 52 Mantels | Sweet C’s Designs
Dimple Prints | Crazy Little Projects | Giggles Galore


Disclosure: I am a member of the Country Chic Blog Squad for 2014. I receive free products in exchange for sharing tutorials for using them. All opinions are 100% mine of course!


I may link up at some of these fabulous places below, for more info check out housie parties:
Make the Scene Monday , Monday Funday , Give Me the Goods Monday , Inspiration Monday, Craft-o-Maniac Monday, Nifty Thrifty Tuesday, Tip Junkie, Project Inspire{d} , Inspire Me Tuesday, The Scoop, Hit Me With Your Best Shot, Wow Me Wednesday Whimsy Wednesday , Fall Into Fall , From Dream to Reality, The Inspiration Exchange, Live Laugh Rowe Live Laugh Linky, Thursdays Are Your Days, The Weekly Creative , The Creative Connection, Inspire Me Please, Catch as Catch Can, Fabulously Creative Friday, Party Junk, Pinworthy Projects , Link Party Palooza,, Weekend Bloggy Reading, Strut Your Stuff Saturday, Spotlight Saturday, Get Schooled Saturday, Overflowing With Creativity , , Suburbs Mama , That DIY Party
Gorgeous!! So unique
Great post, I’m going to give it a try. Thanks
http://sotrendyish.com/
These turned out great! The colours you chose are so lovely. And I totally get that uh-oh moment when you think the project is not going to come together!
These jars are adorable!!! I have never used that brand of chalk paint but I love that color! Of course the coral is gorgeous with the gold, nice job girl! XO
Beautiful! Thanks for sharing at Inspiration Monday!
Gorgeous!! The wax really makes your idea come together. 🙂
Thanks you so much for linking to Whimsy Wednesday! I just love, love the color of your jars and featured them in this weeks roundup! You can see the post here…
http://www.ohmy-creative.com/diy-collections/teacher-appreciation-gifts-printables/
Hope to see you again this week!
Susan
These are beautiful!! I love the color of paint your used. Thank you for sharing it with us! I pinned it to the party board. I also added your Wednesday blog party to my growing list of parties. Have a great weekend! 🙂
Thank you so much Marti! I would be thrilled to have you hop by and share your projects at Work it Wednesday as well:)
I think those are gorgeous! Love pink so much.
Thank you! I am swooning over pink these days too…adding it to our house in a few places!! Thanks so much for the visit!
I think these turned out beautifully, Krista! That gold wax is super cool!
Thanks Alexis- I love the pretty sheen it adds. I wondered if you might be able to get the same effect by watering down gold craft paint… hmmm. I will have to try that! Thanks for coming by!
Nice save, Krista!! I love the gold sheen too!! So pretty and perfect for Spring! I may have to give this one a try soon!
Thanks Selene!! I love the pastels for spring:) And the gold sheen does add to it – more grown up feeling? Thanks for coming by!!
Sooo pretty! Thanks for sharing on the Monday Funday link party!
Thank you!! So thrilled you came by:)
These are so pretty – thanks for sharing how to make them. If I get in a painting mood this summer I might try it.
Thank you – and thanks for popping by!!
Hi Krista,
I love your final product! Those colours are so unique and your choice of flowers for them are perfect.
I have had near-fails (and major fails) happen in the kitchen more times than I care to admit. You envision how it’s going to go and then suddenly it’s not coming together the way your mind had projected it. It’s nice when you can make it work anyway and often it’s even better – like these! Gorgeous!
Thank you Robyn!! It is great when you can ‘turn around’ those fails- and I always learn something in the process!!
I love the unique color you were able to get with these! So lovely. Thanks for sharing on our Link It or Lump It party!
Thanks Amy – adding the gold wax did really change the color. They went from hot pink to almost a coral colour…luckily I like the ‘after’ color better:)
Hi Krista, Beautiful rescue!;)
Just wondering if you have also used Annie Sloan Chalk Paint and how you find the comparison. Country Chic appears to offer a wider range of colors! And…. Duncan is close to Victoria so I could make the trip 🙂 I notice the price is comparable.
Thanks! Carol
Hi Carol! I can’t, unfortunately, give you a good answer because I haven’t tried Annie Sloan yet – but I like Country Chic. The colors are beautiful, and I think they have some new limited edition ones coming out soon. They do ship their products as well, and may even have a retailer in Victoria! I think the pricing is very similar:) Wish I could be of more help!!
I love the chippy look! That wax left such a beautiful sheen and color, I’ve never heard of it before. Where do you buy it?
Thanks Cassie! I got my wax through Country Chic Paint – it seems to take a while to dry so I left it on a few days before I buffed it off a little. But it looks fantastic:)
Love the colors you chose! Very pretty…Pinned:-)
Thank you Aniko- and thanks for the pin!!
What a great idea using the gold wax! Oh, and I too was giving myself the head clunk with the “why didn’t I just paint the inside” thought. Yes, that would make sense! Ha!
Looks awesome!
🙂 Linda
Thanks so much Linda! These brainwaves often come after the fact… right? Great timing. I was thrilled with the gold wax because it helped me rescue them…
Krista, these are STUNNING! I want to crawl into the photo and touch them. Can’t wait to make my own! Love the colors!
Thanks so much Tasha!!
I love to see people be honest about when a DIY doesn’t go as planned! Makes me feel so much better! These are gorgeous!
Hi Amanda! They certainly don’t all work out quite as planned, do they?! Oh well, glad they were not a total write off. Thanks for your kind comments!!
Pinned! Love them.
Thank you Julia! And thanks for the pin:)
I love them! Next time try using a bit of Vaseline on the parts you want to show through, paint with chalk paint and buff off the Vaseline. Should let the gold show thru! Also you can sometimes distress chalk paint with a wet rag!
Awesome tips Amber!! I totally know that Vaseline trick and have even used it before – I should have done that, but in my head the gold was really going to adhere well. Also, since I did two coats I thought I had missed the window for using a wet rag… does it work if you do a solid two coats and then use the wet rag only after the second coat??
oh yes, I can definitely relate!! However, sometimes you end up with something even better and I just love love love your result!! Thanks for sharing the “don’t do this” tips!
Jenna
Thanks Jenna!! Sometimes it can be more informative to read the don’ts – just keepin’ it real!! Have a great weekend!!
Adorable!!! I love the gold hiding beneath! Pinned! 🙂
Thanks Mallory!! I wish it had worked out a little better – the vision in my head had a lot more gold showing… next time I will try the Vaseline trick! Thanks for coming by:)
Love the colors!
Thanks Carli!!
Krista, these came out SO pretty! I’m not the best DIY-er, so it’s encouraging to hear that even pros like yourself can run into bumps along the way and still end up with a winner of a project. Thanks for sharing!
Haha, ‘pros’ like me run into bumps all the time… it is funny to hear me called a pro. I just jump in with both feet and try it and if it doesn’t work…. well, maybe next time?? Thanks so much for your kind comments and coming by Michelle!