
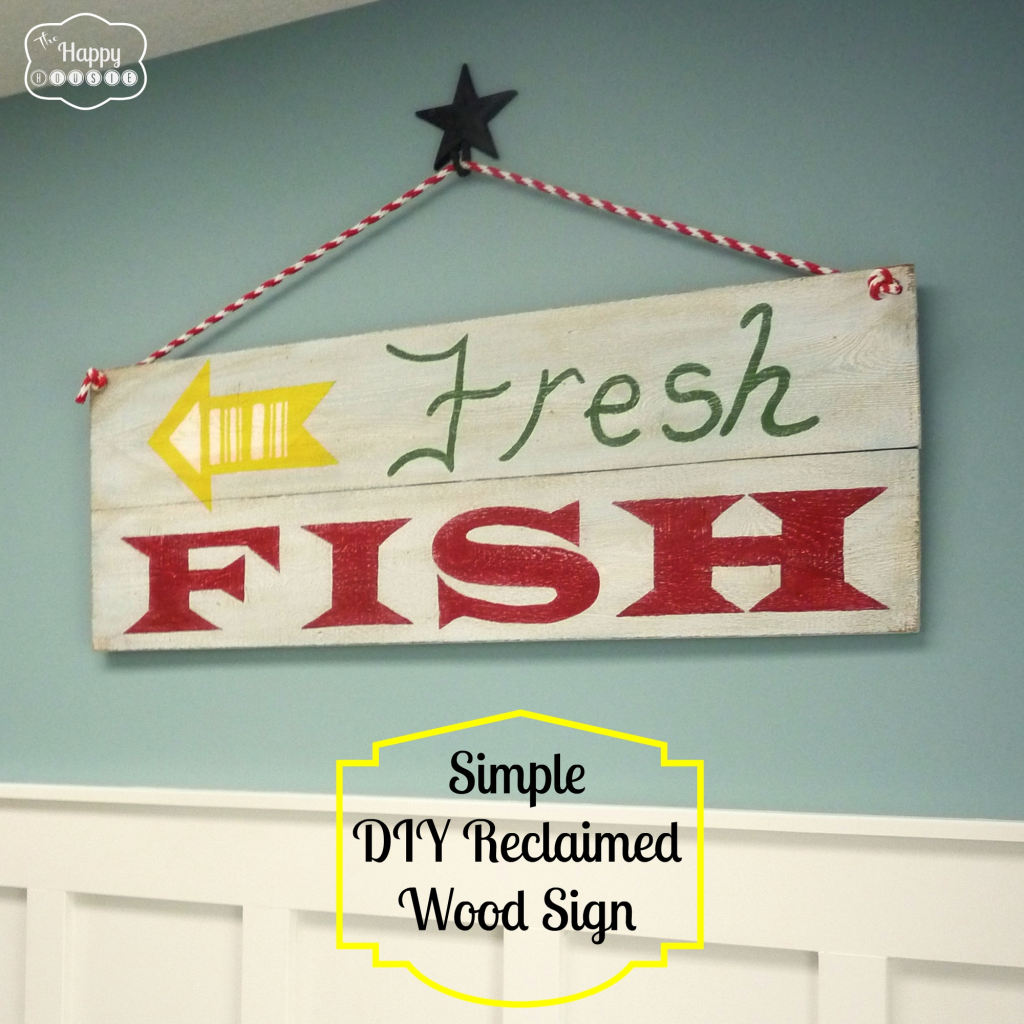
Simple DIY Reclaimed Wood Sign for the Entry Hall
Try making this very cute DIY reclaimed wood sign!
Signs. Kind of having a thing with them lately. Three new ones in the last couple of weeks… this is the second one to show you. Think that three might be enough? Maybe? Perhaps…
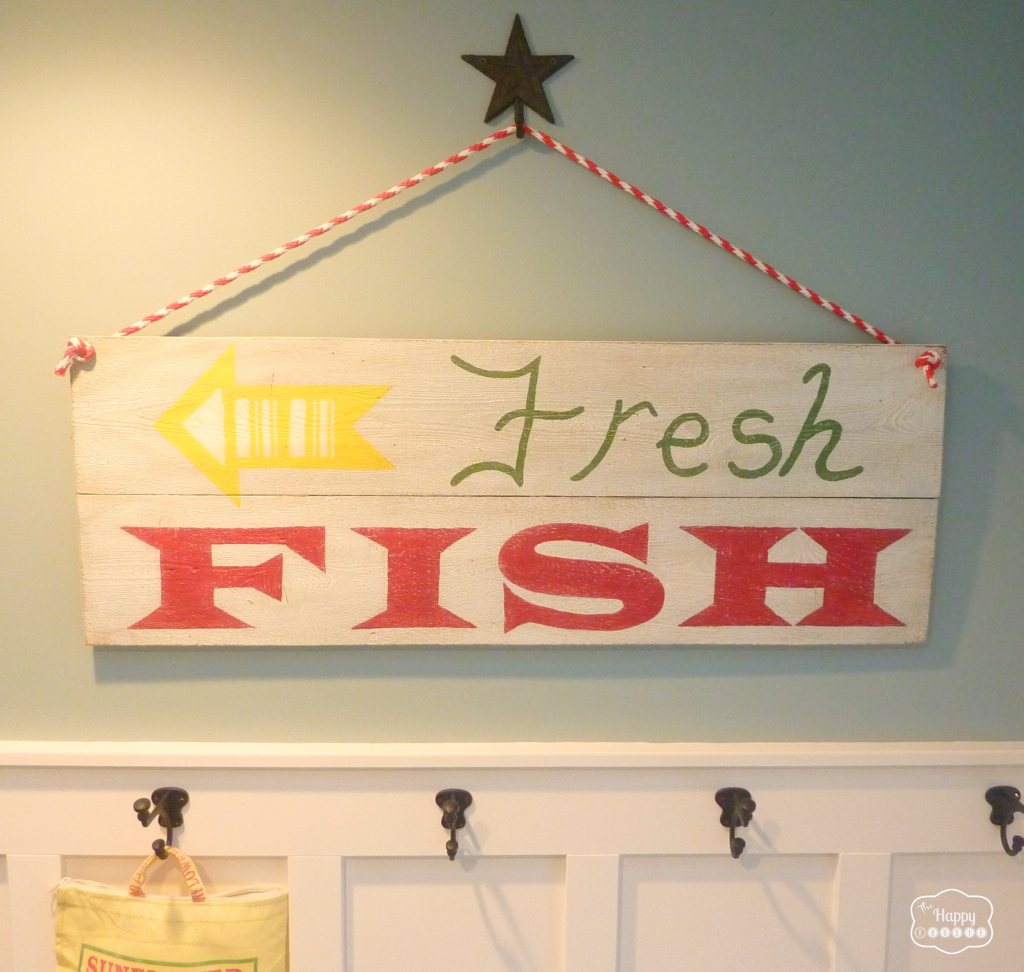
To make this little guy for our entry hall I started out with some reclaimed wood. You can also do this DIY project with ‘new’ wood if you don’t have any reclaimed. The good thing about reclaimed is when you can get it for free – this particular piece floated in to our beach and had probably been part of someone’s dock at some point.
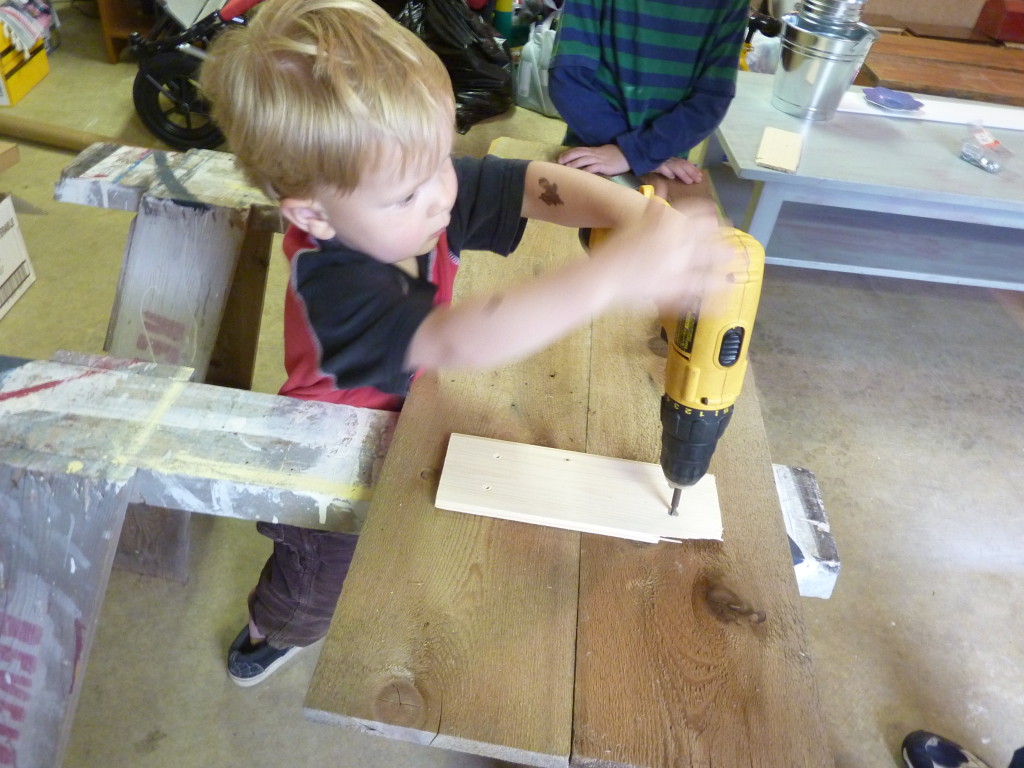
We cut one long board in half and then joined it together using the same technique as I described in my DIY Pallet Sign tutorial. My little helpers did this job for me. Thanks boys:)
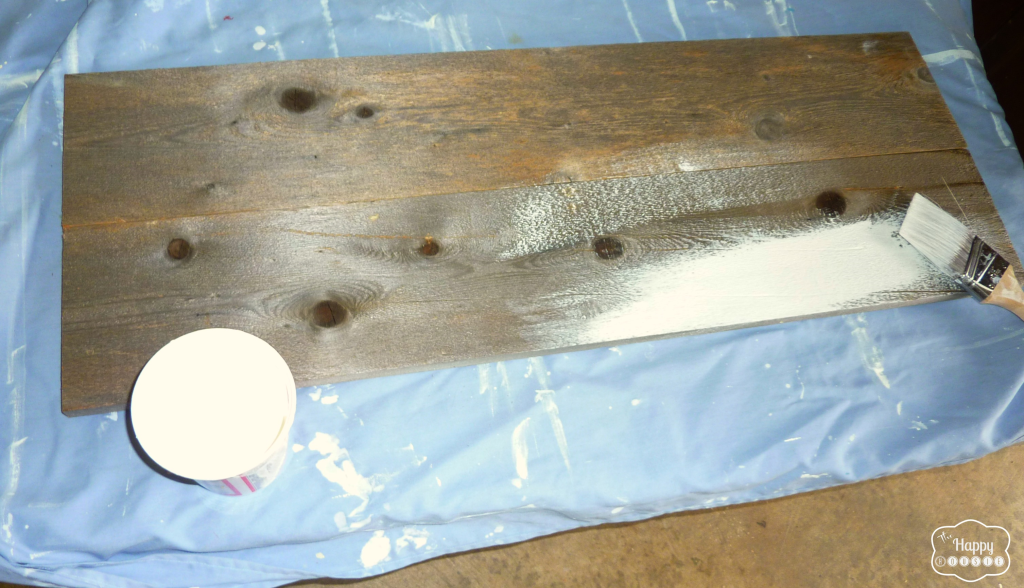
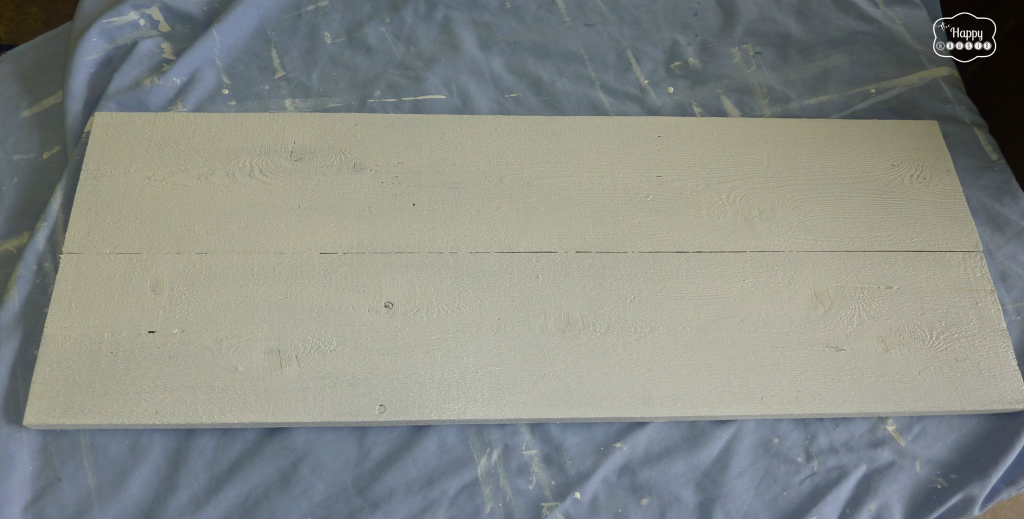
Once the two pieces of wood were joined I gave it a quick couple of coats of paint and then I used some white DIY chalk paint following the same recipe that I used for our little side table and our media console. I chose chalk paint because I knew that I wanted to sand and distress this sign to create an aged look.
Next came the stencil part. I used the same technique that I described in my pallet sign tutorial that I learned from both Nancy at Artsy Chicks Rule and Deb at Lake Girl Paints. They are both awesomely creative ladies and I learn so much for following their fabulous blogs.
Print out the lettering you want, flip it over, and pencil the back where the lines are – I held mine up to a window so I could see it more clearly.
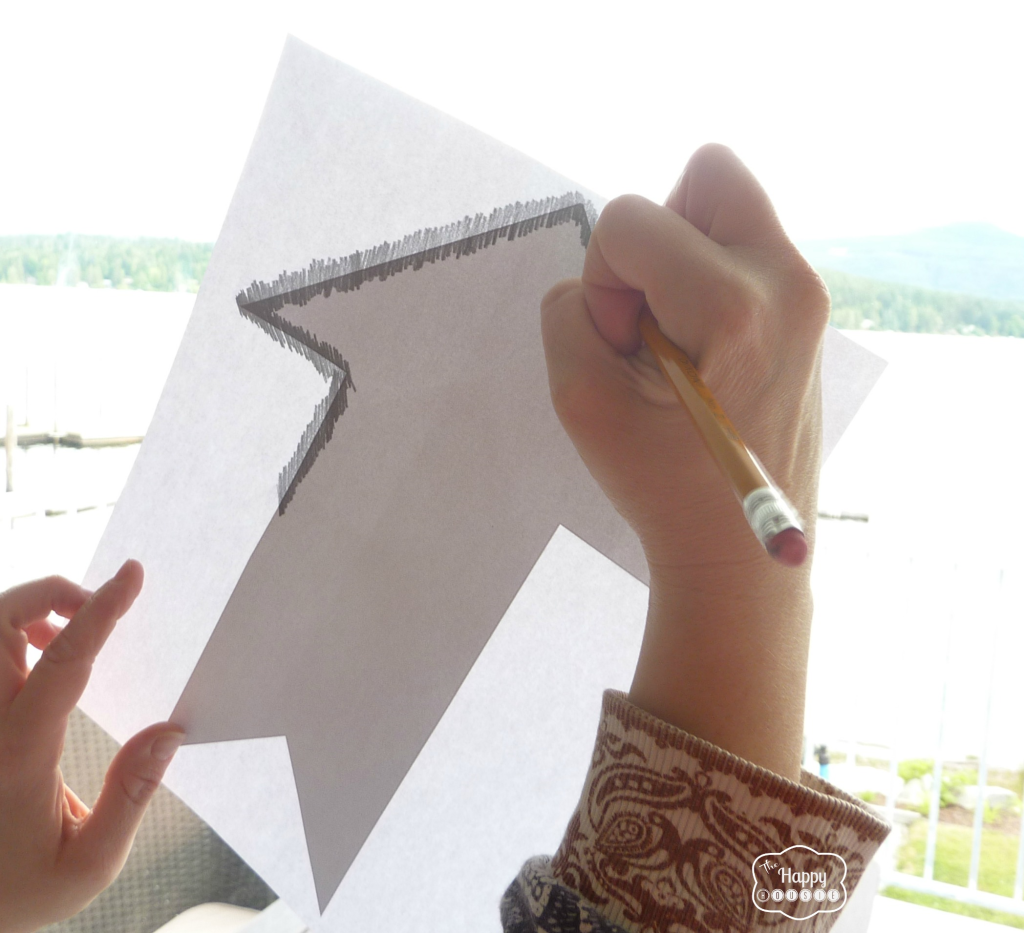
I probably went a little thick and heavy with my penciling but I wanted to make sure it would transfer…
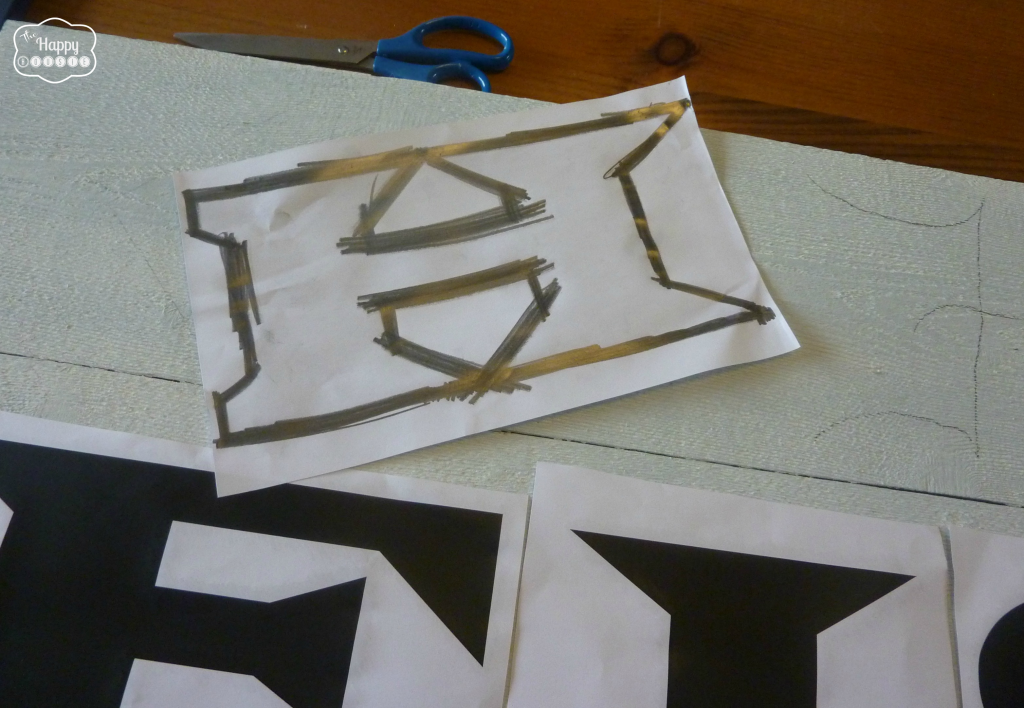
Lay out the letters and check your spacing…
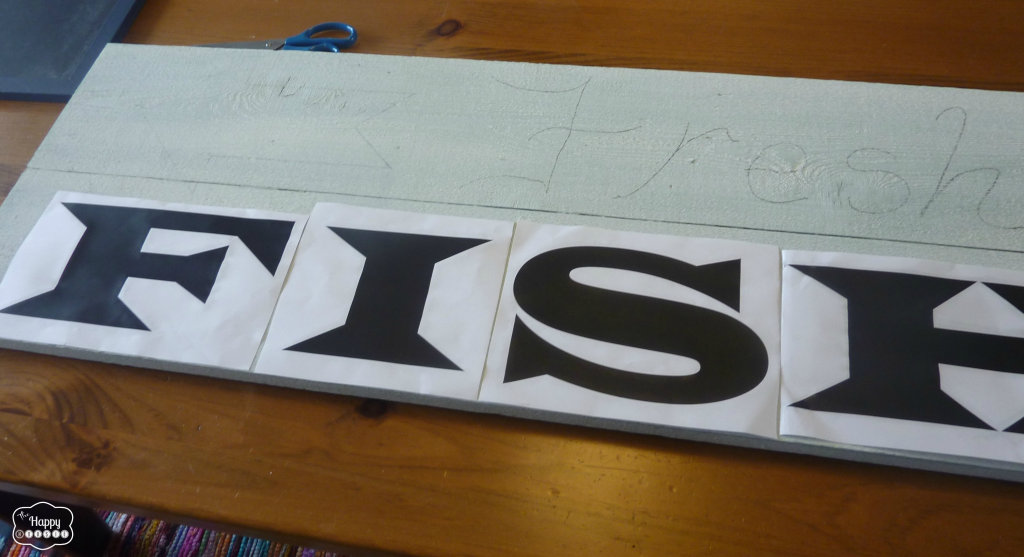
Then trace over them with your pencil to cause the pencil on the back to transfer onto your sign – it is basically DIY transfer paper. I free handed the “Fresh”…
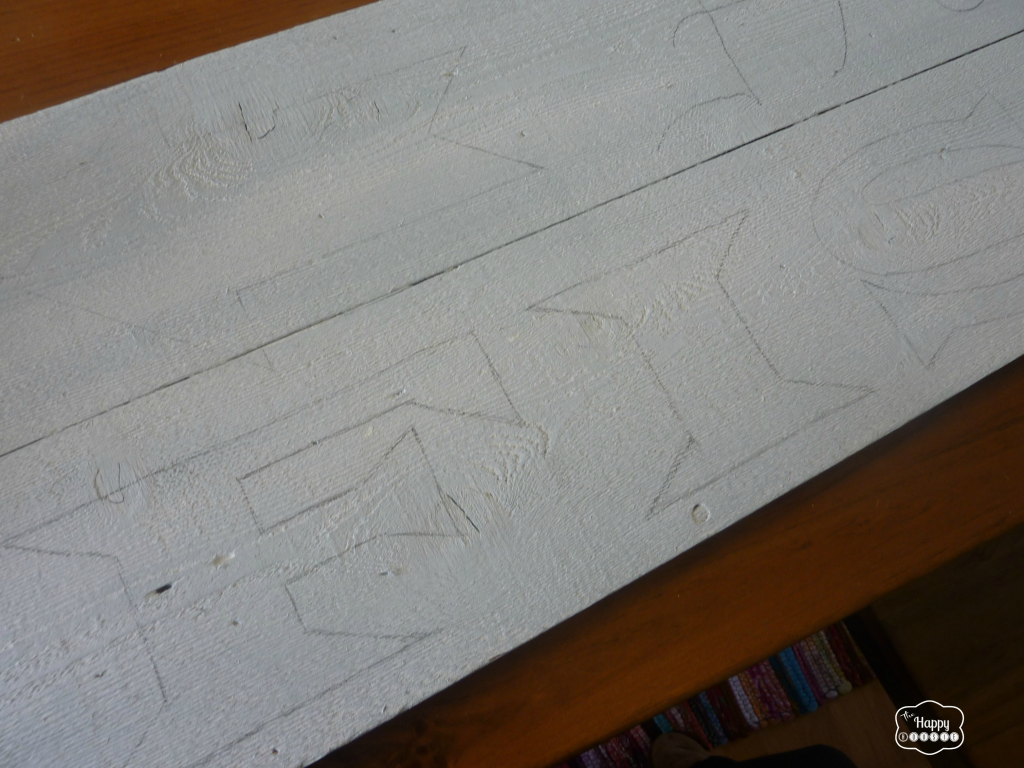
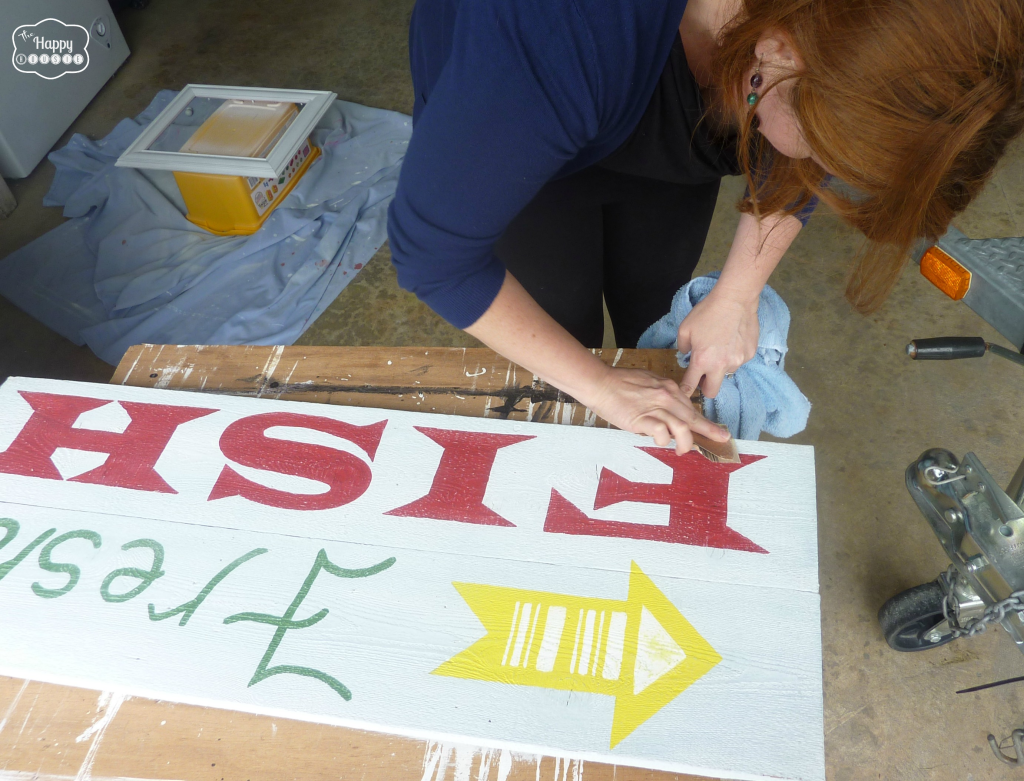
Now fill it in with regular craft paint and a fine brush for around the edges… I used a thicker brush to fill in the middle of the letters. I didn’t take a picture of this step but I am sure you get the idea. Once it is painted in you have a crisp bright freshly painted sign.
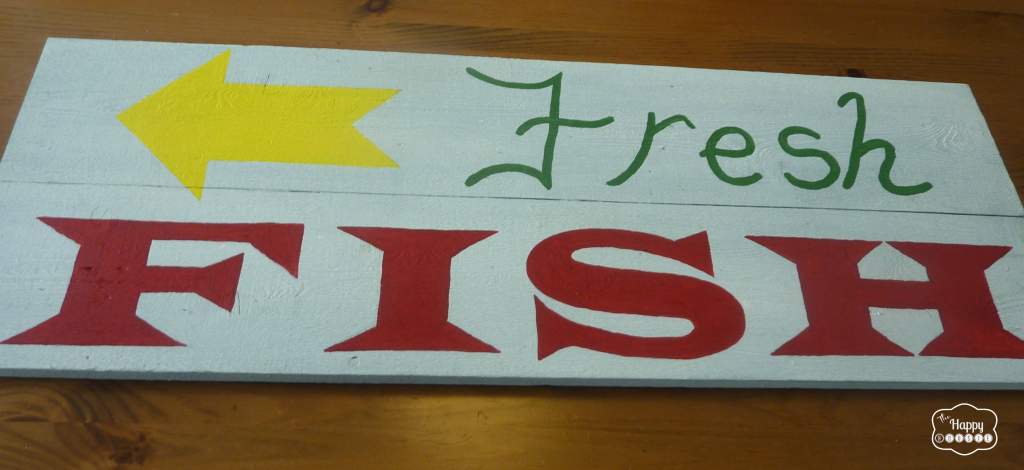
Cute but not what I wanted. Much too crisp and fresh and bright… but you definitely could stop here for some styles of signs. I wanted this one to look aged, like we had picked it up at a vintage shop and it used to hang in a fish market somewhere…
So out came the sand paper – I used 100 grit.

Next I used a tiny bit of stain (sparingly… dipped my cloth in the stain and then rubbed most of the stain off on an old towel… so that it would just get a little hint of age with the staining.
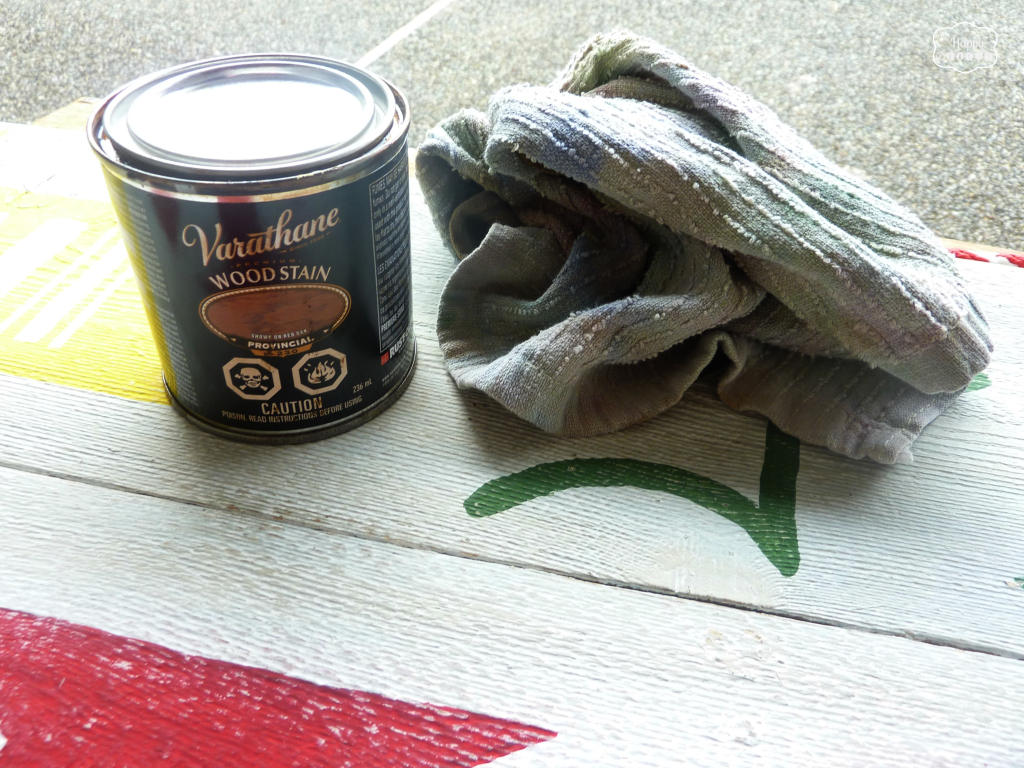
Then I actually sanded it a little more…
I must admit that my wrist was a little sore after this DIY project… between all the pencil tracing, painting, sanding – I broke it a few years ago and sometimes it acts up a little.
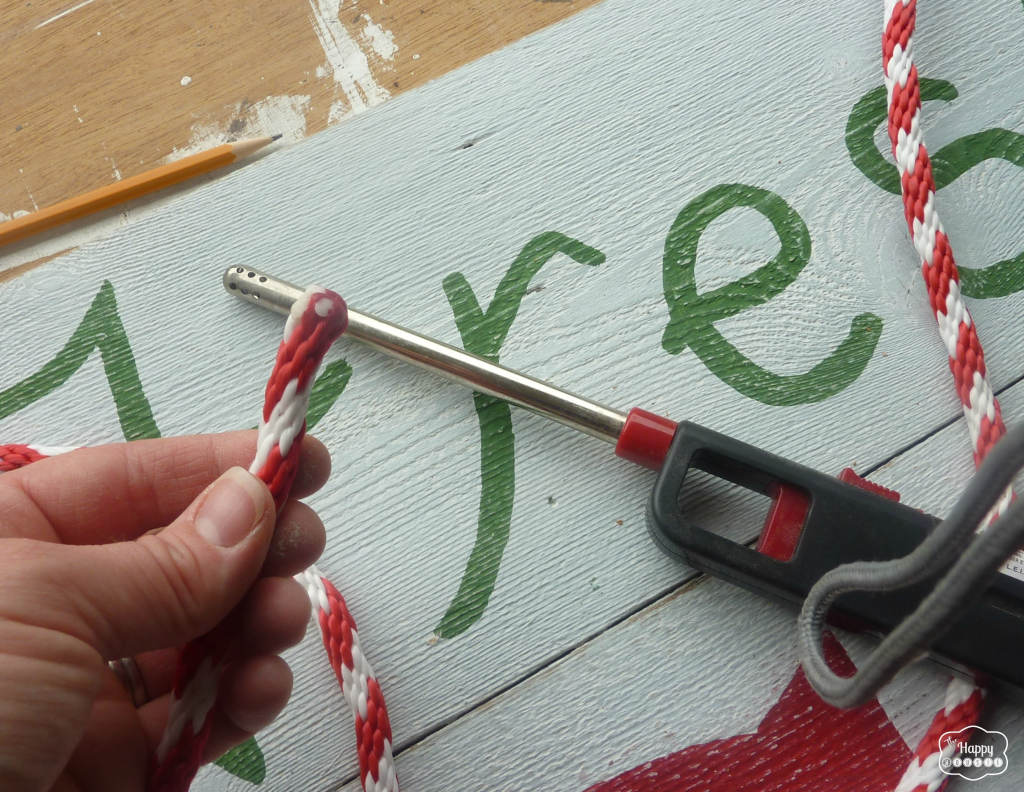
I decided to hang this sign with some nautical rope that we picked up at the local industrial marine supply store (we live in a pretty big fishing area)…. so my big helper drilled some holes in each corner for me.
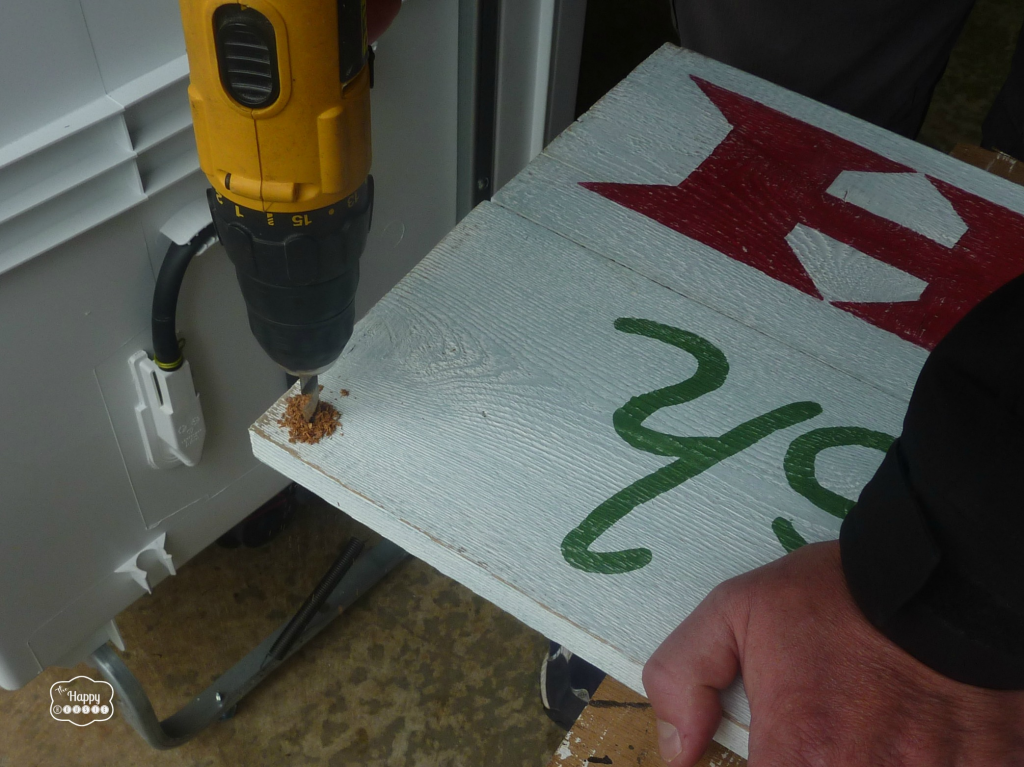
Then we fed the rope through each hole and tied it off at the appropriate length…
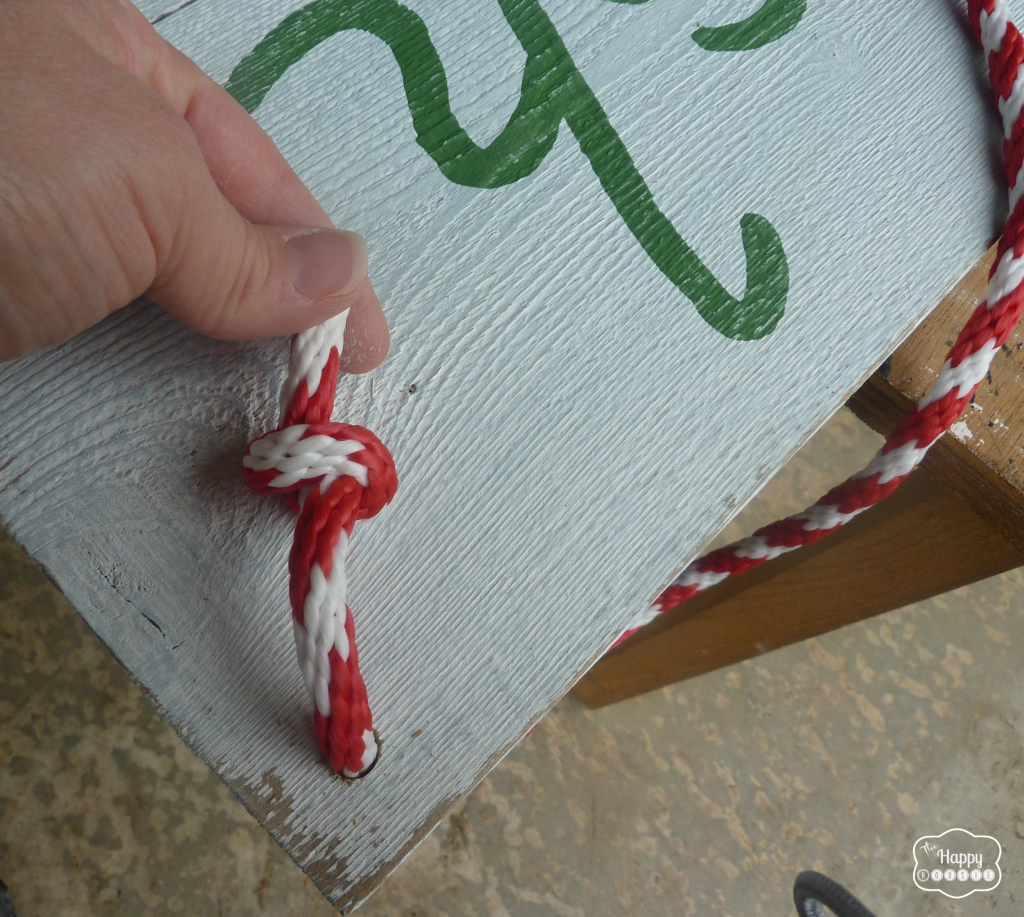
We heated the ends up with our bbq lighter in order to melt them together so the rope won’t fray out on us…
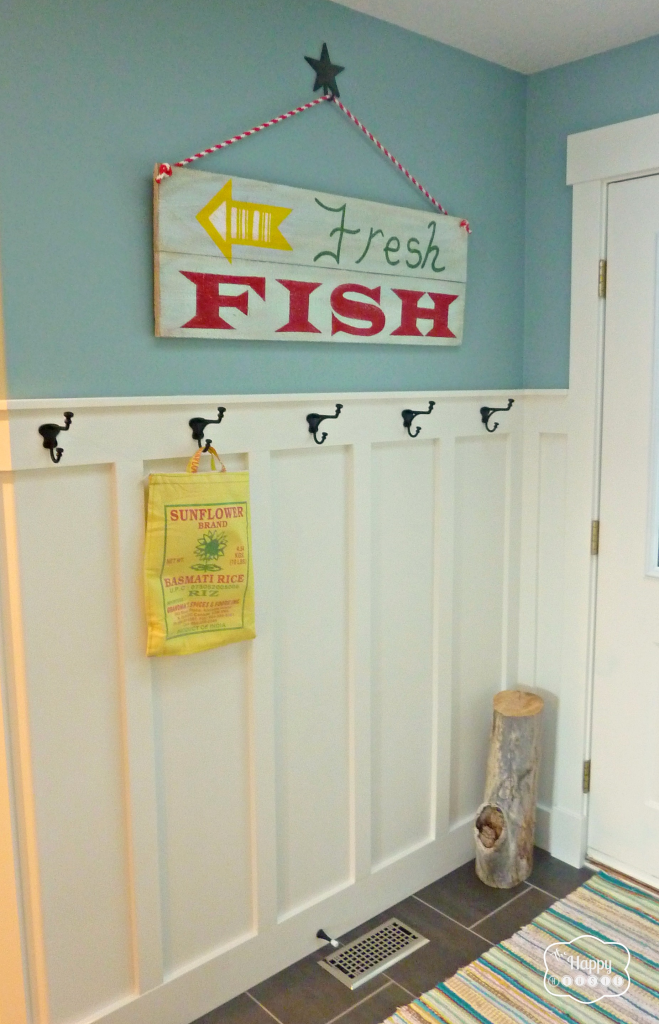
Ready to hang in our entry hall… I chose a cute star shaped hook that I picked up a few years ago as the hanger for it.
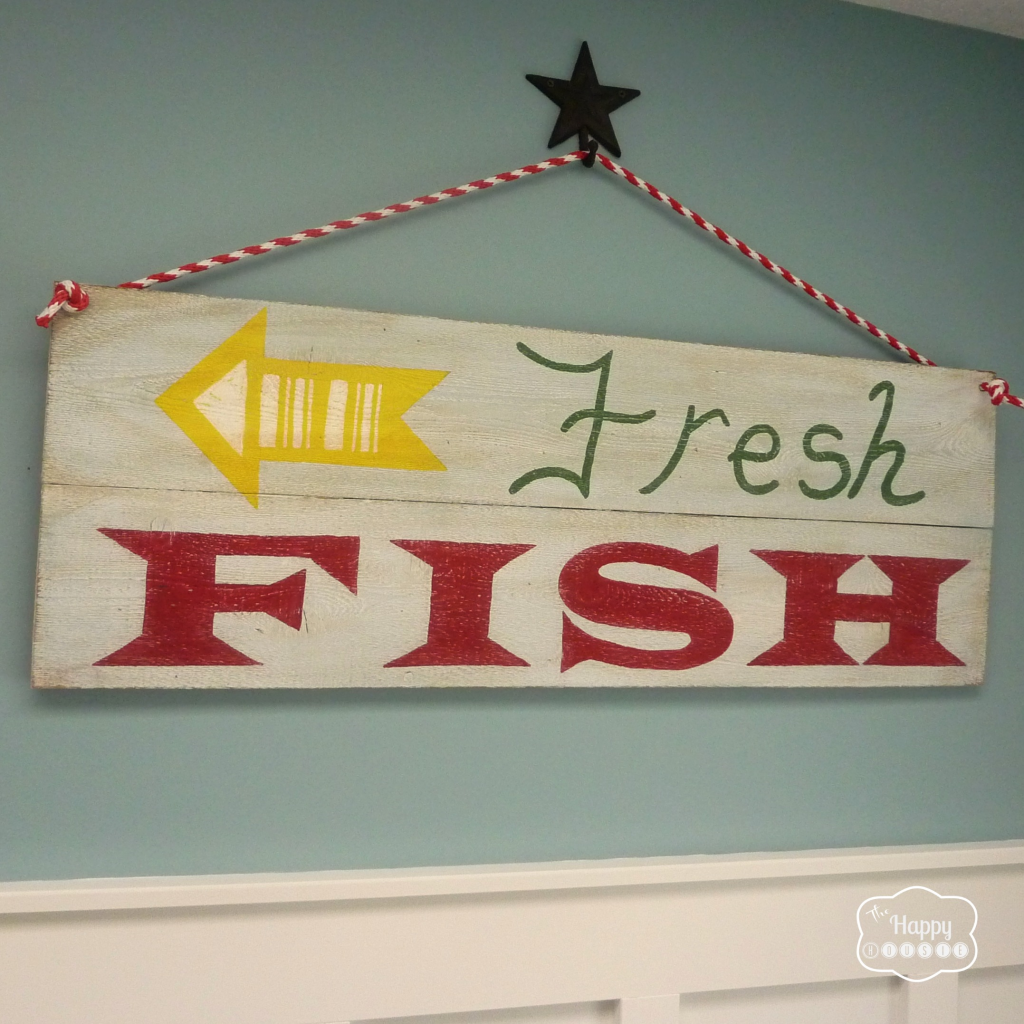
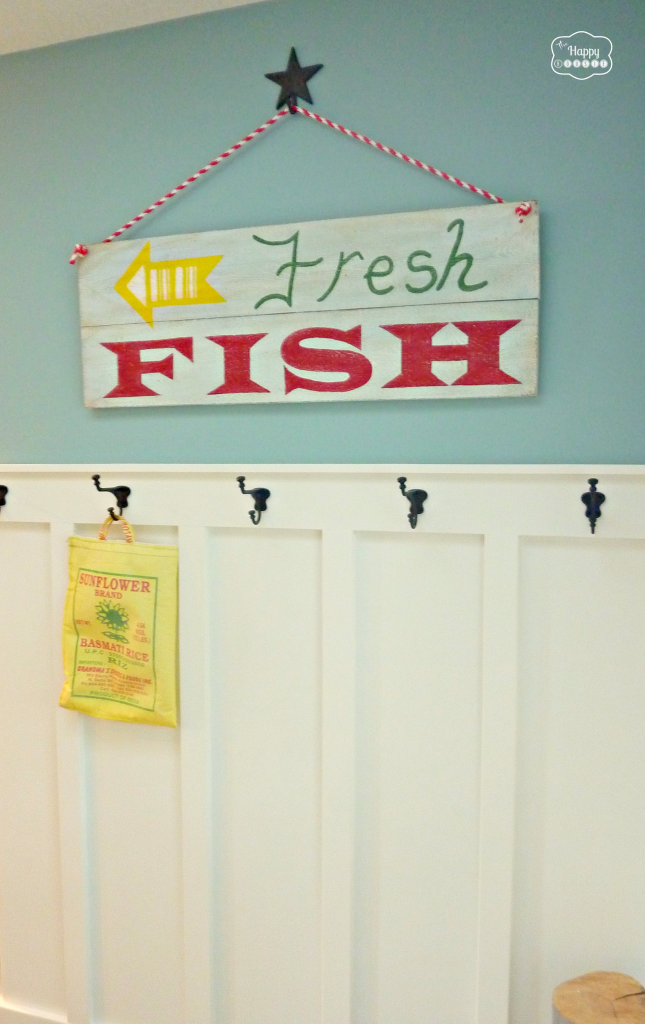
It sits in our entry hall right above our board and batten…I love it against the Colorado Grey walls with all the fresh crisp white below it.
We have tweaked a few more little things in the entry and added some new stuff (like my $1 garage sale rug!!)… lets be honest – it was musical furniture around here the other day and the other half of the entry hall now looks completely different. I will be back with more on that soon.
What projects have you been up to lately? Anything you have been doing a lot of (like making three signs out of reclaimed wood…)? Do you get onto a swing with projects and do a bunch, or is that just me. (please don’t say its just me:)
Thanks for reading! And remember my housie friends, HOME isn’t built in a day. Enjoy the journey!!
This project was featured at!


I may link up at some of these fabulous places below, for more info check out housie parties:
Make the Scene Monday , Monday Funday , Give Me the Goods Monday , Mop It Up Monday , Craft-o-Maniac Monday, Pretty Things, Party in Polka Dots, Project Inspire{d} , Take a Look Tuesday, TCB Get Your Craft On. Tasteful Tuesdays., Share It Link Party, Assets and Efforts, Inspire Me Tuesday, Wow Me Wednesday Whimsy Wednesday , Swing Into Spring Party, From Dream to Reality, The Inspiration Exchange, Fine Craft Guild , , Thursday’s Temptation, Hookin’ Up With House of Hepworth’s, Live Laugh Rowe Live Laugh Linky, Transformation Thursday, Thursdays Are Your Days, Real Family Fun, Pinterest Power Party,, The Weekly Creative , Party Junk, Pinworthy Projects , Weekend Wrap-Up Party, Weekend Bloggy Reading, Strut Your Stuff Saturday, Spotlight Saturday, Get Schooled Saturday, Overflowing With Creativity , Sundae Scoop , Suburbs Mama , That DIY Party
![]()


Hi Krista! My mom came across this sign and absolutely loves it! I decided to make it for her birthday, but have a couple of questions – What size is your sign? what color background paint and stain did you use? And what font did you use? I know I can find something similar, but she wants it to look as close to yours as possible 🙂
Great sign. The lettering on the word “FISH” is nicely executed. I love making signs like this for gifts as well as hanging around my home.
Krista – very cute project and so doable for even a beginner. Love the pictures and the finished sign looks great. Thanks for sharing.
Thanks Orlando Lumber… it was easy!
LOVE!!! Gonna make one for our beach cottage! Please tell me where you found the colored rope! <3 It is a perfect touch!
Hi Paige! I bought it at an industrial marine supply shop – we have quite a few where we live because there is a lot of fishing around here.
Wow, great sign! Love this 😉 Thank you so much for sharing at Give Me The Goods Monday!
Jamie @ Better With Age
Hi Jamie! Thanks so much!! And thank you for hosting each week:)
Featuring you on Thursday from last week’s party!
Yay!! Thank you so much Carrie, so excited to hear that!!
Love the sign Krista…and um, no, 3 is not enough! 😉 lol I am a sign/graphics freak and have one or the other all over my house! My hubby said, I think we have enough “words” everywhere. Um no, never. And the musical furniture comment…so funny, me too! My poor guy never knows what to expect when he walks in the door day to day!
Oh and thanks so much for the mention and the sweet words, friend! 🙂
Pinning and sharing 🙂
Nancy
LOL! I love hearing that I am not the only crazy housie out there!!
Even the hook it is on is adorable! This is so perfect for your house on the water =)
I’ve been having a thing with signs, too! Love this! Thanks for sharing at Pinworthy Projects.
Found you through the craft-o-matic link up. I love this tutorial! I just came across some reclaimed wood and have been looking for some inspiration. Your little helper is adorable too!
Darling sign, Krista! I love the bright colors. You did an awesome job on the tutorial, too!
I’m stopping by today from DIY Showoff.
~ Megin of VMG206
Join me Sun-Fri for DIY Showcase Link Party
This is darling Krista. You make me want to copy everything you do! Wish you could come on over to my lake home and be my design consultant 🙂 Blessings to you, Patti@OldThingsNew
Oh I absolutely ADORE this. Great job!
Thank you Gina!
So adorable! I love that lettering technique! Can’t wait to check out more of those tutorials you linked to as well! 🙂
Thank you April- those girls are super talented! I have learned a lot by following them:)
How fun that you are busy making signs, too! Goodness, I wish we lived just a bit closer and we could paint and chat together!:)
I know Rita!! And we have both been doing our entry hall at the same time… must be something in the island air:)
LOVE it! So fun and colorful! You never cease to amaze me! Jenna @ Rain on a Tin Roof
Thanks Jenna!!
Super cute, I love it!! We would love it if you would link up at our linky party:
Two Girls and a Party
Live every Wednesday to Sunday. Hosted by:
Dana @ This Silly Girl’s Life
Parrish @ Life with the Crust Cut Off
We hope to see you there!
Hi Dana! Thank you so much for the invitation!!
CUTE! If I could make signs that looked this cute, I’d be making them all the time too! 🙂 You are one talented girl! Hope you’re having a wonderful week, Krista!
~Abby =)
Oh Abby, you could definitely do this!! It was not hard!! Thanks though:)
Very cute. I love the rope!
Thanks Al!!
Krista, I absolutely love it. I have an old pallet the neighbor gave me and you have inspired me to make something great! Can’t decide exactly what to do yet.
Ooooh the possibilities!! I got a giant pallet from work that was leftover… so excited but haven’t decided what to do with it either… thinking about a project for my son’s bedroom when he graduates from his nursery (soon) or perhaps a giant pallet clock?!
Hey Krista – that sign is ADORABLE! I love signs too..I’m doing another workshop in July – you should come into town and join us!! You could probably teach us a few tricks:)
Oh I would love a reason to come down to Victoria!! Would be so fun… I definitely have a lot to learn!
Krista
Your lettering is so crisp and clear! I love that transfer technique you use! I am traying to convince hubby to add board and batten to our entryway, too. I think I’ll show him your pics and he’ll finally give in!!
Hi Bronwyn! Best of luck to you… I know that convincing the husband is often the hardest part of a DIY project! Thankfully mine was pretty on board (no pun intended) with the B&B in the hallway… we talked about it for about a year first!! Now we are talking (and talking and retalking) kitchen….
What a great sign! Love the rope too,
Deb
Thanks Deb – glad I have been reading all your awesome tutorials!!
another very beautiful sign from you Krista! I love it! so fun and it looks great in your entry hall 🙂 the red and white rope; great idea! you are very creative! 🙂 3 signs is that a lot? Nope, I don’t think so! 🙂 I love your sings! & thank you so much for the advice last time, I appreciated it! still working on it! (takes me a while to make some decisions) 😉
Thanks Ingrid! I take a while to make decisions too… and then usually make them in a snap after hemming and hawing for a while!
I really luv pallet diy and I’m ready to build a sign now, thanks for this tuto
Awesome Emeline!! Hope you go for it!
The sign is so nice. I love the bright colors and how bold it is. The rope and hanger are great touches.
Thank you Susan.. I think the rope and hanger are a little fun change… just so all three of my signs don’t look the same:)
Krista, I LOVE signs, so you just keep on making them! 🙂 This is really great – the staining and sanding was just right and I love the red/white rope! No, my friend, it’s totally not just you – I often make multiples of the same thing, too! Thanks so much for sharing, pinning and have an awesome day!
Thanks Cindy- glad to know I am not the only one!!