
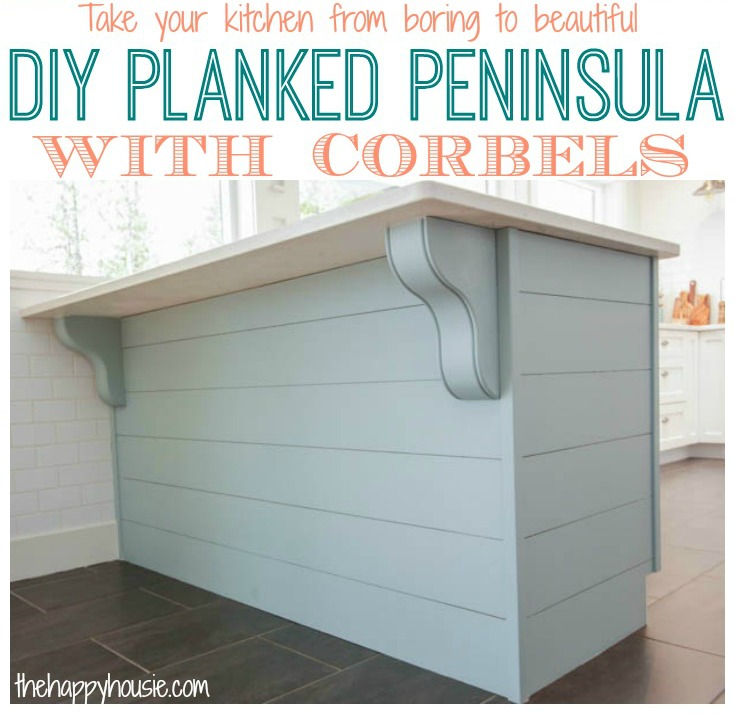
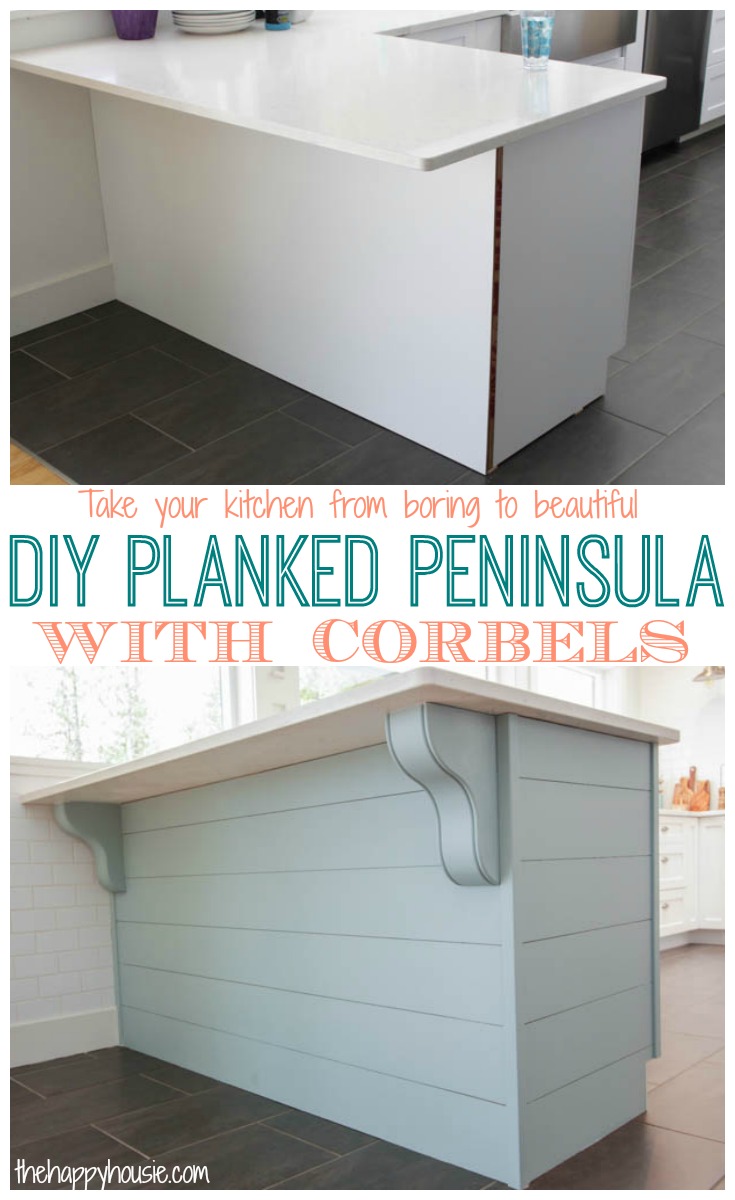
A Little More Kitchen Drama: DIY Planked Peninsula with Corbels
Oh sweet corbels, how the kitchen would be lost without you.
Last week I shared the huge improvement that adding corbels made to our DIY wooden hood fan.
Like, HUGE improvement.
And today I can’t wait to share how a little MDF planking and two more of our beautiful corbels from Osborne Wood Products totally transformed our peninsula from builder basic boring to completely custom and beautiful.
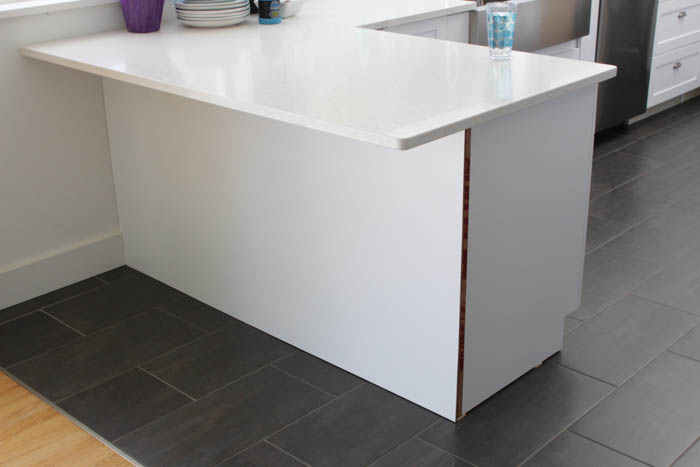
When our peninsula and countertop first went in, it looked a little “white”. And shiny. And boring. I knew it needed something, and pinned all kinds of ideas to my “I heart white kitchens…and blue ones too” board about different ways to plank or panel it.
Eventually I settled on MDF planks – it gives not only the look I was after, but is super amazingly thrifty as well.
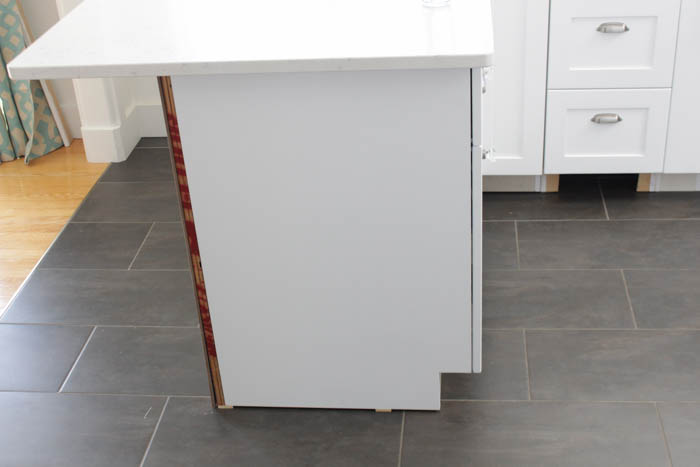
Here is what we started out with…
We bought one 4×8 sheet of 1/4″ MDF and had it cut into 6″ strips. It worked perfectly with the length of the peninsula – so that we only needed the one sheet to clad the entire back and side. Woot woot! That came in at around $20.
![]()
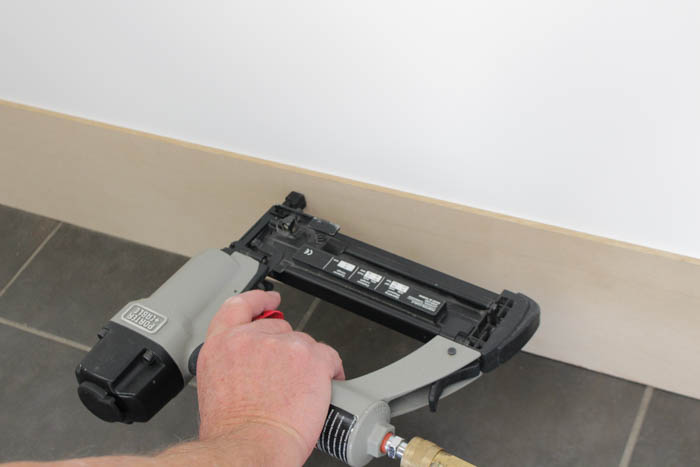
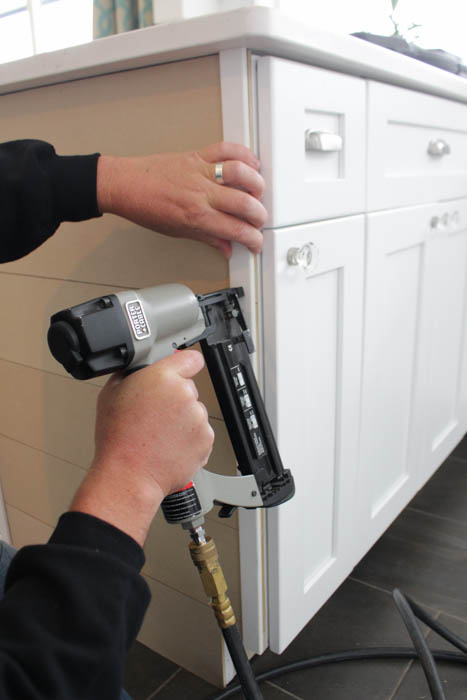
To install the MDF planks we started at the base of the peninsula and nailed it directly into the back of the cabinet using our air compressor nail gun. You can see in the “before” pictures that the back of our peninsula has a sheet of plywood attached, so the nails go directly into the plywood. As such, we really didn’t need to use glue as well.
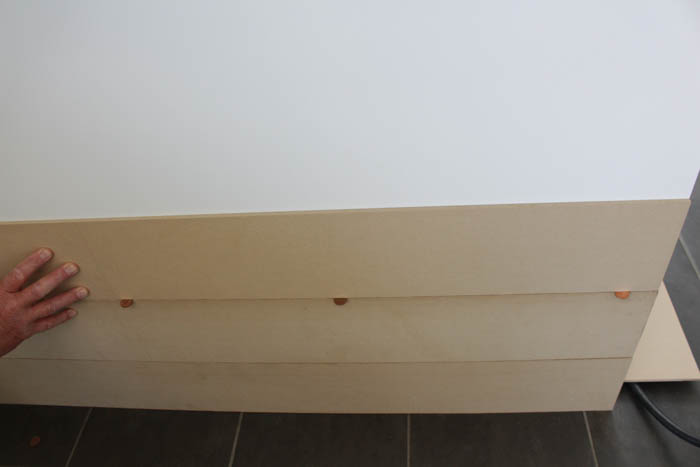
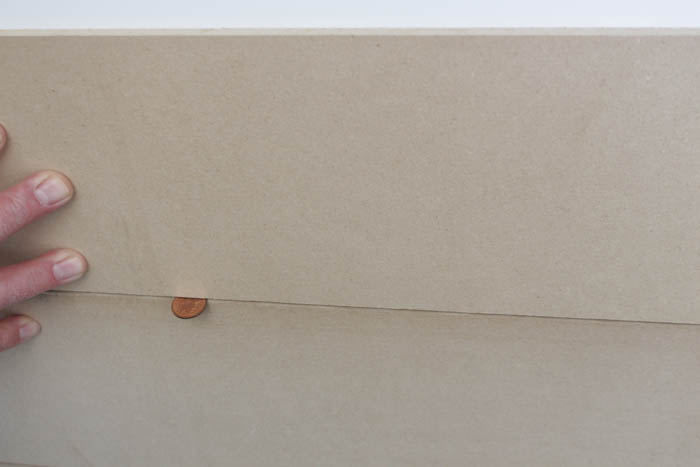
We used pennies to keep the planks slightly apart and create that perfect planked ‘gap’ that I love so much.
They went up really quickly and easily…
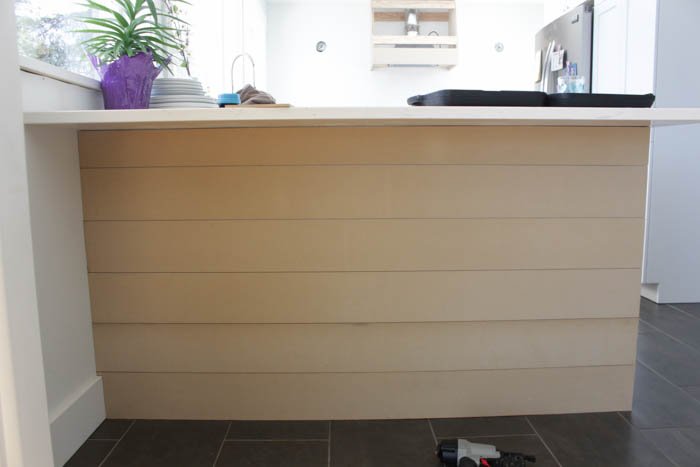
We used our mitre saw to cut the appropriate length pieces for the side of the cabinet. Once those were installed, we just capped it off with a corner piece of trim that we picked up at the hardware store when we bought the MDF.
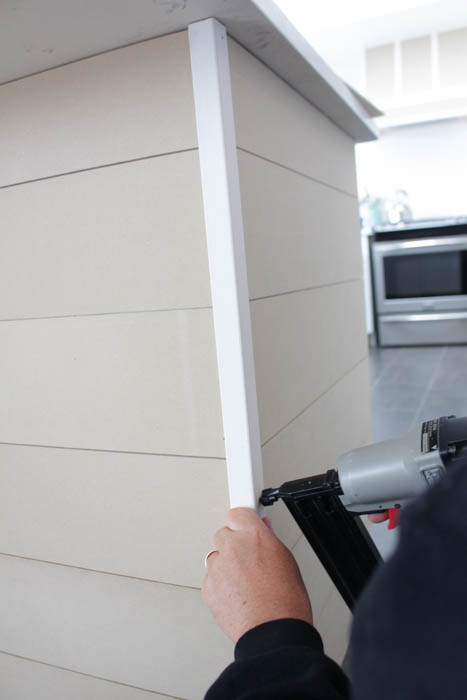
We added a matching flat piece of molding to the edge closest to the cabinetry, and also in the far corner closest to the window wall. We just nailed all the trim pieces on using the nail gun.
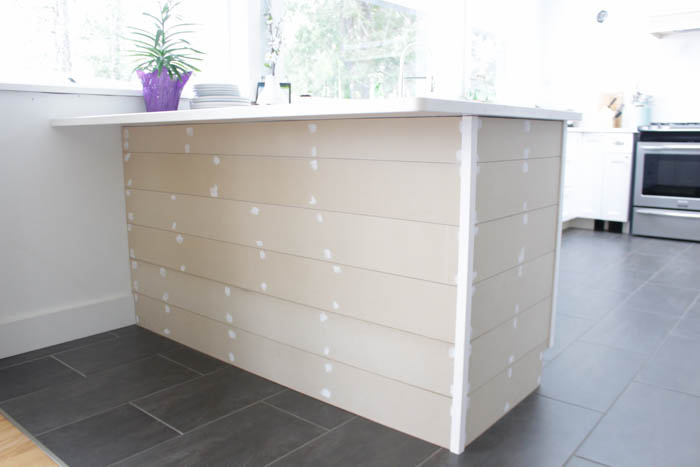
Then came the fun job of filling all the nail holes, followed by sanding off the filler… creating a perfectly smooth finish. Of course, MDF needs to be primed before painting it as well.
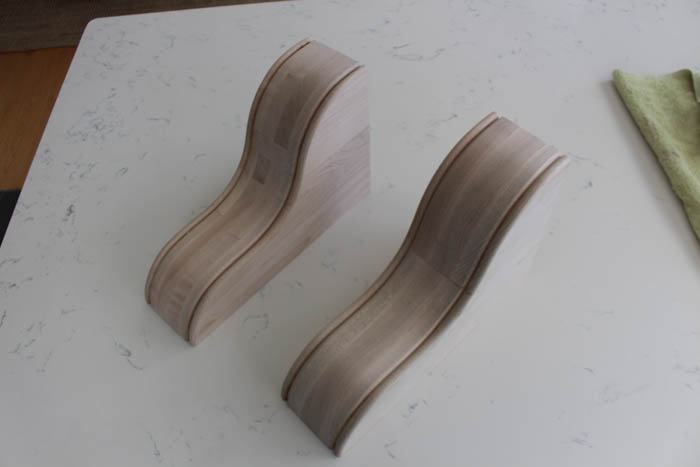
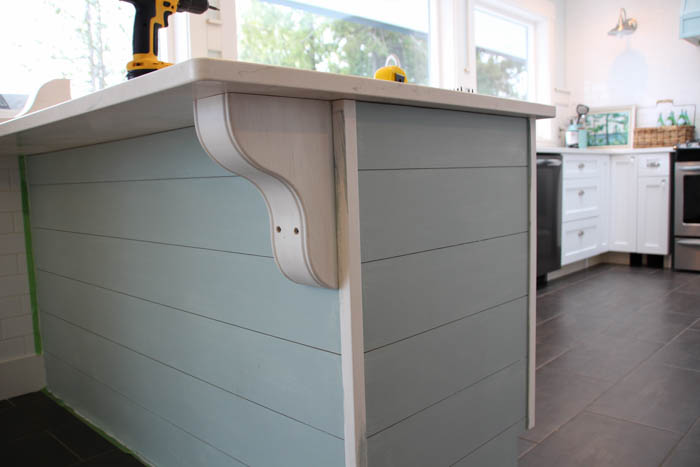
Then it was time to add a little more drama with the corbels! We used another pair of the same corbels that I shared last week: the Boston Bar with Beaded Edge (in paint grade – soft maple) from Osborne Wood Products.
To install these we had to come up with a custom system, since the hardware on the back requires you to slide the bracket over the screw and then slide it down into place. Obviously with a countertop directly above, we were not able to do it this way. Had we planned a little bit more ahead, we could have installed the corbels right before the countertop installers came, but at that time we still thought we were going to use them as brackets for open shelves.
To install them – we predrilled with a drill press directly through the slimmest part of the corbel and drilled it out slightly so that we would be able to countersink our screws…
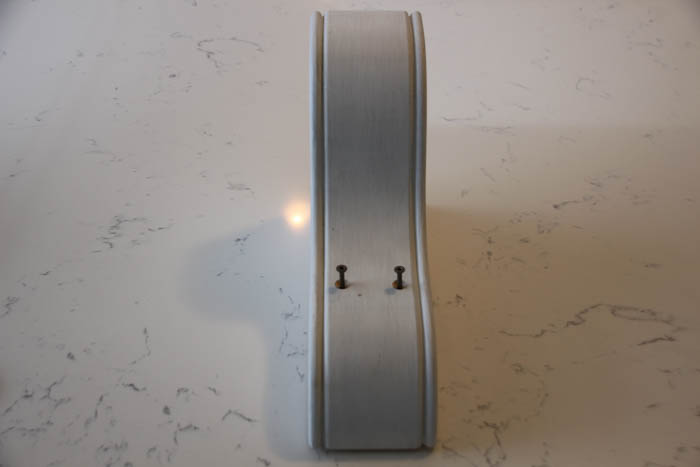
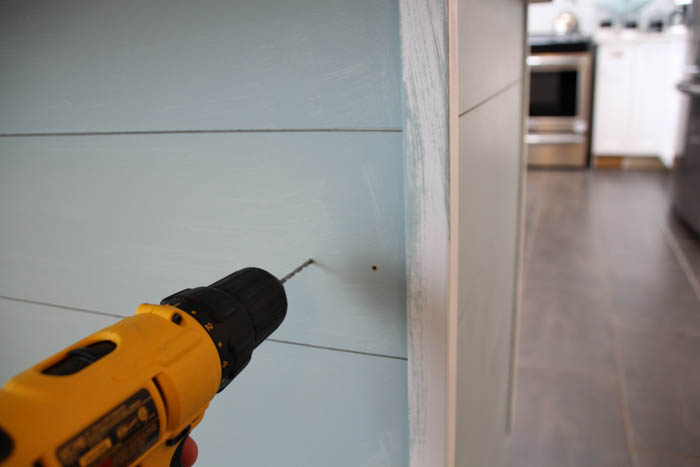
Then we figured out placement, and drilled the screws in slightly in order to create a mark on the plank where the screws would go.
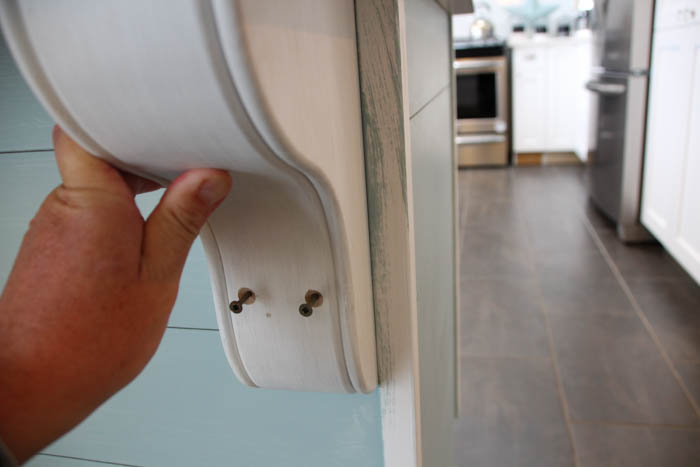
We removed the bracket and predrilled the holes through the planks and into the plywood…
Then added some awesome adhesive to the back and top of the corbels…
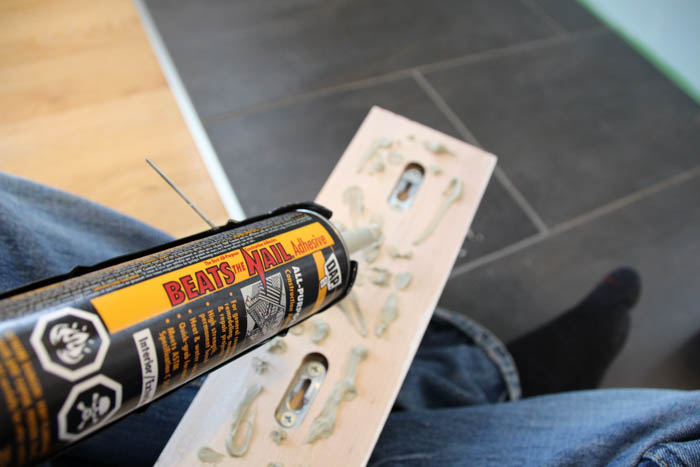
Before putting them back in position and screwing them into place.

Done!
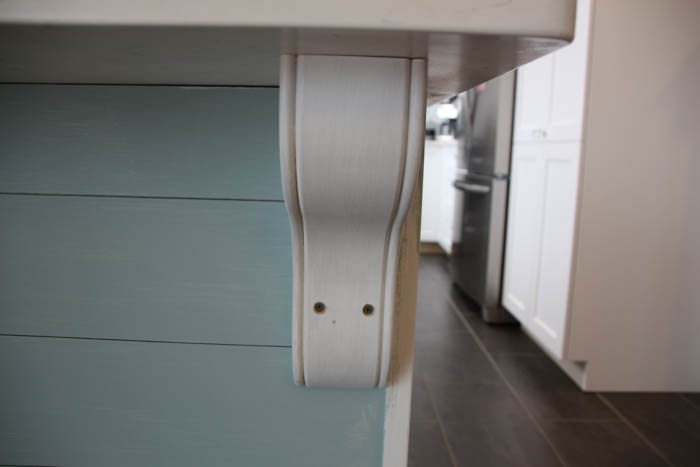
After a little more painting…
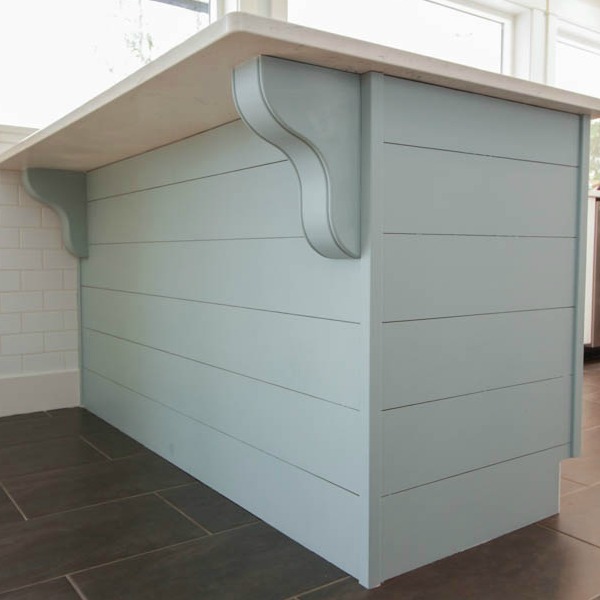
Quite a difference, I think…

I still want to add a coat of satin Varathane or another similar clear coat over top of the paint to make it more washable and help prevent marks from dirty little feet and sticky little fingers.
That’s one of the last jobs to finish before I can reveal this whole kitchen!
Are you sick of reading about the DIY projects, or what?
Time for the reveal, already!
Am I right?!?
It is coming really soon, I promise!

![]()
![]()
![]()
![]()
![]()
![]()
![]()
Save


What an amazing transformation! This kitchen turned out so beautiful. I am setting a goal to do a couple home improvement projects this year. I think we are going to start out with some kitchen cabinet refinishing. Thanks again for sharing!!!
What is the brand of paint and color did you use on the penninsula?
We used Benjamin Moore Wedgewood Gray.
Such a great idea! What color is the paint? It’s perfect!
Sorry, I saw you already answered this question
Did you paint the front of the cabinets too? Do you have a picture showing the front and sides together? Looks great!
Hello,
The cabinets were brand new, and we planked the back and painted it to give the peninsula a more finished look – you can see pictures in the full kitchen reveal in this post: Our Coastal Style White Shaker Kitchen Makeover {the Reveal!!}
Krista
Hi there! Thank you for this post, your kitchen is stunning! I am looking to install MDF panels/planks in my kitchen. But I have one question, when you say you had the mdf cut into 6 inch planks: did the hardware store cut them for you? The panels I purchased at lowes they told me that they could cut them but they said their saw could potentially damage the mdf. Did you have your planks cut at the store or at home? I know you used a mitre saw for the length. I’m just a little hesitant for the store to cut them but they won’t actually fit in my vehicle as a big 4’x8′ sheet. thank you in advance!!
Hi Claire,
I did have them cut at the store. I’ve also planked walls with the cabinet grade super thin plywood. The edges on both materials can get slightly chippy from their saws, but you can sand them off by hand with a little sandpaper. I didn’t find it a big issue, and hope that you won’t, either! Good luck with your project:)
Krista
What color did you use? I love this color and it is just perfect!
Hi Amanda – it is called Wedgwood Gray by Benjamin Moore. Good luck with your project!
Do u know what color paint this is ?
Hello Kayleigh. Our paint colour on both our planked peninsula and our hood fan is called Wedgewood Gray by Benjamin Moore. Hope that helps!
Gorgeous, gorgeous, and more gorgeous. Thank you for sharing your wonderful work
Did you add the piece of plywood yourself or could I just nail it into my cabinet directly? Also do you wish you would have painted the planks before installing?
Hello! When our contractor installed our cabinets he added a piece of plywood backing to the peninsula, but I think that you could probably just nail into the back of your cabinets – just pay attention to the size of your nails so they don’t go through. You totally don’t need to paint the planks before – maybe if you were doing MDF on an outside wall that is susceptible to moisture and temperature changes, you should seal the back so that the MDF doesn’t take on moisture and warp, but in this application it was not necessary.
I love this! Did you paint the front blue also?
Hi Denise!
We painted the back of the peninsula and the side of it (also planked) in blue – the fronts of all the kitchen cabinets are white! Check out the full Kitchen Reveal if you would like to see more!
What a fabulous project, it looks great!
I adore the colour, I think this would look great when I eventually get round to painting the cupboards in our utility room.
Thanks for the inspiration.
Glad you found some inspiration -thanks for your kind words!!
Hi!
I loved the way it turned out! I’m wanting to do the same thing in my kitchen, but I can’t find that thickness of MDF. Where did you purchase yours? Thanks so much!
Hi Jessica! I purchased mine from the hardware store and it is 1/8″ thickness I believe. They are really quite thin and lightweight planks:) I had them cut it for me into strips – I had to pay per cut but it was easier then doing it ourselves as we didn’t have a table saw setup at the time (and I thought they would do it straighter then we could:). Good luck with your project!!
Hi In the post you said you used one 4×8 sheet of 1/4″ MDF – in this comment you said you used 1/8 inch which one is it – i love the look of yours and want to follow this tutorial exactly!
thanks!
Hi Nicole – it is definitely 1/4″ – sorry, I made a mistake with the 1/8″ inch!! Good luck with your project!
Came over from Amy and Christy’s. Love how the island turned out and the color!! Looking forward to following along.
Your kitchen keeps getting better and better! Love this 🙂 We’re sharing as a favorite tomorrow from the June Pretty Preppy Party!
It’s gorgeous, Krista!! What a huge difference! Love this idea 😉
Hugs, Jamie
I’m so loving the look of plank wood right now and it looks right at home on your island with the corbels! The paint color is such a happy looking shade, too! Fabulous job Krista!
I love this look! What is the name of the color you painted the peninsula? It’s just what I’ve been looking for!
Hi Kristy, I painted both the peninsula and our hood fan in Ben Moore’s Wedgewood Grey. It is a rally pretty pale aqua/grey colour. I love it!
Love it! Bookmarking to share on our social accounts tomorrow.
Looks awesome! What a difference!
Wow, what a difference! I love the planks and the color you painted them but those corbels are like the pearls on the little black dress.
Your peninsula is gorgeous, Krista! Wow! I love the color you chose… And those MDF boards are the perfect addition to give it character! Hope you’re having a great week! xo
Just so you know, I am SO copying you when we start the kitchen remodel!!! I love the look of this peninsula!
What a great idea! Looks terrific!!
WOW!!! This looks beautiful. Well done. Could you please tell me what the thickness of the MDF panel is that you used for this project.
Kind regards,
Kylie (Australia)
I love how it turned out. Looks so fabulous in that color too.