
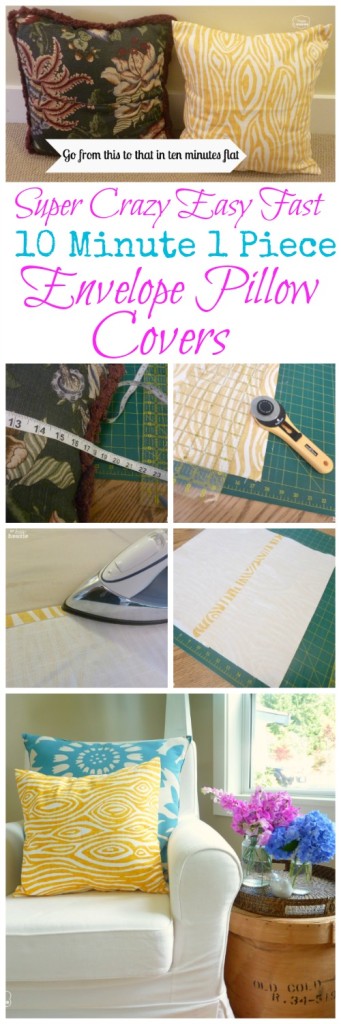
Super Crazy Easy Fast Ten-Minute One-Piece Envelope Pillow Covers
Today is all about making some super crazy easy fast ten-minute one-piece envelope pillow covers. Say that ten times quickly. Saying it would be harder then following this tutorial. If you can operate a pair of scissors, have access to a sewing machine, can iron a fold/hem, and can sew a semi-straight or even partly crooked line… then you can do this. It is that easy.
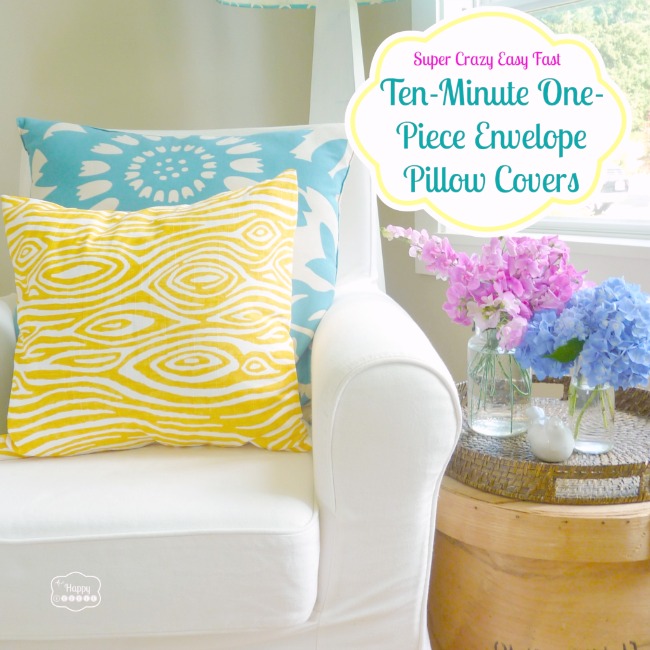
If you are a regular reader you may have realized that I have a little bit of a pillow obsession. Just a little bit. Anyhooo… I think that changing up your pillows is one of THE best ways to give your house a quick little refresh. Think of them as soft cushy art. And with the price of store-bought pillows hovering between $20-30 each or more, learning how to sew my own has quickly become a key skill and priority. Once you have mastered this simple task the world of fabrics opens up to you and the possibilities become endless. So let’s get started… because you can literally go from 1.25 yards of fabric to three new 18″ pillows in 30 minutes.
Head over here for the full and detailed tutorial….


Thanks so much for this quick and easy tutorial.
Thanks so much for this quick and easy tutorial. Got an awesome birthday gift idea for my beloved younger sister.
Thanks so much for this quick and easy tutorial. Got my birthday presents all finished. Took longer to wrap them than to make them!
Awesome!! So glad to hear they were so easy for you!!
I am going to make envelope pillow covers tomorrow so checked out your easy DIY page – who even needed to read it, your pix are perfect! (And the fabric I am going to use is the same blue you show at the end of the instruction page!
very nice pictures and a great set of instructions
Really great tutorial. I’ve only done a tiny bit of sewing and this was really easy! I couldn’t find any cushions to match my couch but I found a fabric that did. Stuffed them with some cheap IKEA cushions and they’re perfect!
Krista, I am not the best at sewing so I was very hesitant to do this project. Once I started, I left the computer open so I could continue to refer to your instructions. The pictures helped me soooooo much. I am redoing my kindergarden classroom. This has really helped my room pop. I made four of the coverings for my reading area. I am so proud of myself as the pillows look great! I did make a few errors (they are on the back so I am not as worried) but I am hoping that practice makes perfect.:-) Thank you so very very much Krista! How kind and generous of you to share this with the rest of us. 🙂 Dianne
That is such a clever idea. I just sew them up, but that makes it much easier to wash.
Thanks! Yes, we need to wash them every now and then around here with two busy and messy little boys!!
We are selling our house and I need to stage the rooms. Painted everything neutral and it’s so boring. I went to Ikea a bought $4.00 pillows and then fabric and made these covers. They were so so easy and now all the rooms will just POP with color. Thank you so much for sharing this easy tutorial! Can’t wait to make some more for my new house!
That is great to hear Donna! I am so glad you found the tutorial easy and that your pillows turned out well. I know how much I love changing up the look of our rooms with some new pillow covers, and even though I know it is easy to do, I am always surprised by how quick it really is:) Good luck with selling your house!
I found your tutorial on pinterest. I also have a phobia about my sewing machine but this was extremely easy. I made four pillow covers last night and they look great covering my old couch pillows. Thanks for sharing!
These are great! I wish I wasn’t afraid of a sewing machine LOL
Erica
http://www.fortheloveofdecorating.com
Hi Erica- I used to be terrified of my machine too. You know the scariest part for me? Having to rethread and feed the bobbin. But now that I have gotten comfortable with it (even though it still gives me a little trouble every now and then) – I am thrilled to be able to whip up cushion covers so quickly and easily.
I have an obsession as well and funny thing so does my dog, yes my dog. She always lays on a pillow on the couch or in her crate. I just made 4 small ones, a square one for the computer chair as well as 2 bed sized ones, all for the couch and dog. So, needless to say, they go in the wash frequently. It’s fun to have a lot of coordinating ones on a plain brown leather couch. They are so quick and easy to make! Thanks
Hi Nancy- it is fun to have so many… I love to switch mine out for the seasons. Our dog would love them too but we do try to keep her off the couch since she is black, sheds like a monster, and weighs about 80 pounds! Thanks for your visit and comments!!
SO cute Krista! I would love to feature you… Please come and link up with The Party Bunch! http://www.the36thavenue.com/2014/01/best-diy-projects-38.html
Thank you so much Desiree- I am so thrilled and honoured that you popped by!!
Thank you so much for this tutorial–I am going to try it with some old pillows. Did you cut the fabric off of the old pillow before you stuffed it, or did you just stuff it in as is?
Hi Erin! I just stuffed them in as-is because I wasn’t convinced that there was a lining inside that fabric and thought I may open them up to find a bag of pillow stuffing… but that only worked because my fabric was thick enough to hide any color or pattern underneath it. I hope that makes sense!! Good luck with your project- I need to make myself some more soon too:)
HI, I was making this pillow and ran into the same problem as Kathy who commented earlier. I think maybe you meant that you hemmed the shorter 18″ lengths? Then folded it into the square shape and hemmed together the outer edges (which were the 42 length). Because if you hem the long sides, then the short parts that make the opening are still rough.
Hi Nicole! I went back and reread the post – I could see how people would read it that way. What I meant by the ‘long’ ends was the ends of the LENGTH (so the ends of the 42″ length) but that wasn’t super clear. Sorry! So I edited it -hopefully it will make more sense now. Thanks for pointing that out:) Good luck with your project!
Great tutorial! Thanks for the envelope technique!
Thanks Kate- hope it works out really well for you!! I love the one piece pillows more then my two piece ones- so much quicker. Actually, I need to make some more here pretty quick for our winter living room:) So thrilled you came by!!
This looks easy enough for even me to accomplish… I’ll be making “new” pillows today, thank you for the tutorial!
Awesome- good luck with your project!!
I read your blog this morning and made 4 cushion covers by dinner time. 2 for me and 2 for a friend for Xmas. This is also the first time I’ve used my new sewing machine that has been sat in its box for a year. Super super easy!
I love this. Thank you so much for sharing! The only thing I need is to find the actual pillows to put the covers on. Do you have a good recommendation of where to get a good one that isn’t too expensive?
Hi Erin! My favourite pillow form source is IKEA – they have awesome poufy feather down inserts for around 6-7$ (Canadian – it is probably even less expensive in the US). But I know that there isn’t always an Ikea readily available to people… I have also bought forms from Jysk but find that they aren’t as full as I would like and the forms that I have bought at Walmart are polyester fill and I don’t like them as much. If you don’t have an Ikea nearby then perhaps try a local fabric store like Joann’s or Fabricland. Or look pillows on clearance at big box stores and don’t worry if you can’t stand the cover- you can always recover them if the form itself is nice and full. Good luck!!
I think the Ikea ones are 20 inches by 20….do you make the pillow covers bigger to accompdate the size or do they fit okay in a 18 by 18 pillow cover? Thanks!
Hi Eva! I think that the best rule of thumb is to measure your pillow cover to see what size it will be when squished fairly full. You don’t want your pillow covers too big or they will look sloppy- you want them to fit your forms quite snugly.
I recently picked up some new pillow inserts at Ikea (they are my favourite) and I think they were called 20×20 on the tag – I squished them and measured and I made covers with a finished size of about 18×18, or 18×19″. I did this because I wanted to sneak two covers out of my one yard of fabric so I cut my fabric to be 18″ (so, half of my yard) by the full width of the fabric (54″). I then cut my 54″ piece down to 46″ – that is double the pillow (18+18+10″). The extra 10″ gives you lots of room to do a nice seamed edge on the each end of your 46″ piece. Does that make sense?? Let me know if you have any more questions!!
Thank you! Can’t wait to try it out!
Hi Krista, I am going to try making pillows this weekend. My daughters and I bought fabric last summer and I have not been able to get started, since I don’t really sew, but this tutorial looks so easy! One question- the tutorial says you ironed and hemmed the 42″ lengths, but in the picture it looks like the short ends that form the opening. Can you clarify, so I don’t procrastinate even longer? Thanks.
Hi Kathy!
I am slightly confused by the question so I am just going to go ahead and explain what I do using an 18″ pillow as an example. Measure your pillow (so 18″ for a down pillow insert or 18.5″ for a really full and stiff pillow insert – I use down inserts which are squishy so I make my pillow covers slightly smaller then the measurements of the pillow so that my fabric isn’t baggy). So cut your fabric to the correct width (18 or 18.5″) and then double the width and add six -so an 18X18 would mean that you cut a piece 18 by 42 (18+18+6 for overlap). Then I hem the edges of the 42″ length (so really it becomes about 41.5 or 41 after each end has been hemmed. Then I fold the strip of fabric in on itself and measure to make an 18″ square with it overlapping – measure it and make sure that you are putting the RIGHT SIDES (or the printed side of the fabric) together facing IN. Then pin and sew along each edge (about 1/4 inch seam). For a down form I will end up with a cover that is about 17.5 inches by 18″ and it fits the form nicely. Does this make sense? I hope so- let me know if it doesn’t!! Good luck, once you figure it out you will wonder what you were procrastinating it for. That’s how I felt once I got my groove going… now I can’t stop making new pillows covers:)
Hi Krista. I used your super easy tutorial to make these cute pillows http://holdtheoffice.com/it-was-them-not-me/. It was just as easy as you said! Thanks so much for having this out there:)
Nicole @ HoldtheOffice.com
Yay!! So glad you found it easy too…. it really really is!! Glad you could use it – your pillows look awesome!!
Can’t believe I missed this post Krista! Thanks for sharing this super easy looking sewing project!
It was super easy!! I love making these… literally about ten minutes max each pillow!!
Love the fabric. Love your technique. Love your theory on age = pillows!!!
Hi Krista! Just popping back over to let you know that your fantastic pillow covers are one of my picks and will be feature tomorrow night at Best of the Weekend! Hope you can party with us tomorrow and thanks so much again for joining us. Have a happy Friday! 🙂
Oh Cindy I was so thrilled and honoured to see this!! Thank you so much for the feature, I am so glad to be part of your party now!! Have a wonderful weekend:)
Krista
I just love your colors!! You always show great tutorials and make it seem simple….love that!!
Come link up your post at my party Centerpiece Wednesday http://thestylesisters.blogspot.com/2013/07/centerpiece-wednesday-85-and-wrap-up.html
Karin
I love them. I love your fabric choice too:)
Nicole
Hold the Office
Thank Nicole!!
Krista, Thank you so much for sharing this tutorial! Its so clear and easy sounding, I can’t wait to try it!
Hi Madalyn!
Thanks for your kind comments! I wish you great success with your new pillow project:)
Thank you so much for giving me the information on the blue pillows! Thank you for taking the time – that was very kind of you! Many continued blessings to you and yours!
No problem Eowyn, glad I could be of some help!!
These look sooo cute! I have a ton of old throw pillows that belonged to my grandma just been looking for the right tutorial to try covering them with and this one is definitely it! Thanks so much for Sharing! Definitely pinning♥
Hi Christal! It is a great way to reuse those old throw pillows… good luck with your project!
Love the prints and the colors!
Thank you Megan!
Those pillow are precious! Great job. I love the idea of recycling old pillows.
Stopping by TTand Jello.
Hi Crystal… why not make something old and dated new again! Thanks for your visit and comments:)
Hello Krista! You are fabulously talented – what a wonderful gift! I am so ecstatic to find your blog. I was hoping you could kindly share the fabric on the blue pillow pictured with your new faux bois print. I’ve seen it in Better Homes & Gardens and other décor but I’ve not been able to find the name of it. Thank you so much! I live on a lake also but in Southern N.J.
Hi Eowyn! Thanks for your awesome kind comments! That pillow I did not make but the fabric is a print by Duralee by Thomas Paul called Sunflower, I believe. Hope you can track it down!
Krista
Love that fabric! (both pillows!!) Great tutorial Krista! PInned!! 🙂
Nancy
Thanks Nancy!!
YAY!! Now that’s a sewing project I can handle!!! Thanks for the tutorial Krista!! xoxo
Of course you could handle it Christine! I would love to see what you make!!
Wonderfully clear directions! I’ve never used a mat or rotary cutter, but they sound terrific!
Hi Barbara! They are quilting tools that I got from my mother but you can buy them in a lot of fabric or craft stores (maybe even walmart). I find them super useful crafting tools and great for little sewing projects as well! Not just for quilting…
that’s the best and easiest way to make pillow covers. Nice pop of color. Great job
Thanks Daniela!!
I love this tutorial Krista. Super easy! I’ve made envelope pillow covers in the past and they were not this easy! Can’t wait to try! Thanks for sharing friend 🙂
Thank you Chelsea! I can’t wait to see what you create!! I’m sure it will be fabulous:)
Found this project on Sew Much Crafting’s pin party! You did a great job with these; they look great!
Thank you!!
Brilliant!!! I just started making my own pillows and i’ve also just started sewing. Loving it!! This tip is such a I am all for easy and quick. Thanks for sharing! I came across your spot on A Stroll Through Life. I’m # 144.
Crystal
Hi Crystal! So glad you stopped in… hope this tutorial helps you make some fabulous new pillows! I will hop over to visit you as well:)
Krista
I’ll be sure to send you a link when I give it a go! Looking forward to the task now 🙂
Crystal
Krista- I wanted to thank you for the sweet comments you left about my chicken coop turned coffee table. Your words meant a lot to me coming form someone who is so well revered in blogland. Thank you again.
On a different note, I love these pillows. Envelope pillows are so easy and fun to make. Have them everywhere. I used to make the permanent kind of covers but then had children! Envelopes make it so much easier to keep clean!
Hi Kim!
Your chicken coop coffee table is unreal! I love it!! Thanks for returning the blog visit, so glad to meet you and find your awesome blog too!!
🙂 Krista, I love pillows too but like you said they can be expensive and I really need to do what you do to decorate my very boring living room! 🙂 I really love the pillows you us and your last picture is gorgeous: you style everything very well! 🙂 & how many pillows are too many hmmmm…. maybe a 1000 anything under that it’s OK! 😉 wish you a beautiful week Krista 🙂
Lol Ingrid! Pillows will probably give your living room a quick and easy (and inexpensive if you make your own) wakeup call- you should make some, you will love it! Thanks for your kind awesome comments. Hope your week is awesome as well!!
That’s my kind of pillow. I am even lazier and I use the salvage edge to save myself one hem. 😉 I really need to make some of these!
Hi Kelly! I love that idea!! I think I was cutting my fabric in the opposite direction so I couldn’t take advantage of the salvage… next time I will try that!
I love envelope pillows. They are awesome and so versatile! Love the colors you picked too!
Thank you Emily! So glad you came by the blog to visit:)
Love your fabric choices and a super tutorial too. They look wonderful. Thanks so much for linking to Inspire Me. Hugs, Marty
Thank you Marty! I love that faux bois print!! Thanks so much for hosting every week:)
Thank you very much. I’m not much of a sewer but I think I can pull this off.
Hi April! I really think these are the simplest ever pillow covers, I am sure you can do it!! Plus, the more times you try the better you get!!
I love your pillows and great tutorial Would love it if you came by One More Time Events and shared http://www.onemoretimeevents.com/2013/07/share-it-one-more-time-features-and.html
Thank you Tammy!
I love that fabric!!!!!!!! where did you get it? great tutorial!
Hi Jamie! I put a link to the fabric in the post – it is called Willow by Premier Prints and comes in a few different colours. I love it too, have to get some more for my fall pillows I think, maybe in a different colour:) You can check out fabric.com or tonicliving.com for it….
Love that yellow wood grain fabric – so fun! Envelope pillow cases are such a great way to change up your pillows without having to buy new forms. Thanks for sharing.
Also – 5 pillows on a bed isn’t overkill. You can never have too many throw pillows 🙂
Hi Amanda! Thanks for the support… I am glad that you don’t think five is too many for a five year old!!
Looks good girl! Thanks for posting this. I was just asking my self about envelope pillow covers. I think I’ll try to make some soon!
Awesome Stephanie! They are so easy and totally satisfying to see done:)
Oh I love these, especially the colors you choose! Where did you get the yellow wood grain pattern? I was looking for something this weekend!
I would love for you to link these up with me this week: http://www.livingbettertogether.com/2013/07/tgif-link-party-no-4_11.html
Hi Rebecca! Isn’t the faux bois pattern the best! It is called Willow by Premier Prints and comes in several colorways. I put a link to it in the post as well. I will check out your link party, thank you for the invite!!
Your pillows are gorgeous! Love the pattern!
I love this envelope technique for covering up old pillows! Always works like a charm!
Selene @ Restoration Beauty
Hi Selene! I love this pattern too… think it will be sneaking in elsewhere in the house in some other colours really soon:) It is a fab easy technique, isn’t it!
thanks for the tute! Pinning it!!
Thanks Anne! Great!!
I need to make some super crazy easy fast ten-minute pillows….I just need to learn how to sew first! 🙂
LOL April! A sewing machine helps, I find the hardest part is getting the thread and bobbin set up. As long as I don’t have problems there, the semi-straight lines are pretty easy to conquer!
Krista, that pillow looks fantastic – ok, I need to actually try to sew something and I think I can do this! Thanks for sharing – pinned! Would love you to share these at our Best of Weekend party this Friday, it would be wonderful to have you join us! Happy Monday!
Hi Cindy! Thank you, and thanks for the invite… I will definitely have to add that to my party page and hop over:)
My mother passed the pillow/cushion-obsession gene on to me – I am grateful for that gene!!! It makes decorating so much fun! If I want to change my colour scheme for different seasons (or just because after one week I want to swap with another colour!), I always have a change of cushion/candle/canvas – all matching colours – (I paint cheap canvasses myself to match my cushions), and sometimes a matching fake flower-stick thingy (you get my meaning)!
Exactly Petra! I love to have the freedom to change things up like that!!
This is AWESOME!! I am pinning, and excited to be following you!
Yay Mindi! So excited to hear that!!