
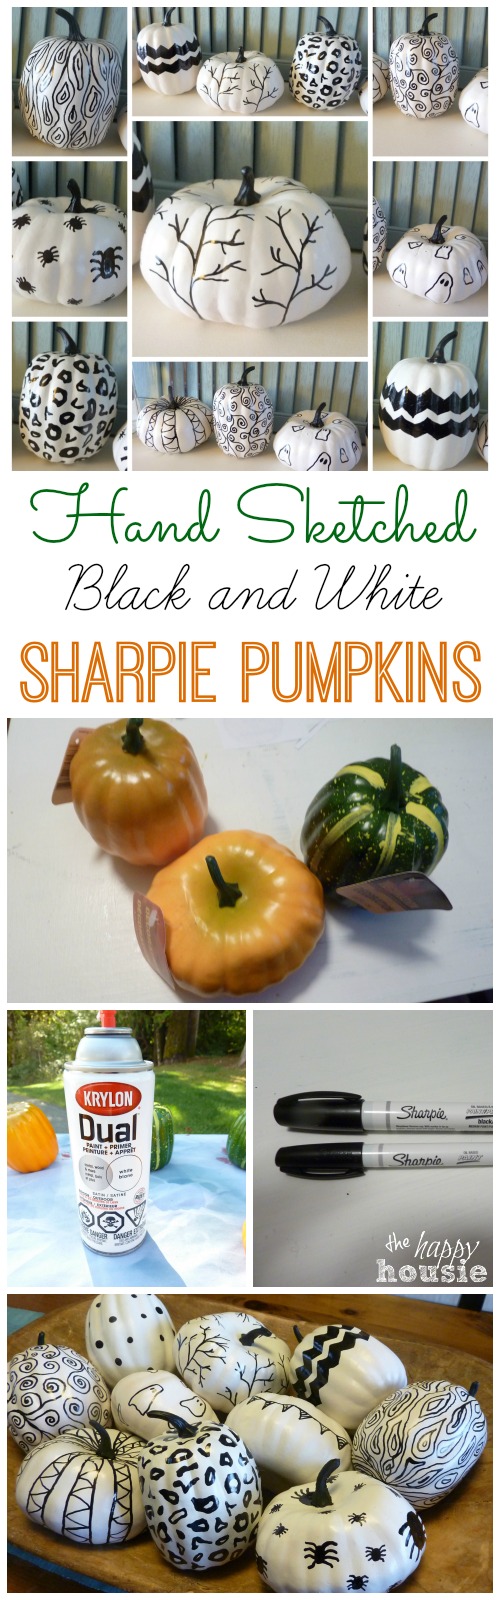
Hand Sketched Sharpie Pumpkins
I will show you how I made these black and white sketched sharpie pumpkins by hand!
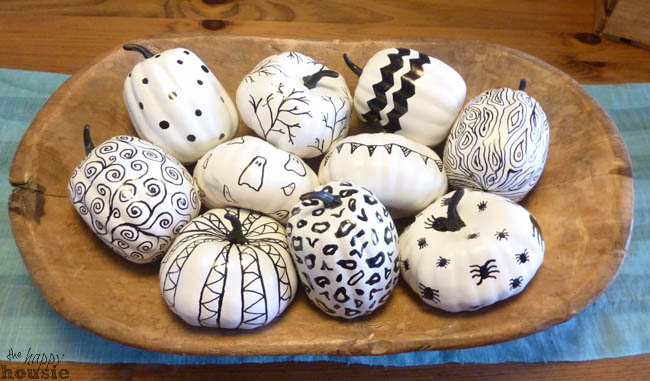
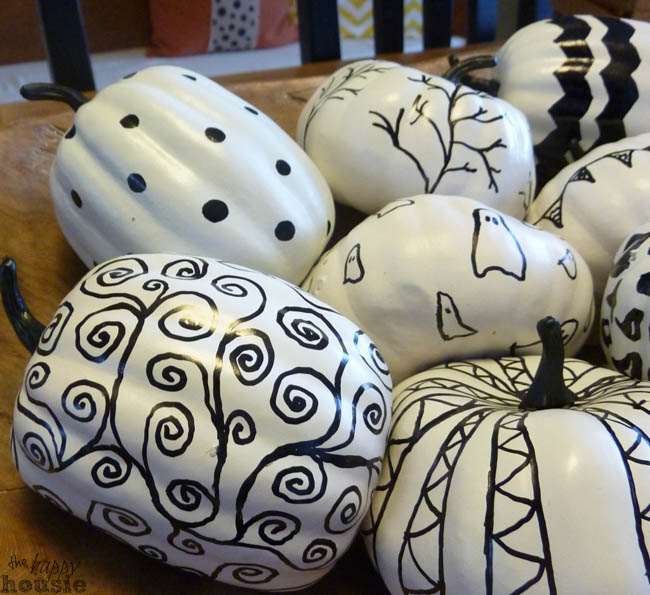
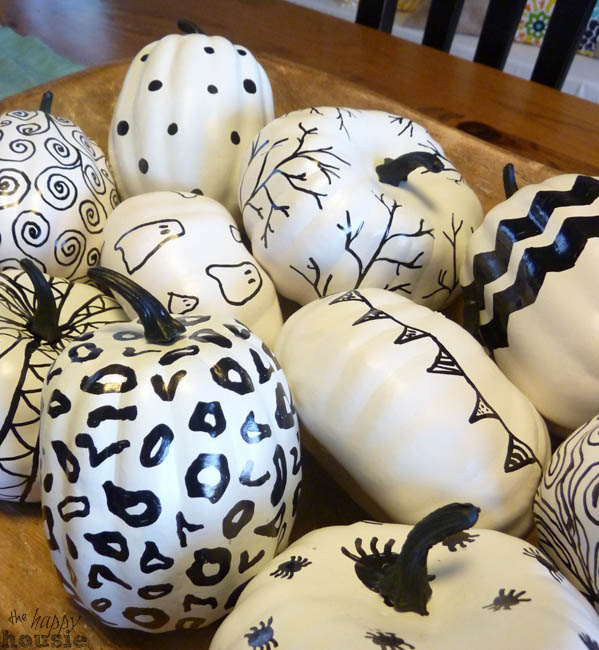
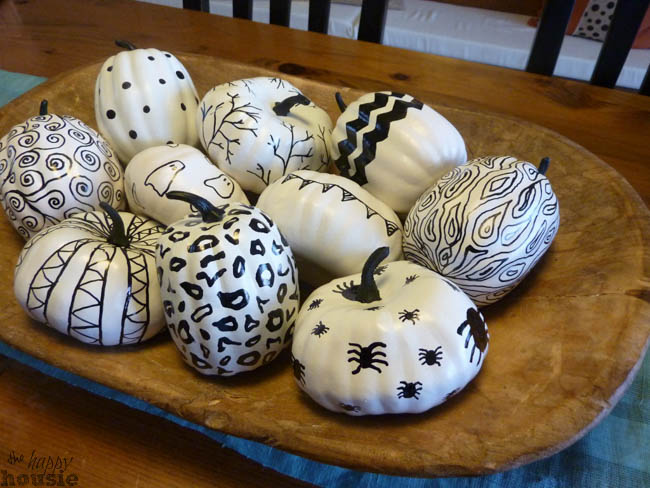
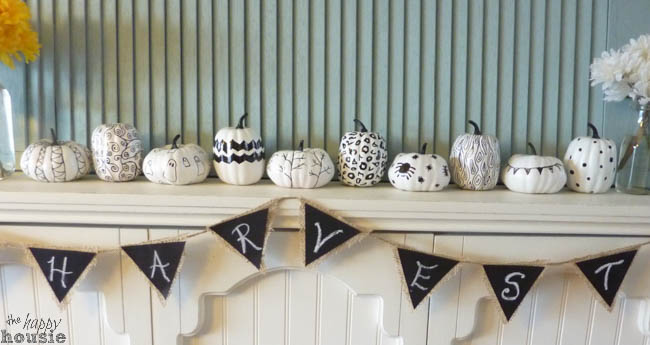
Hello everyone! I am seriously ridiculously excited about sharing today’s Halloween project with you: black and white Hand Sketched Sharpie Pumpkins!! These cute little babies are a bit of a change for me because they are black and white – and if you are a regular reader you probably know I have a bit of a thing for zingy colour!! But I LOVE the crisp contrast of the black and white and I think they turned out to be really playful and fun looking because of all the fabulous (hand sketched) patterns.
To make these you need:
![]()
- faux pumpkins
- white spray paint (primer and paint in one works well)
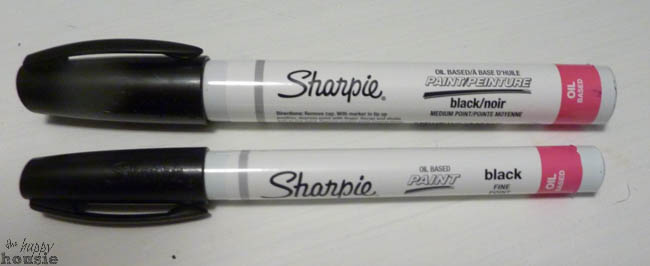
- OIL BASED Sharpie PAINT PEN in Black (or any other colour you would like to use)
- Black spray or craft paint for the stems
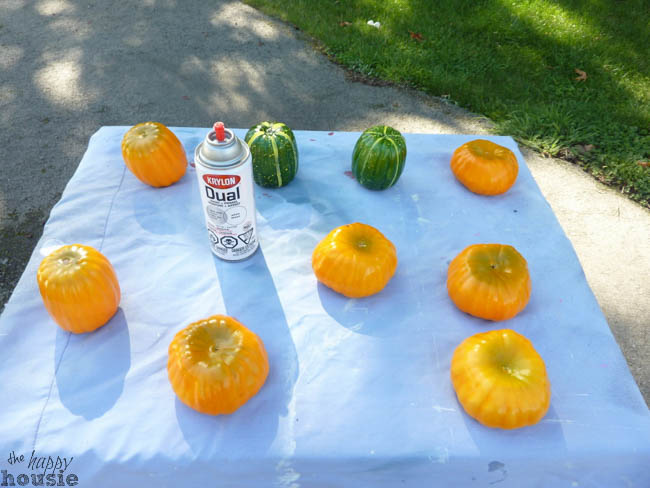
I picked my faux orange pumpkins up at the Dollar Tree. They started out looking like this:

My oldest son kindly helped me remove the tags, and I removed the plastic stems in order to paint them black. I then I treated the pumpkins to a few good coats of white satin Krylon dual (paint and primer in one) spray paint.
I let the pumpkins dry thoroughly for 24 hours after finishing the last coat of white paint. As I mentioned, I used some flat black spray paint I had on hand to paint the green stems.
Then… I whipped out my new oil based sharpies that I picked up at a recent trip to Michaels. Use an oil sharpie (or even a black paint pen) because a regular water based sharpie won’t hold up to writing on a painted surface for very long (in my previous experience)….
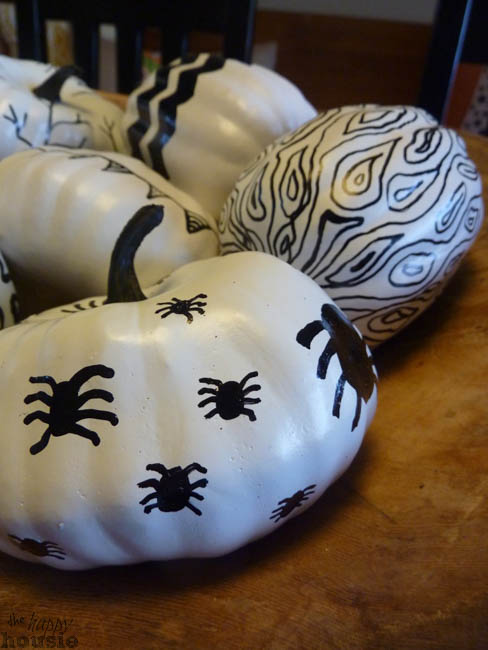
To get ideas for the patterns I just searched online for different images that I thought I would like to try and then practiced sketching them on some scrap paper. I kept my sketches nearby when it was time to draw on my pumpkin designs and just went with it. They don’t have to be perfect! They are supposed to be unique and handmade looking!!

I love how cute they turned out… what do you think?
I haven’t decided if I prefer them in this big rustic wooden carved bowl…
or running the length of our faux mantel:
It will be a tough choice! Hmmm… maybe I just need to make more. I have already thought of a few more patterns I could do…
Like these? Want to try it?
Pin it to remember it!
What do you think? How have you been decorating for fall? Are you starting to think about Halloween decorating yet? I would love to hear about it!


I really really love love these! Thanks for sharing!
These are awesome!! I love the simple black-and-white contrast, plus all of the fun patterns and designs you created! Thanks for linking up with Merry Monday 🙂
These are super fun and my idea of pumpkin decorating! No more carving here. Visiting from Share It Link Party.
These are awesome! So fun for a kid Halloween party!
These are great! Love the different color idea from Stephanie too -you could do school colors! Jennifer
That is a great idea! You could really go in any direction with it:) I was diggin’ the graphic bold feel of black and white – maybe I will switch it up next year!
Very cute! Love them all lined up on your mantel! 🙂
Thank you Mari!
totally loving the leopard one! very cool!
super cute:) Definitely considering for next year!
Ok, I’m definitely going to try this. My favorite is the leopard print 🙂 TOO cute!!
I love the leopard one too.. and also the faux wood grain one. They are probably my favourite project of the season so far:) Thanks so much Amy!!
Hi Krista! I’m back again to let you know I included your cute pumpkins in my favorite Halloween ideas round-up posted on my blog today 🙂 Have a great weekend!
Yay Amy! Thanks – I saw that, am following you now on bloglovin’. You do fabulous projects and I didn’t want to miss any of them!!
Krista, Thank you so much for linking up at A Stylish Interior! I am featuring your cute pumpkins on Stylish Friday Finds! The party goes live Thursday night at 7:00pm EST. Please stop by and grab a featured button! I would appreciate any love you could send my way. Tweet it out that you got featured! Facebook it! Google + it, whatever you’d like!
Have a stylish day!
Karen
http://www.astylishinterior.com
Thanks so much Karen!! That is awesome… I will definitely hop back over today:)
I love, love, love these. How fun. Thanks so much for linking to Inspire Me. Hugs, Marty
Thanks Marty! They were really fun to make too:) Thanks for hosting!!
These are fantastic, Krista. I’m going to pin them to my Halloween board.
Thank you! They were pretty fun and easy to make… and you cam really make them to suit whatever patterns you like best! Thanks so much for your visit and comments:)
These are so clever and fun Krista! Fabulous idea!
Thanks Bonnie and Trish!! So thrilled you came by to check them out:) Have a fabulous week!!
Hey Krista! I love these so much, I must try it this year. I’m excited to tell you that we will be featuring your pumpkins this weekend at our “Inspiration Monday Party” So nice to get to know you more. ~ Julie redheadcandecorate.com
Yay – thank you Julie!! SOOO thrilled to hear that!!
Super cute! Love them on the mantel.
I agree Jennifer… they may have to move to the mantel once I change things up again and do a Halloween Mantel:) Thank you so much for your visit and comments!
Love, love love… do you know how expensive little pumpkins are? This is brilliant! Thank you for sharing it at the Pinworthy Party Linkup. I featured it on my facebook page
They are so expensive! Last year I spent $40 on harvested gourds and mini pumpkins from the local farmers market. This cost just over $10 plus the paint/and pen which I already had. And they will last!! Thank you soooo much for sharing it!!
These are too cool! I have a load of faux little pumpkins in my basement that may need this treatment. Stopping over from Serenity Now.
Awesome Kim!! They were so fun and easy to create. So glad you came to visit!!
Hi Krista! Your pumpkins are so unique! They do look lovely on the mantel! What a talented lady you are! Thanks for sharing! Blessings from Bama!
Aw, thank you Felecia! I am so thrilled you came to visit and comment today!! Great to meet you:)
Super cute! I love them all!
Visiting from Maison de Pax!
Thank you! And thank you so much for your visit and comments!
Love these! They turned out fantastic!
Thank you Megan!! And thank you so much for your visit and comments!
That is a fun project I love all the different designs you made! This is so creative and it looks so good there with the garland! Thanks so much for sharing this with me at Bewitch Me & Titi! Hope to have you back with more amazing shares! Hope you are having a marvellous week!!!
XOXO
Cami @ TitiCrafty.com
Hi Cami!! Thanks so much for your visit and kind comments- and for hosting!!
They look so awesome!
Thanks Kayla!!
I’ve just started decorating for fall this weekend, and now it’s time to switch out for Halloween.
Your sharpie pumpkins have inspired me. I love the graphic look of the black and white. Great job.
Lol- the seasons can move quickly! I think these pumpkins can be fall or Halloween… am planning to make them live out the whole ‘season’!!
awesome job they turned out so super cute i love them running along your fantel
And I love the word FANTEL! I almost forgot about that term… thanks for reminding me! I have to post about how we made it really soon:) Thank you so much for your visit and comments!
Oh my gosh, these are adorable! I love the black and white and all the different patterns. I think my faves are the leopard print one and the polka dot one. I bought little white pumpkins last week and did the gold polka dots on them, but I love the varying patterns even more! These are cute and happy, just like how I think of you. 🙂 Sharon
Aww Sharon you are so sweet:) Gold polka dots sound gorgeous – can’t wait to see them!
They’re cute! I like the spiders the best! Love your blog, Julia
Thank you Julia!! The spiders are a decidedly Halloween touch… wonder if I can make that last through November:) LOL. It was fun to just go with different ideas and make them all unique!! Thanks so much for your super sweet comments!!
These are cute, cute, cute!!! Your pumpkins are adorable, I love the patterns you chose. Great tutorial. I’m inspired!! Thanks so much
Thank you Ann! So thrilled to inspire! Thank you so much for your visit and comments!
CUTE Krista! What a great idea to paint the dollar store ones white first, they sure look better your way! I love the spider one!
Jenna
Thank you Jenna!! They look better even just in white, don’t you think… the patterns are just an extra little kick:) Thank you so much for your visit and comments!
OOH I love these! Such a classy Halloween in the black and white. Pinning now, thanks for sharing! Have a great weekend 🙂
Hannah ♫
Sew Lah Tea Dough `
Hi Hannah- I think I took the inspiration from some fab black and white chevron that I made into some pillows… was glad to carry the crisp black and white a little further! Thank you so much for your visit and comments!
I did this a couple of years ago on white, orange, and black pumpkins. I used Zentangle designs and I love the way they look! Yours look great – now I’m inspired to paint some more. Thanks!
Oooh, I don’t know about Zentangle designs – I will have to look that up!! Thank you so much for your visit and comments!
Those are super cute pumpkins! They look so great together on your mantel. Seems like a super easy project too and I love those! Pinned it to my Fall Decorating board.
It was easy!! And fun to be creative and go with the design flow a little as I drew… Thank you so much for your visit and comments!
Did this such a great idea! I’ve featured you this week on my blog. http://www.somersetlaneblog.com/2013/09/friday-five_27.html
Oh thank you so much Bette!!
Krista, I guess I know what I’m doing this weekend…THIS PROJECT! I have some of those pumpkins and have already painted them white. Never thought to bust out my sharpie! Thanks!
Please share your awesomeness today at Stylish Friday Finds link party!!
Have a great weekend!
Karen
LOl- hope it turns out super well for you. I found the oil sharpie (or a black paint pen) works best – a regular sharpie seems to wear out quickly on a painted surface!
These pumpkins are so cute. Looks like a great project for all ages and abilities. Fun! Fun!
Thanks Tammy! I bet you could make these with all age groups- great idea!!
Great project! I love how each pumpkin is different! I hope you’ll be linking this up to our All Things Thursday Blog Hop and It’s Fall Y’all Link Party.
Blessings,
Nici
Hi Nici! Thanks so much for your sweet comments – I will have to check out your blog hop!!
Love these! So adorable! Found you on the LiveLaughRowe party. Following via BL!
Yay – that is awesome Raquel. And thank you so much for your visit and comments!
Can you be any cooler? Seriously these are stinkin cute! Good job Krista!
LOL Mindi- don’t you mean ‘can you be any more of a house geek?’. Thanks for your kind comments friend!
Love these.. great info and looks easy enough to tackle!
Totally easy and kind of fun to be super creative while you are sketching!! Thank you so much for your visit and comments Marni!
These are so cool and very original! Love all the options you could have!
Yes Katie you are only really limited by your imagination!! Thank you so much for your visit and comments!
This is so awesome and very creative! I love how you decorated each one. 🙂
Thanks so much Julie- it was fun brainstorming and then practicing each design a little before ‘going for it’!
Soooooo, so, so, so CUTE!!!!
aww thanks April!!
love these! I already have a plan for a sharpie-d white (big) pumpkin in mind, but I might just need some of these now, too!
Oh Gretchen that big sharpi-d pumpkin sounds awesome!!
These turned out so cool Krista!! They remind me of Zentangle. I didn’t even know sharpie made oil-based pens so thanks for that tip!! Pinning 🙂
Cindy @ Diy beautify
I haven’t heard of Zentangle but two people have mentioned it now- I guess I must research it!!
This is an awesome idea! So graphic yet pretty too. I didn’t know you could get oli-based paint pens – I must search them out with my latest Michaels coupon in hand! I love how they look mixed together in your bowl. Lovely, as usual!
Oh yes those Michaels coupons are worth their weight in gold!! Thanks so much for your kind comments Bronwyn!
they are so pretty Krista! 🙂 they are perfect to decorate a mantel or any table! 🙂 love that you used a sharpie; very clever 🙂
I started decorating for Fall and Halloween too! 🙂 nothing big , just enough of orange hi!hi!
Hi Ingrid- I actually got the idea for the oil based sharpies from you and your DIY custom mug – they work much better then a traditional sharpie for many projects like this one!
What a cute idea, Krista! I have a hard time holding my hand steady sometimes, so my designs should be very interesting.
Maybe just go for some more flowly/less structured designs and it won’t even be noticeable! Plus the hand sketched look is part of the charm!!
Love this idea, I’m going to have to check out if my dollar store has some faux pumpkins!
Thanks Ashley!! I imagine that they will – mine were a buck each but will still be a savings from the $40 I spent last year on real mini pumpkins and gourds!! ouch!
Krista…Love your cute little pumpkins! You made a great job! Super cute!Pinned! Come check out my creations, posted today…Xoxo
Thanks Aniko – I love your pumpkins too!!
They turned out fantastic! You would never know they were dollar store pumpkins.
I agree Amanda, they are almost unrecognizable after!! Thank you so much for your visit and comments!
Absolutely love those and might have to copy!!
Deb
Well that would be a change Deb because usually I am copying you! Lol!!
I love this idea as well! Looks easy and cheap with such a rich outcome. I must find me some pumpkins asap! Wonder what they would look like if I used colorful sharpies or gold? hum! Must try. Thanks for the inspiration and I’m pinning as well. You rock!
Hmm Stephanie you have totally been rockin’ the gold lately- I bet that would look stunning too!!
Krista, what a great idea!! I definitely love how the black and white looks and your sketches are fantastic! They look perfect across your mantel with your harvest sign! I am definitely hoping to get my Halloween mantel done over the next week and thank you for keeping up the inspiration! Pinning! Have a great Tuesday!
Thanks Cindy- I hadn’t planned to use them there but I liked how they looked lined up too. Might have to go back to that!! Thank you so much for your visit and comments!